
Updated for Version 1.4

Note that the information given may change if new discoveries are made. More extensive testing is in progress.
Join our Discord to check on and participate in the theorycrafting process.
Table of Contents
Introduction
Asta is a 4-Star Fire Harmony character given to all players for free while on the Herta Space Station. Fittingly for every player’s introduction to the Path of Harmony, Asta focuses on powerful, universally applicable buffs that can give any team an edge in combat. For those willing to look beyond her supportive capabilities, Asta reveals herself to be a true jack-of-all-trades. With her high damage Skill, impressive Toughness damage, DoT, and noteworthy durability, Asta can adapt to any situation and any team composition.
Mechanics
Asta is a near universally applicable character, bringing some proficiency in multiple roles alongside her buffs. Compared to other Harmony characters, Asta lacks direct and team-specific buffing potential, instead relying on buffing the more general stats of ATK and SPD for the entire party. In place of more focused buffs, Asta instead brings an exceptionally high ATK multiplier and Toughness damage on her Skill, a notably higher DEF than other Harmony characters, a weak Burn effect tied to her Basic ATK, as well as impressive amounts of Fire DMG%.
Asta’s versatility and powerful generic buffs come at a cost, as a noteworthy portion of her buffs and personal durability is tied to Charging, which is indicated by a decaying set of five diamonds visible on her character portrait. Without spending SP, it is impossible to get Charging to a high number of stacks and keep it there. Proper use of Asta demands that players think ahead and manage their SP over the long term in order to ensure that Charging stacks remain high and are at their peak at crucial moments in the fight.
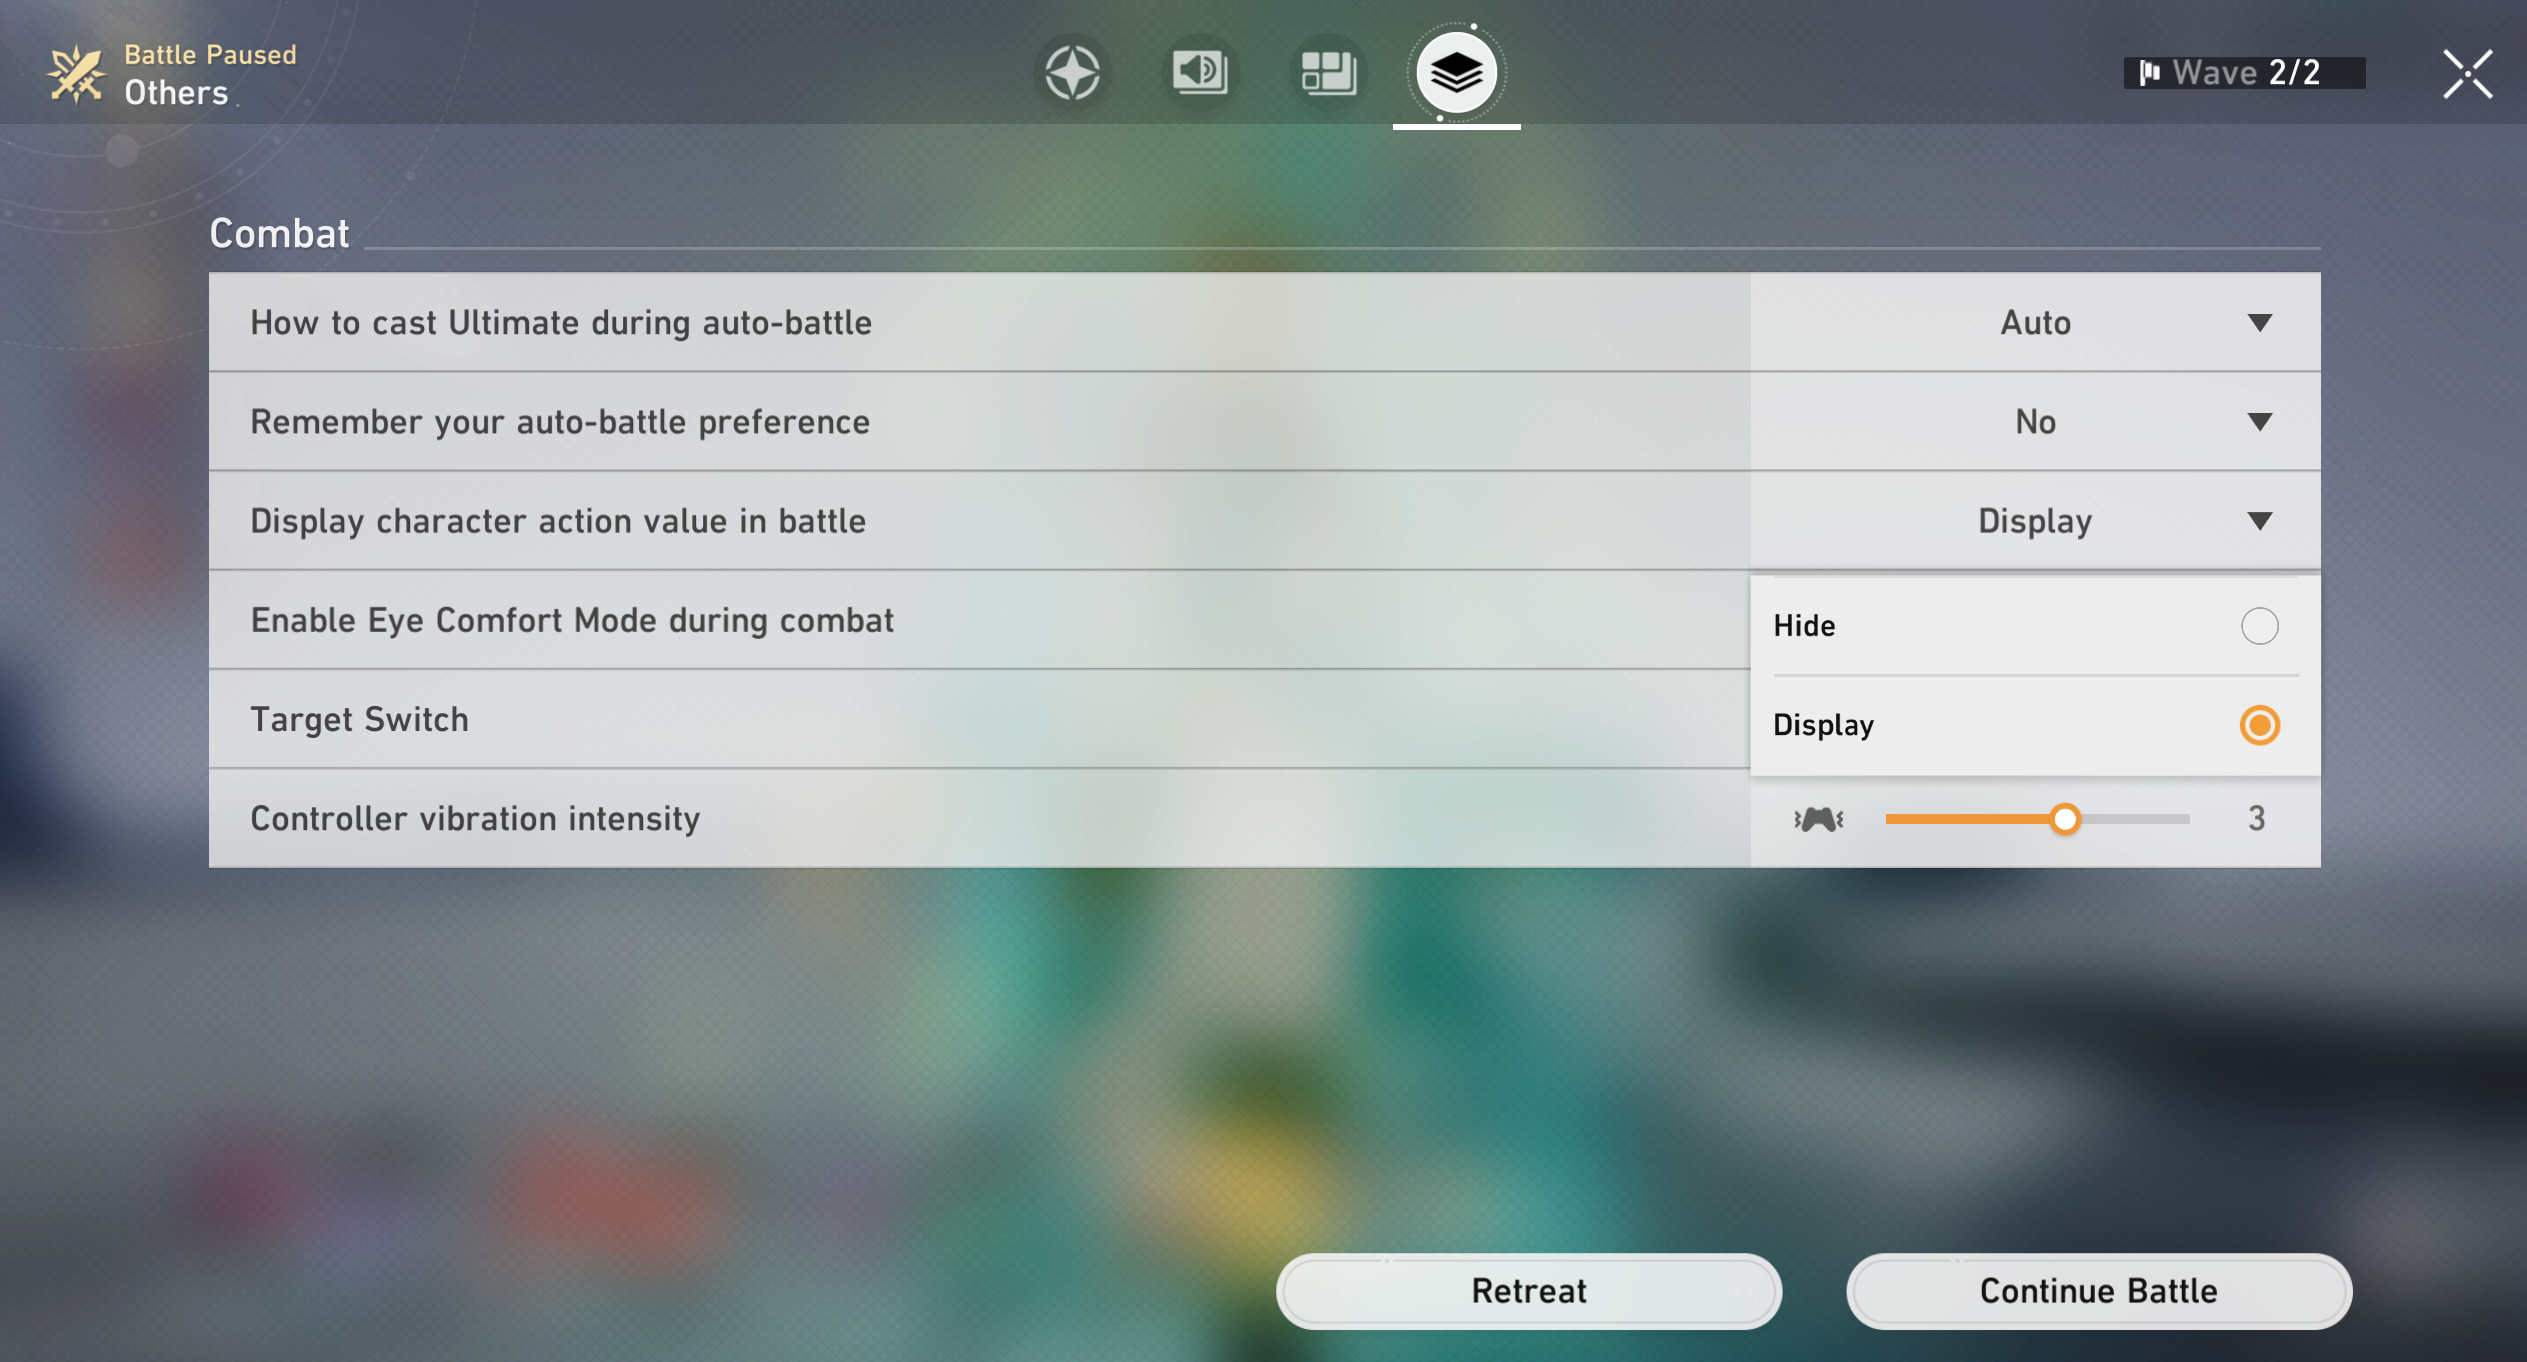
When playing Asta, it is important to enable the ability to see the Action Value of characters in the Other Settings tab of the Settings Menu. Asta’s Ultimate is extremely reliant on correct timing to make the most of it, and using her Ultimate when the displayed Action Value is high for all members of your team is the key to optimizing its impact on combat. Poorly timed Asta Ultimates can lose as much as half of their value.
As Asta interacts with the SPD stat directly, it is recommended that you review the Speed Guide.
Trace Priority
 >
>  >
>  ≥
≥ 
Ultimate > Talent > Skill ≥ Basic ATK
While Asta has multiple playstyles with differing choices of Relics and Light Cones, she is still a Harmony unit at her core, and should always prioritize her role as a support over being a damage dealer. As such, her Ultimate and Talent take priority over her Skill and Basic ATK.
Traces
Basic ATK | Spectrum Beam
Trace Description
Spectrum Beam [Single Target]
Deals Fire DMG equal to 50%/100%/110% of Asta’s ATK to a single enemy.
A standard Basic ATK. Asta’s Ascension 2 Bonus Ability, Sparks, allows her to Burn enemies, but her Basic ATK is otherwise simply a method of generating SP and maintaining Charging stacks.
Skill | Meteor Storm
Trace Description
Meteor Storm [Bounce]
Deals Fire DMG equal to 25%/50%/55% of Asta’s ATK to a single enemy and further deals DMG for 4 extra times, with each time dealing Fire DMG equal to 25%/50%/55% of Asta’s ATK to a random enemy.
An exceptionally powerful Skill with high direct damage and Toughness damage, as well as Asta’s main method of stacking Charging. The first attack deals twice as much Toughness damage as the rest and will always hit the target you are aiming for.
While Meteor Storm is very powerful, repeated usage is SP intensive. It is important to make sure that Asta does not consume SP that other characters need when choosing whether to use Meteor Storm.
Ultimate | Astral Blessing
Trace Description
Astral Blessing [Support]
Increases SPD of all allies by 36/50/52 for 2 turn(s).
One of the only sources of Flat SPD in the game besides Relics. The duration of the buff does not decrease at the end of the turn this was activated on. When utilized properly, Flat SPD does not desynchronize rotations.
Astral Blessing should be used after the last action of your party, and the option to display Action Value should be enabled in Options when using Asta. Poorly timed Astral Blessings can result in losing half of its effectiveness and desynchronizing rotations.
Talent | Astronomy
Trace Description
Astrometry [Support]
Gains 1 stack of Charging for every different enemy hit by Asta plus an extra stack if the enemy hit has Fire Weakness.
For every stack of Charging Asta has, all allies’ ATK increases by 7.0%/14.0%/15.4%, up to 5 time(s).
Starting from her second turn, Asta’s Charging stack count is reduced by 3 at the beginning of every turn.
The ATK% bonus granted from Charging is massive, and many of Asta’s other mechanics interact with it. You gain one stack for each unique enemy hit, plus one additional stack for each enemy hit that has a Weakness to Fire-Type damage.
Charging stacks are lost at the beginning of Asta’s turn and gained at the end of Asta’s turn. As a result, Asta can struggle to benefit from the ATK% granted by Charging.
 Technique | Miracle Flash
Trace Description
Miracle Flash
Immediately attacks the enemy. After entering battle, deals Fire DMG equal to 50% of Asta’s ATK to all enemies.
One of the better Techniques to start battles with, as it immediately grants Charging stacks for each enemy in the battle.
 Ascension 2 Bonus Ability | Sparks
Trace Description
Sparks
Asta’s Basic ATK has a 80% base chance to Burn an enemy target for 3 turn(s).
Burned enemies take Fire DoT equal to 50% of DMG dealt by Asta’s Basic ATK at the start of each turn.
While the Burn DoT deals low damage and has only an 80% base chance, Sparks gives Asta the ability to contribute an additional DoT to DoT compositions. Lasting for 3 turns can help to maintain effects such as the damage bonus of the Nihility Light Cone Good Night and Sleep Well or the additional damage from Hook’s Talent.
 Ascension 4 Bonus Ability | Ignite
Trace Description
Ignite
When Asta is on the field, all allies’ Fire DMG increases by 18%.
An additional 18% Fire DMG for Asta and all allies is a rather significant amount of DMG% and brings Asta up to an impressive 40.4% Fire DMG from Traces.
 Ascension 6 Bonus Ability | Constellation
Trace Description
Constellation
Asta’s DEF increases by 6% for every current Charging stack she possesses.
The 6–30% additional DEF combines well with Asta’s DEF% from Traces for a total of 52.5% DEF at 5 Charging stacks. This is only slightly less than the DEF% granted by a Relic’s main stat.
Note: Trace levels shown are 1/10/12 (Basic ATK 1/6/7).
Eidolons
 Eidolon 1 | Star Sings Sans Verses or Vocals
Eidolon Description
When using Skill, deals DMG for 1 extra time to a random enemy.
Gaining an additional hit on Asta’s Skill both increases its damage output and its Energy generation, going from 30 to 36 Energy per use.
 Eidolon 2 | Moon Speaks in Wax and Wane
Eidolon Description
After using her Ultimate, Asta’s Charging stacks will not be reduced in the next turn.
Helping to preserve Asta’s Charging stacks over extended periods helps to maintain its buffs. Extremely important for maintaining buff uptime beyond the opening turns of a fight.
 Eidolon 3 | Meteor Showers for Wish and Want
Eidolon Description
Skill Lv. +2, up to a maximum of Lv. 15.
Talent Lv. +2, up to a maximum of Lv. 15.
Surprisingly impactful, offering a 10% increase to the damage of Meteor Storm as well as increasing the impact of Charging stacks. Becomes more valuable the more SP-negative you are willing to play Asta.
 Eidolon 4 | Aurora Basks in Beauty and Bliss
Eidolon Description
Asta’s Energy Regeneration Rate increases by 15% when she has 2 or more Charging stacks.
Asta’s most important and impactful Eidolon, enabling 100% Ultimate uptime when combined with S5 Memories of the Past or S5 Meshing Cogs. Without this Eidolon, it is not recommended to play Asta as an SP-negative character.
 Eidolon 5 | Nebula Secludes in Runes and Riddles
Eidolon Description
Ultimate Lv. +2, up to a maximum of Lv. 15.
Basic ATK Lv. +1, up to a maximum of Lv. 10.
Largely unimpactful. An additional 2 SPD is unlikely to grant additional turns, and increasing the damage of Asta’s Basic ATK has little value.
 Eidolon 6 | Cosmos Dreams in Calm and Comfort
Eidolon Description
Charging stack(s) lost in each turn is reduced by 1.
Enables Asta to permanently sustain 5 stacks of Charging against a single enemy with a Fire-Type Weakness and maintain the ERR bonus from her 4th Eidolon when played as SP-negative against any enemy.
Playstyles
Asta is one of the most versatile characters in all of Honkai: Star Rail. Between her powerful party-wide buffs that are useful on nearly every character and her kit’s multitude of powerful tools for any scenario, it can be hard to even know where to begin when building Asta.
Asta’s kit can be broken down into three core builds, each focusing on bringing a specific facet of Asta’s secondary traits to the forefront without sacrificing her core role as a Harmony support.
- Defensive Asta brings her durability to the forefront, allowing you to conserve SP by not requiring targeted healing or shielding while generating SP with her Basic ATKs.
- Breaker Asta takes full advantage of the Toughness damage inherent to Asta’s Skill while still striving to maintain SP for other characters.
- Aggressive Asta focuses on maximizing both the powerful ATK% scaling on her Skill and the uptime of her Ultimate, sacrificing SP to push her offensive and supporting prowess to its limits.
There is no one true Asta build, and different teams will always prefer a different Asta playstyle. As such, it is extremely important to consider what teammates Asta will be paired with when considering what Relics and Light Cones she should use.
Asta’s Ultimate requires proper timing to use effectively. Enabling the display of Action Value at all times is required for effective use, as Asta’s Ultimate only lasts for 2 turns per character and increasing SPD is more impactful the further down a character is in the Action Order. Asta’s Ultimate should always be used when the overall displayed Action Value for the party is as high as possible, typically right after the fourth character acts. Effects that modify turn order such as the 4-Pc Set Effect of Eagle of Twilight Line or the Light Cone Multiplication can pull characters out of sync and change when Asta should use her Ultimate. By paying careful attention to the displayed Action Values, Asta can maintain optimal Ultimate uptime.
Builds
Defensive Asta
Asta gains DEF% from both her stat Traces and her A6 Bonus Ability. When built defensively, Asta becomes a wall capable of surviving for extended periods without the need for healing or shielding. Leaning into this durability allows you to prioritize SP for other characters while still reaping many of the benefits of Asta’s kit.
Relics
Relic Sets
 4-Pc Guard of Wuthering Snow | Guard is an exceptional defensive set, granting healing as well as damage reduction. While somewhat unreliable, the extra Energy granted while below 50% HP can potentially recharge Asta’s Ultimate a turn sooner than normal. The real value of Guard is in Asta’s strong inherent durability, which further increases the value of the 8% HP healed every turn. Asta’s turns will come up very frequently due to her large SPD increase. Ease of farming for Guard, due to sharing a Cavern of Corrosion with Genius of Brilliant Stars and combined with its extremely strong effects, makes it very difficult to suggest any 2-Pc combinations. |
 4-Pc Messenger Traversing Hackerspace | While lacking the raw durability of Guard of Wuthering Snow, giving Asta more SPD is valuable. A strong Relic set for all Asta playstyles that synergizes well with her kit. However, an additional 12% SPD for 1 turn is not a particularly large teamwide buff when Asta is not using her Ultimate as rapidly as other builds. |
Planar Ornaments
 Fleet of the Ageless | Granting both HP% as well as a party wide ATK% buff, Fleet of the Ageless helps Asta to both take more damage and buff her team. As Asta should always be running SPD Boots, the 120 SPD requirement of Fleet is effortless. |
 Broken Keel | Asta has no inherent source of Effect RES, but there is little reason not to build her with Effect RES when played defensively. While not as effortless to activate as Fleet of the Ageless, Keel’s 10% CRIT DMG bonus is more impactful to most teams. |
 Sprightly Vonwacq | Primarily notable for enabling 3 Basic ATK rotations against Fire-Weak enemies in conjunction with her 6th Eidolon, allowing a very SP-positive rotation while keeping decent Ultimate uptime. In conjunction with her 4th Eidolon, it can also supplant the need for an Energy Regeneration Rate Link Rope. Do note that the start of battle Advance can desync rotations. |
Light Cones
 But the Battle Isn’t Over | The increased survivability and Skill Point generation provided by But the Battle Isn’t Over helps to improve Asta’s SP economy, both in generating additional SP from using her Ultimate, and from the increased HP and DEF helping to prevent the need to heal or Shield Asta. While the Energy Regeneration Rate gain is quite small, it does increase the Energy generated by Guard of Wuthering Snow and from taking damage, which potentially grants faster Ultimates in some scenarios. Proper SPD tuning is required to take full advantage of But the Battle Isn’t Over as it is important that the primary damage dealer act directly after Asta. |
 Dance! Dance! Dance! | An exceptionally powerful Light Cone for Asta when she is equipped with Guard of Wuthering Snow. Gaining more actions leads to more self-healing, allowing Asta to linger around half of her Max HP without risk of dying. Lingering at low HP directly leads to more Energy from Guard of Wuthering Snow, which in turn leads to better Ultimate uptime, which leads to more Dance! Dance! Dance! triggers, and thus more actions. |
 Memories of the Past | The 4-Star version of Meshing Cogs, granting additional base stats and Break Effect. While Memories of the Past has the potential to be stronger than Dance! Dance! Dance! at high Superimposition Ranks due to accelerating the frequency of Asta’s Ultimate, its value can fluctuate heavily based on whether Guard of Wuthering Snow is equipped and its Energy Regeneration effect triggers. |
 Meshing Cogs | Meshing Cogs is the most reliable method of accelerating Asta’s Ultimate, as it can easily reach Superimposition Rank 5 due to being a readily-available 3-Star Light Cone. However, with its lower base stats comes a significant loss in DEF, making it less appealing for Defensive Asta. |
Stats
 Body |  Boots |  Sphere |  Rope |
| HP% or DEF% | SPD | HP% or DEF% | Energy Regeneration Rate |
Substats
SPD ≥ Effect RES% (until 30%, if using Broken Keel) > HP% ≥ DEF%
HP vs DEF
While HP is slightly better due to Asta’s inherent DEF%, the gap is not wide enough to matter. Use whatever has better substats.
Breaker Asta
Asta’s Skill, Meteor Storm, deals 90U of Toughness damage, which is the same as a single-target Ultimate, increasing to 105U after her 1st Eidolon. This gives Asta among the largest amounts of Toughness damage on a Skill in all of Honkai: Star Rail, tied with Sampo. By using her Basic ATK and Skill with the enemy Toughness gauge in mind, Meteor Storm is able to deal explosive amounts of Break damage, both directly and in the form of a smaller Burn DoT.
When building a team, it is generally a bad idea to have more than one character focus on building Break Effect. Breaker Asta should not be used if another character besides her is focusing on Break Effect, as Asta has other effective builds as well.
Relics
Relic Sets
 4-Pc Thief of Shooting Meteor | While the Energy gains from Thief of Shooting Meteor are minimal and unreliable, 32% more Break Effect is quite significant and helps to maximize the Burn DoT applied by Weakness Breaking enemies. Thief of Shooting Meteor is readily available from Echoes of War, is the only Relic Set that offers Break Effect, and will benefit greatly from being run as 4-Pc. It is difficult to suggest any 2-Pc combinations that can compete with it. |
4-Pc Messenger Traversing Hackerspace | While Breaker Asta does not build Energy Regeneration Rate, she does appreciate SPD regardless, and giving more SPD to your team with Astral Blessing is never a bad thing. |
Planar Ornaments
Broken Keel | Even without having any inherent source of Effect RES, Asta can easily reach the requirements for Broken Keel without compromising on stacking Break Effect. DoT units, such as Kafka and Sampo, do not gain much benefit from CRIT stats. While Broken Keel is easier to use with Breaker Asta compared to other Asta playstyles due to a lack of other required substats, it may not always be the best option. |
Fleet of the Ageless | Fleet of the Ageless is effortless for Asta to activate and improves the effectiveness of DoT teams more than Broken Keel. The extra HP% is also helpful for survivability if your Relic substats favor more offensive stats such as ATK%. |
 Talia: Kingdom of Banditry | Farming for Talia: Kingdom of Banditry is somewhat inefficient, as it has very few users and shares a world with Sprightly Vonwacq, another set with few users. Its Set Effect is unreliable due to requiring exceptionally large amounts of SPD for relatively minor gains in Break Effect, only activating while the buff from Asta’s Ultimate is active. Still, it is the path to the largest possible amount of Break Effect, and while it cannot be reasonably suggested, it is an option for those willing to invest heavily into Breaker Asta. There are better uses of your Trailblaze Power. Like Credits Calyxes. Or Reserved Trailblaze Power. |
Light Cones
Memories of the Past | As the only Harmony Light Cone that gives Break Effect, Memories of the Past is useful both for Energy as well as increasing Asta’s Break damage. Far and away the best Light Cone for Breaker Asta. |
Dance! Dance! Dance! | Even with less frequent Ultimates, Dance! Dance! Dance! is a very strong Light Cone. Action Advance helps to compensate for less Ultimate uptime. |
Meshing Cogs | Additional Energy helps with Ultimate uptime, helping to compensate for Breaker Asta’s lack of Energy Regeneration Rate. As Breaker Asta does not particularly need offensive stats and tends to be reasonably durable regardless of Light Cone, the reduced base stats from a 3-Star Light Cone are not a concern. |
 Chorus | Further increasing the team’s ATK% can help to fit more damage into the periods where enemies are Weakness Broken. As Breaker Asta does not particularly need offensive stats and tends to be reasonably durable regardless of Light Cone, the reduced base stats from a 3-Star Light Cone are not a concern. |
Stats
Body | Boots | Sphere | Rope |
| HP% or DEF% | SPD | HP% or DEF% | Break Effect |
Substats
Break Effect > SPD > HP% = DEF% = ATK%
ATK%
While ATK% does not modify the damage dealt by Weakness Breaking enemies, it does increase the damage dealt by Asta’s A2, Sparks. This can be helpful for Kafka in particular, who already appreciates Asta’s SPD buff and immense break DoT potential.
Aggressive Asta
Aggressive Asta focuses on using Asta’s Skill, Meteor Storm, on each of her turns in order to deal heavy damage and potentially achieve 100% uptime on her Ultimate. When combined with Superimposition Rank 5 Memories of the Past or Meshing Cogs as well as her 4th Eidolon, Asta can use her Ultimate every other turn.
Easily Asta’s most offensively oriented setup, focusing on going fast and hitting hard. Care should be taken when building teams around Aggressive Asta, as she cannot afford to use her Basic ATK without losing Ultimate uptime.
Relics
Relic Sets
 4-Pc Firesmith of Lava-Forging | As Asta will be using her Skill every turn with this build, Firesmith’s bonuses to Fire and Skill DMG% will shine. The additional 12% to 24% DMG granted by Firesmith’s 4-Pc Set Effect eclipses any possible 2-Pc combination. |
4-Pc Guard of Wuthering Snow | Guard of Wuthering Snow is efficient to farm and the extra Energy from its 4-Pc Set Effect can potentially allow you to achieve 100% Ultimate uptime without constant Skill use. Achieving 2-turn Ultimates without constant Skill use is contingent on Asta remaining below 50% HP. It is very unlikely you will find a better use for offensive stats on Guard of Wuthering Snow than Aggressive Asta. |
4-Pc Messenger Traversing Hackerspace | With the Aggressive style of play activating Asta’s Ultimate every other turn, Messenger Traversing Hackerspace is active 50% of the time, granting a further increase to team SPD and potentially an additional action. |
Planar Ornaments
Fleet of the Ageless | Effortless to activate for Aggressive Asta, as she will be perpetually under the effects of her Ultimate, Astral Blessing, and should always be using SPD Boots. Fleet of the Ageless offers Asta a mix of personal durability and a party-wide ATK% buff. The ease of farming combined with no extra effort being required to reach 120 SPD makes this set Asta’s default pick for this playstyle. |
 Space Sealing Station | Effortless to activate for Aggressive Asta, as she will be perpetually under the effects of her Ultimate, and should always be using SPD Boots. Space Sealing Station grants Asta a larger damage increase than her more support-oriented options. As it only grants 16% more ATK than Fleet of the Ageless, it does not take much in the way of substats for Space Sealing Station to be outperformed by the more support-oriented set. |
Broken Keel | As Asta does not gain additional Effect RES% from Light Cones or Traces, activating Broken Keel requires you to build the full 30% Effect RES requirements from Relics. For Aggressive Asta in particular, this can come at the cost of offensive stats. |
 Rutilant Arena | An additional 20% Skill DMG on Asta is very impactful when Asta is using her Skill every turn. Rutilant Arena benefits heavily from Asta’s 6th Eidolon helping to maintain high Charging stacks for the extra ATK as it does not give ATK% like Fleet of the Ageless and Space Sealing Station. Rutilant Arena can be very hard to activate, particularly on characters with no innate sources of CRIT Rate. While it is Asta’s best set for personal damage, the requirements are exceptionally hard to achieve and other sets offer strong bonuses without intensive farming. |
Light Cones
Memories of the Past | Superimposition Rank 5 Required. It can be difficult to acquire five copies of Memories of the Past, but it is the stronger of the two Light Cones available for this playstyle, as it offers additional base stats and Break Effect over Meshing Cogs. Not required, but a nice luxury upgrade. |
Meshing Cogs | Superimposition Rank 5 Required. The freely accessible version of Memories of the Past. Sacrifices base stats and Break Effect in exchange for the same core effect of granting additional Energy. |
 Planetary Rendezvous | While incapable of achieving 2-turn Ultimates and thus losing one of the primary benefits of Aggressive Asta, Planetary Rendezvous does offer the largest potential damage output for Asta. Increasing the Fire-Type damage of the entire team can be useful if her teammates include Himeko or Hook. |
Stats
Body | Boots | Sphere | Rope |
| CRIT Rate% or CRIT DMG% | SPD | Fire DMG% | Energy Regeneration Rate |
Substats
CRIT > ATK% > SPD > Break Effect
Character Comparisons
Asta carves out her niche amongst Harmony units as the game’s current premier SPD buffer as well as providing a strong teamwide ATK% buff. While ATK% buffs are common among Harmony characters, Asta’s SPD buff and the mechanics of her kit are unique to her and make her difficult to compare to other characters in her role.
Notable Synergies
Damage Dealers
 Fire Damage Dealer | As a Harmony unit, Asta can run Planetary Rendezvous, which trades Energy regeneration from other Light Cones to further buff the Fire-Type DMG of units such as Himeko or Hook. The Fire-Type DMG Boost will stack with the DMG% buff granted by Asta’s A4 Bonus Ability. | ||
 Kafka | As a DoT focused unit, Kafka does not scale off of CRIT for most of her damage output, and prefers ATK and SPD instead. Asta provides a large ATK% buff through her Talent, as well as a big SPD buff with her Ultimate and possibly Messenger Traversing Hackerspace, allowing Kafka to take more actions and trigger more DoTs. | ||
  DoT Characters | As with Kafka, DoT units such as Sampo and Luka do not scale off of CRIT and as such benefit strongly from Asta’s ATK% buff. Her SPD buff is more negligible than in Kafka’s case, but it allows them to more easily refresh their DoT. However, if building for Weakness Break on any of your units, keep in mind to only build Break Effect on one of them, as only one unit can own Weakness Break on an enemy. For example, if running a Breaker Asta, a Sampo would be built for maximizing his DoT damage, while a Breaker Sampo would necessitate a Defensive or Aggressive Asta build. | ||
 Jing Yuan | Jing Yuan strongly appreciates Asta’s SPD buff from her Ultimate, allowing him to use more Skills and thus add more Hits Per Action to the Lightning-Lord before it attacks. | ||
Supports
  SP-Efficient Units | Low SP-cost units like Pela and Luocha synergize well with Asta, allowing her to use her Skill more liberally. This results in higher Ultimate uptime, higher average stacks on Charging, and more frequent Weakness Breaks against enemies with Fire-Type Weakness. Recommended in scenarios where Asta’s SPD buff is more needed. | ||
Notable Anti-Synergies
While Asta is an extremely flexible unit, some teammates require a bit more planning to use effectively and consistently with Asta. These units are not necessarily bad with Asta, and may in fact do rather well with her, but do require some consideration to use together.
 Gepard | When coupled with Asta’s SPD boost, Gepard can run into issues of his Ultimate expiring sooner as he will act faster and get more turns, thus lowering the uptime on his Shield. Gepard also relies heavily on Energy from getting hit, and increasing his SPD will result in less consistent Energy regeneration. | ||
 Clara | While Clara can benefit from Asta’s ATK% buff, she doesn’t really gain much from SPD buffs as the vast majority of her damage output is based on getting attacked by the enemy. If no other alternatives are available, Asta is a serviceable buffer for Clara. | ||
Teams
Asta is a very flexible support unit that can be slotted into many team compositions. Almost all teams appreciate her SPD buff, but teams that appreciate her ATK% buff derive the most benefit from using her. The teams listed below are not an exhaustive list of all her teams or an ordered list of her best teams, but are all strong options that use Asta well.
Hypercarry

A hypercarry team consists of one main damage dealer, Asta, a buffer or debuffer, and a defensive unit, with focus upon one character’s damage.
Often, hypercarry formats have SP surpluses that allow for higher Asta Skill usage, favoring Toughness Breaker and Aggressive Asta builds.
Example Teams
Kafka Hypercarry

As Kafka is a DoT character, Asta provides her with the two stats she appreciates the most, ATK% and SPD, with Tingyun further buffing Kafka’s ATK% and DMG%. Since Asta and Tingyun are both SP efficient units, Kafka can freely use her Skill for maximized damage output. This team format is elaborated upon further in the KQM Kafka guide.
Jing Yuan Hypercarry

Jing Yuan is able to fully benefit from all of Asta’s buffing capabilities, with her SPD buff allowing him to further stack the Lightning-Lord’s attack. Tingyun and Pela are strong, low-SP cost supports, often letting Jing Yuan use his Skill freely without worrying about running out of SP.
Fire-Quantum

With Planetary Rendezvous, Asta can provide a hefty DMG% buff to her Fire-Type damage dealer teammates. The options for Fire-Type damage dealers are currently limited to Himeko and Hook, with Himeko working better in multi-target scenarios and Hook better in single-target. Note that Asta’s value will decline for Fire-Type damage dealers who do not scale off of ATK% or do not highly value SPD.
A Quantum-Type defensive unit like Lynx combined with Silver Wolf allow this team to handle most content. However, in the event the enemy already has Fire-Type Weakness, other units can be considered in place of Silver Wolf.
Dual Damage Dealer
A dual damage dealer team consists of two damage dealers, Asta, and a defensive unit. All damage dealers will benefit from Asta’s teamwide ATK and SPD buffs.
Keep in mind to maintain SP balance among Asta and both damage dealers to maximize team damage.
Example Teams
Kafka w/ DoT Unit

Similarly to the Hypercarry Kafka team above, Asta provides the stats most beneficial to DoT units, which benefits the whole team.
Her SPD buff is not as potent on the non-Kafka DoT unit, but it allows them to more frequently refresh their DoTs and generate Energy.
F2P Friendly

An accessible team composition. Dan Heng and Asta are both free units, and Serval was given away during 1.0 and is available in the Starlight Exchange. SP-positive defensive units are preferred here to maximize damage.
Dual Fire Damage Dealer

Another variant of the Mono Fire team. This version of the team trades Silver Wolf’s Weakness implant in exchange for being able to bring a stronger defensive unit.
Credits
AnemoneMeer
Alreph
MasterDank47
Changelog
- October 14th 2023 – Published for v1.4