
This new player guide covers Honkai: Star Rail’s basic systems, combat mechanics, and other frequently asked questions. The guide will not address endgame strategy, optimal gearing, or other minmax related content, and is meant purely to help players who may feel lost with the game’s base systems.
This guide also does not cover rerolling; refer to our Reroll Guide for information related to rerolling.
Note that the information is subject to change; more extensive testing is in progress. Join our Discord to check on and participate in the theorycrafting process.
Table of Contents
Genshin Impact Terminology in Honkai: Star Rail
A sizable number of HSR players are familiar with one of HoYoVerse’s other games, Genshin Impact. The following is a quick cheat sheet on HSR terms that have Genshin equivalents. If you aren’t familiar with Genshin, feel free to skip this section.
- Gacha
- Banner = Warp
- Standard Banner = Stellar Warp
- Beginner Banner = Departure Warp
- Acquaint Fate = Star Rail Passes (used on Standard and Beginner Warps)
- Intertwined Fate = Star Rail Special Passes (used on Character Event Warps and Light Cone Event Warps)
- Primogems = Stellar Jades
- Genesis Crystal = Oneiric Shard
- Starglitter = Undying Starlight
- Stardust = Undying Embers
- Gnostic Hymn (Battle Pass) = Nameless Honor
- Blessing of the Welkin Moon = Express Supply Pass
- Banner = Warp
- Equipment
- Artifacts = Relics
- Weapons = Light Cones
- Constellations = Eidolons
- Currencies
- Mora = Credits
- Fragile Resin = Fuel
- Condensed Resin = Immersifier
- Original Resin = Trailblaze Power
Beginner Progression
Trailblaze Level (TL)
Trailblaze Level is your account’s level. It increases once you have sufficient Trailblaze EXP, which is granted by completing Missions (quests), spending Trailblaze Power (stamina), and participating in events.
Many game features will unlock as Trailblaze Level increases. You also receive rewards every level by talking to Pom-Pom on the Astral Express. The maximum Trailblaze Level is 70.
At certain Trailblaze Levels, you will receive a number of Star Rail Passes, which are used to pull from the Standard Warp; as well as Stellar Jades, which are the game’s premium currency. Stellar Jades can be used for all Warps.
- TL5:
 10 Star Rail Passes
 - TL15: 10 Star Rail Passes
- TL25: 10 Star Rail Passes and 800 Stellar Jades
- TL35: 10 Star Rail Passes and 800 Stellar Jades
Some other notable TL breakpoints:
- TL14: Unlocks Daily Training
- TL20: Unlocks Equilibrium 1, which increases the difficulty of enemies but grants increased rewards.
- TL24: Unlocks Caverns of Corrosion (Relic farming).
- Farming Relics isn’t recommended until you reach at least TL40, which guarantees 5★ Relics each run. Until then, you should farm Character EXP and Ascension Materials; Light Cone EXP and Ascension materials; and Trace Ascension materials.
In the early game, there are sections of the main story that are locked behind Trailblaze Level. In order to progress, you will need to complete side-quests, do daily missions, and spend Trailblaze Power on resource gathering.
Daily Activities
Daily Training
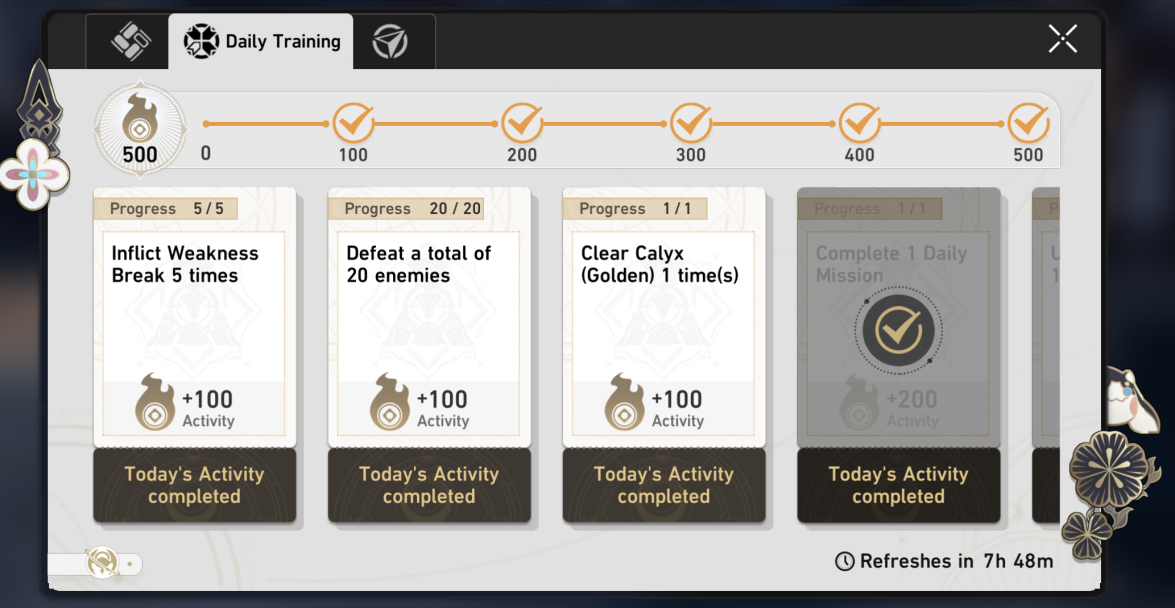
Daily Training is one of your primary recurring sources of both Trailblaze XP and Stellar Jades. Progress resets with the Daily Reset, at 4 a.m. local time. Daily Training is a series of tasks you can complete, which award up to 500 total Activity. Note that you do not need to complete all of the listed tasks – you just need to do enough for the 500 point threshold. Reaching the threshold will give you 60 Stellar Jades, some Trailblaze EXP, and some Character and Light Cone EXP based on your Equilibrium Level.
Daily Missions
Daily Missions are one of the tasks that you will receive each day as a part of your Daily Training. They will appear in your Quest Log and will reward 200 training points upon completion. They will usually involve small tasks or dialogues with NPCs, and are often linked together in storyline-esque sequences across multiple days.
Assignments
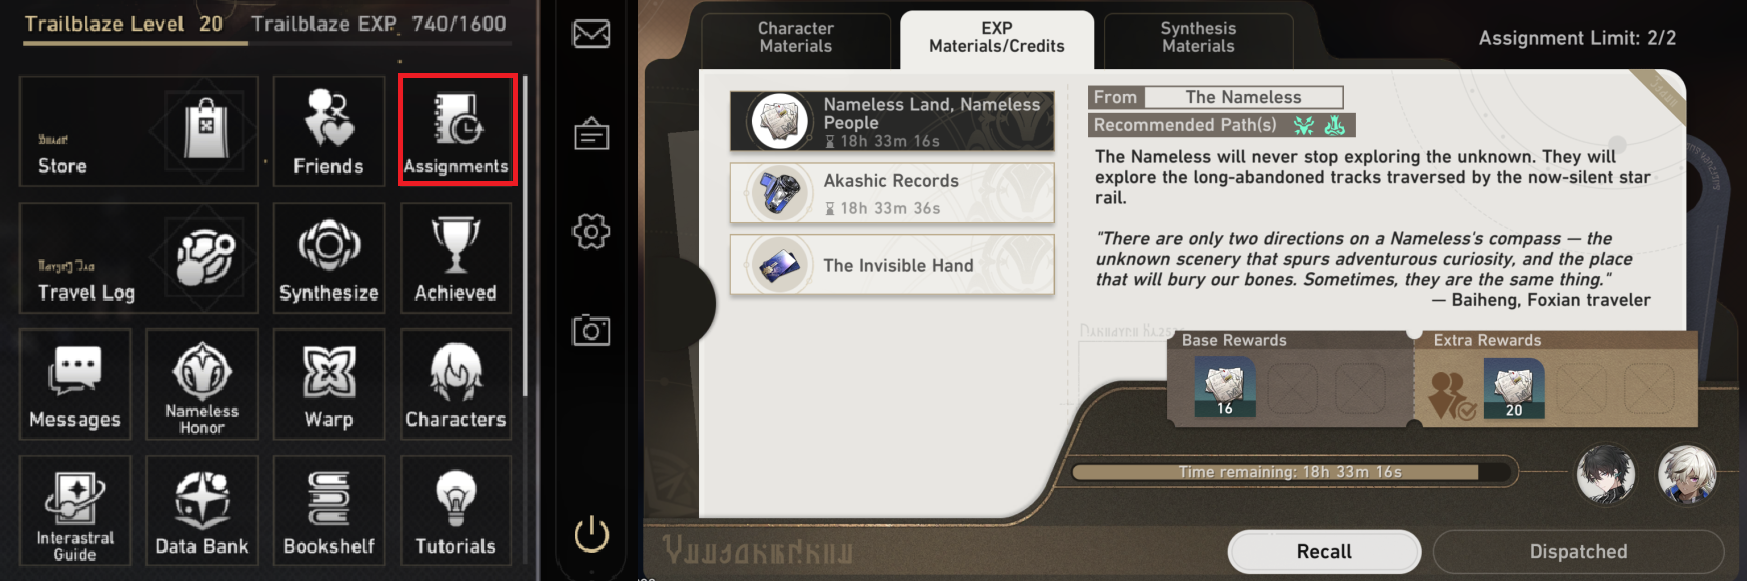
Assignments are time-gated farms that give various materials based on the time and characters committed. They do not affect actual gameplay; sending off Dan Heng on an Assignment does not prevent you from using him while he is dispatched. As seen above, they can be accessed from the top right corner of the Trailblaze Menu. Assignments can provide Character, EXP, and Synthesis Materials as well as Credits.
You have an initial maximum of 2 Assignments active at any given time, which increases as your Trailblaze Level does. The Assignment menu gives you the option to assign 2 characters to any given Assignment. You can set a time interval for anywhere from 4 to 20 hours, with 20 hours giving the highest reward. Assigning characters with the same Path as the recommended Path(s) listed at the top will give you additional rewards.
While the rewards may seem small, they will add up over time and save you Trailblaze Power that you would have otherwise spent on those materials. Try to do your Assignments every day.
Trailblaze Power (Stamina)
Most activities in Honkai: Star Rail require Trailblaze Power, the game’s stamina system. You can hold up to 180 Trailblaze Power at once. Trailblaze Power naturally replenishes at a rate of 1 per 6 minutes, for a total of 240 Trailblaze Power per day; however, you can also replenish it using Fuels (rewarded from certain missions and TL rewards) or using Stellar Jades.
Trailblaze Power is used to obtain the following resources:
- Light Cone Ascension Materials
- Character Ascension Materials
- Character Trace Materials
- Character EXP
- Relics.
These resources are used to upgrade Characters and Light Cones. Later sections of the guide explore these resources in further detail.
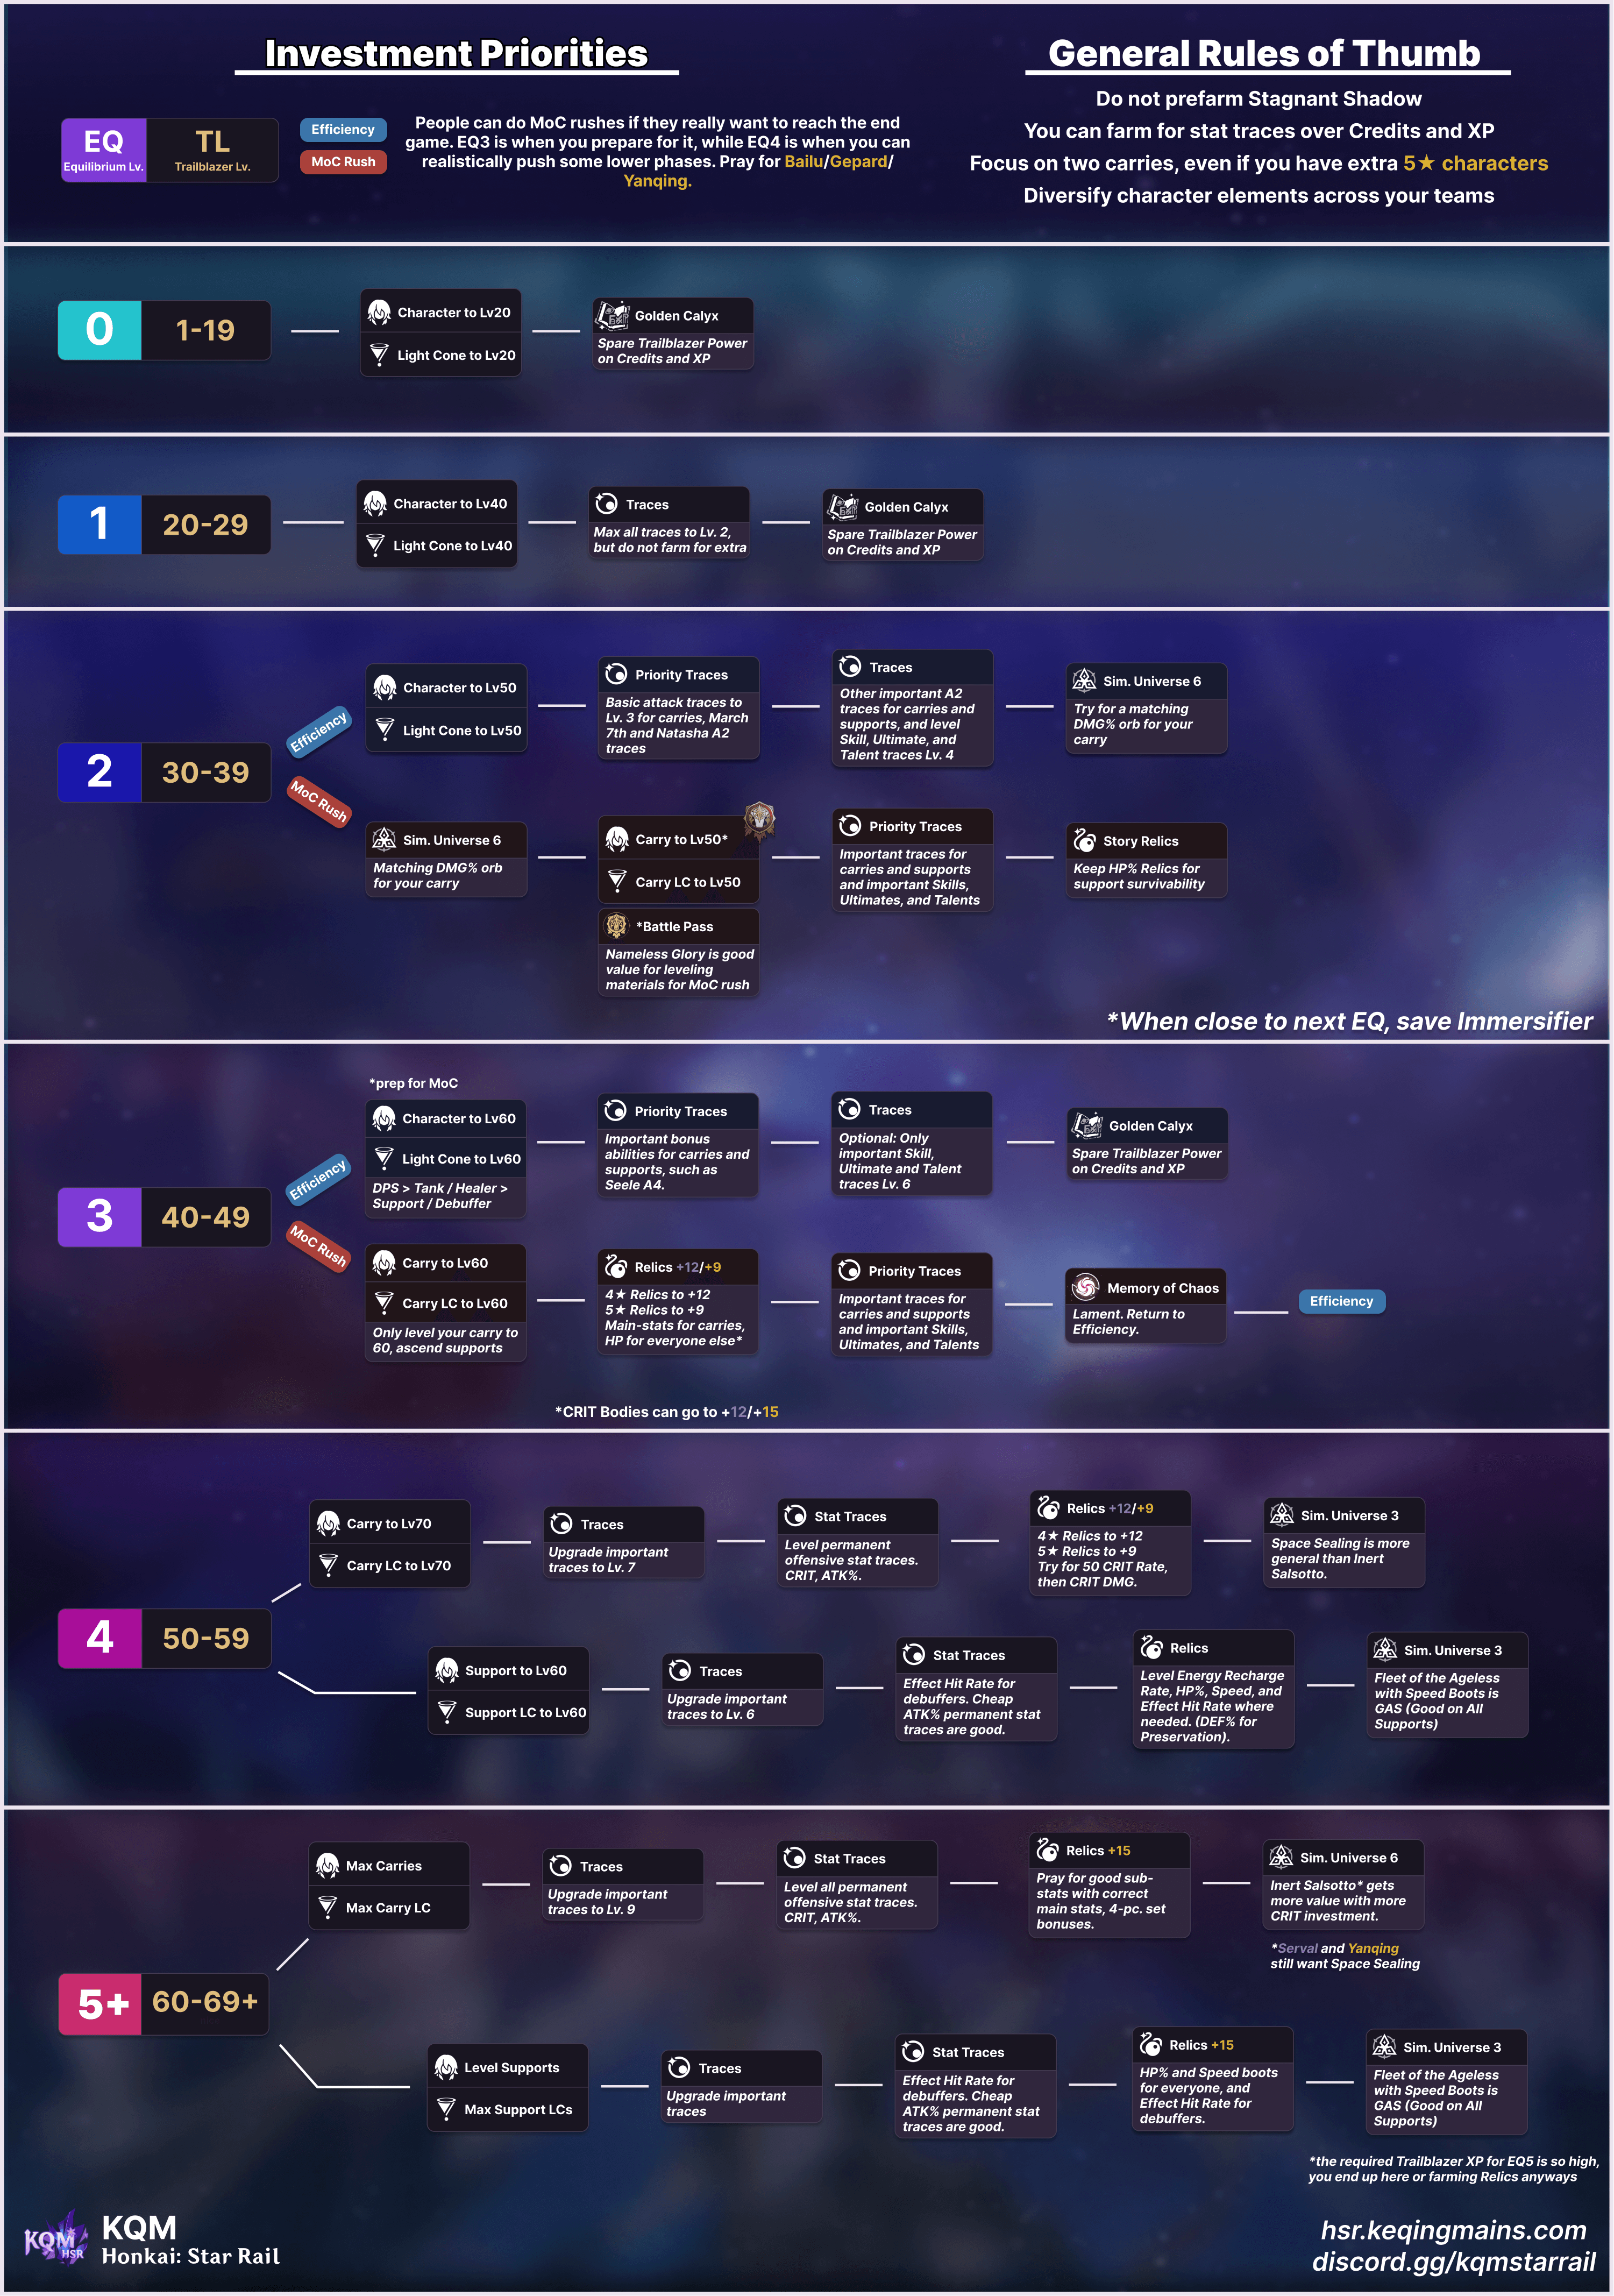
It is generally inefficient to farm Relics before TL40, which is when 5★ rarity Relics are guaranteed. The Main Story Quests do not require highly geared characters, and further testing is ongoing to see if 4★ Relics are worth pursuing. Fuel should not be used for Relic farming before TL50. For a general overview on our recommendations on farming, check out our Investment Priority infographic.
Operation Briefing
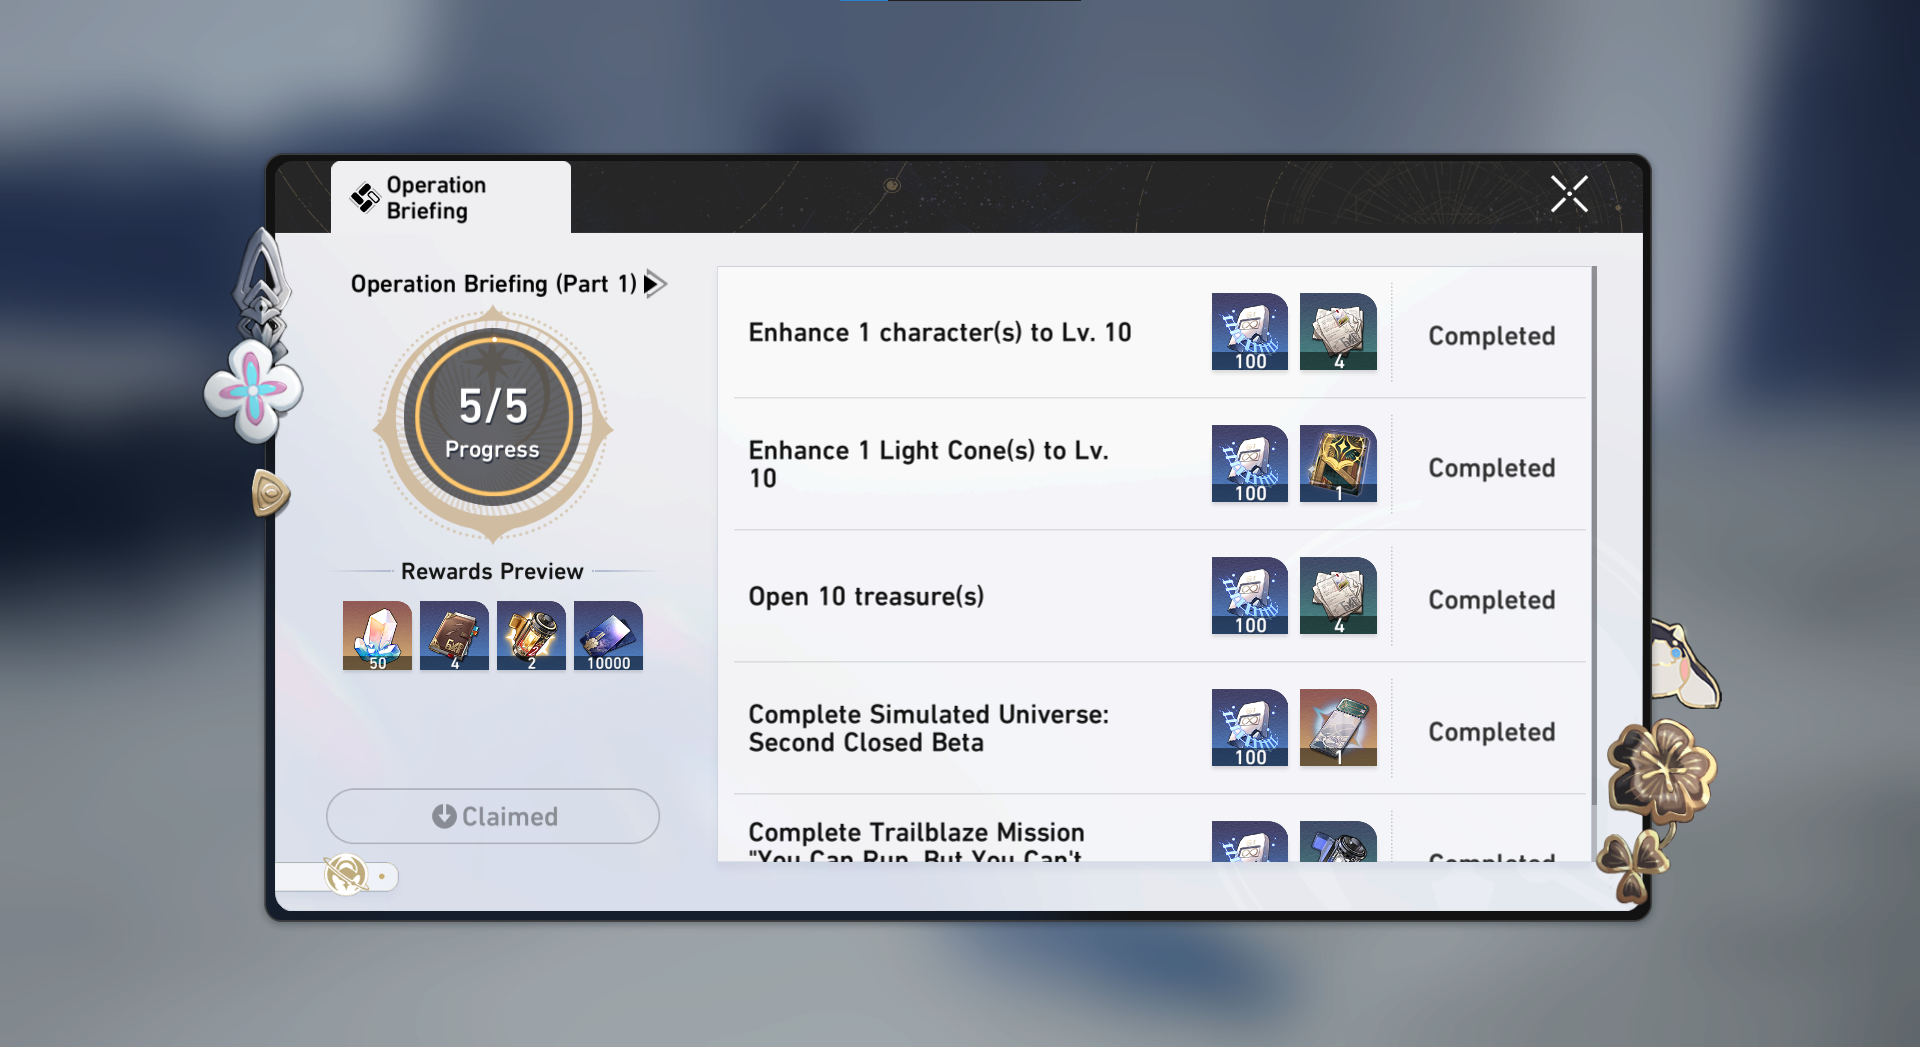
The Operation Briefing is a series of beginner missions designed to situate you with the game. It rewards you for completing tasks like enhancing characters or progressing in Herta’s Simulated Universe.
The following resources can be obtained from Operation Briefings. These resources are awarded at the completion of each Part unless otherwise specified.
- Stellar Jades
- Part 1-4: x50
- Part 5-9: x100
- Light Cone Ascension Materials
- Character Ascension Materials
- Character EXP
- Trailblaze EXP
- Relic EXP
- Trace Materials
- Credits
- Light Cones: 3★ Data Bank (Part 1), 4★ Woof! Walk Time! (Part 2), 4★ Eyes of the Prey (Part 4)
- Relics: 4★ Passerby of Wandering Cloud Full Set (Part 3), 4★ Musketeer of Wild Wheat Full Set (Part 5), 4★ Thief of Shooting Meteor Full Set (Part 7), 5★ Musketeer of Wild Wheat Coarse Leather Gloves x1 (Part 9)
Game Mechanics
Character Attributes
Each character belongs to a Path, which determines their gameplay focus (e.g. AoE Damage, Healing, Buffing, etc.), as well as their Element, which dictates what type of Elemental damage they are able to deal.
Paths
 Destruction
Those who follow the “Destruction” Path admire recklessness, anger, and destructive behavior.
These characters focus on a general mix of damage and survivability. They are jack-of-all-trades suited for most combat scenarios.
 The Hunt
Those who follow the “Hunt” Path admire determination, ruthlessness, and tenacious behavior.
These characters focus high single-target damage. They function best as the main damage dealer against Elite enemies.
 Erudition
Those who follow the “Erudition” Path admire thinking, logic, and strategic behavior.
These characters focus on high multi-target damage. They function best as the main damage dealer against groups of enemies.
 Harmony
Those who follow the “Harmony” Path admire understanding, support, and cooperative behavior.
These characters apply buffs that improve the team’s combat capabilities.
 Nihility
Those who follow the “Nihility” Path admire laziness, exhaustion, and meaningless behavior.
These characters apply debuffs to enemies that reduce their combat capabilities.
 Preservation
Those who follow the “Preservation” Path admire patience, sacrifice, and defensive behavior.
These characters possess powerful defensive abilities that protect their allies.
 Abundance
Those who follow the “Abundance” Path admire selflessness, altruism, and healing behavior.
These characters heal allies and restore HP to the team.
Elements
There are seven Elements: Physical, Fire, Ice, Lightning, Wind, Quantum, and Imaginary. These types define the Elemental damage that characters deal in combat.
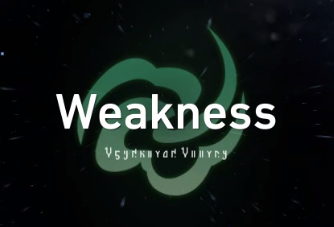
Every enemy in the game has a weakness to one or more Elements. These weaknesses are displayed as Element icons above the enemy’s Toughness bar. Dealing any kind of damage to an enemy will reduce the enemy’s Health, whether or not the enemy is weak to that Element. However, dealing damage in one of the Elements that matches an enemy’s weakness will additionally reduce an enemy’s Toughness. Fully depleting an enemy’s Toughness bar results in a Weakness Break, which delays the enemy’s turn, deals extra damage, and applies a special effect based on the Element of the hit that caused the break. The effects of a Weakness Break scale with Character Level and the Break Effect stat, and is affected by which Element does the Break.
When you break an enemy’s Toughness bar, they will take an instance of damage depending on the Element in question. Different Elements deal different amounts of Weakness Break damage, as outlined below:
Physical = Fire > Wind > Lightning = Ice > Quantum = Imaginary
This is NOT an Element ranking or effect ranking. It only shows how much immediate damage each Element does on Weakness Break.
The section below covers the seven Elements and their break effects.
 Physical
Using Physical attacks to trigger Weakness Break will deal Physical damage and apply the Bleed effect, dealing Physical damage over time.
Physical is a damage-oriented Element that does a high amount of damage upon Weakness Break. The Bleed effect lasts two turns and does one instance of Physical damage per turn. Bleed does more damage against non-boss enemies, and less against bosses.
 Fire
Fire
Using Fire attacks to trigger Weakness Break will deal Fire damage and apply the Burn effect, dealing Fire damage over time.
Fire is a damage-oriented Element that does a high amount of damage upon Weakness Break. The Burn effect lasts for two turns and does one instance of Fire damage per turn. It is not affected by enemy type.
 Ice
Ice
Using Ice attacks to trigger Weakness Break will deal Ice damage and Freeze the target, immobilizing the enemy and dealing additional Ice damage.
Ice provides a mix of crowd control and damage. The Freeze effect lasts until the enemy’s next turn. When that enemy’s next turn begins, the Freeze effect expires, dealing damage and preventing the enemy from taking action on that turn, although their next turn will come faster.
 Lightning
Using Lightning attacks to trigger Weakness Break will deal Lightning damage and apply the Shock effect, dealing Lightning damage over time.
Lightning is a damage-oriented Element that does a low amount of damage upon Weakness Break. The Shock effect lasts for two turns and does one instance of Lightning damage per turn. It is not affected by enemy type.
 Wind
Wind
Using Wind attacks to trigger Weakness Break will deal Wind damage and apply the Wind Shear effect, dealing Wind damage over time.
Wind is a damage-oriented Element that does a moderate amount of damage upon Weakness Break. The Wind Shear effect lasts for two turns and does one instance of Wind damage per turn. It does more damage against Elite and Boss enemies.
 Quantum
Using Quantum attacks to trigger Weakness Break will deal Quantum damage and apply the Entanglement effect, delaying the enemy’s next turn and dealing additional Quantum damage at the beginning of the enemy’s next turn. When the enemy is hit, this extra damage will increase.
Quantum provides a mix of crowd control and damage and does a very low amount of damage upon Weakness Break. When an enemy is Weakness Broken by Quantum DMG, the enemy is pushed down in the turn order and inflicted with Entanglement, which lasts until the enemy’s next turn. When that enemy’s next turn begins, the Entanglement effect expires, dealing damage once. This damage is increased depending on how many times the enemy is hit while affected by Entanglement, starting at 1 stack with a maximum of 5.
 Imaginary
Using Imaginary attacks to trigger Weakness Break will deal Imaginary damage and apply the Imprisonment effect, delaying the enemy’s next turn and reducing the enemy’s Speed.
Imaginary provides strong crowd control. When an enemy is Weakness Broken by Imaginary DMG, the enemy is pushed down in the turn order (even more than when broken by Quantum) and inflicted with Imprisonment, which reduces the enemy’s SPD stat.
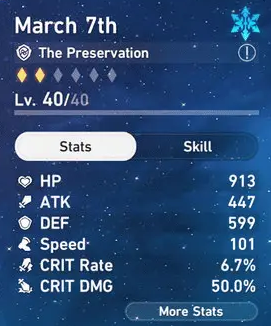
Character Stats
Level: Characters can be leveled up to Lv. 80, which requires not only Character EXP but also various Ascension materials.
Primary Stats
HP: The character’s total Hit Points. When a character’s HP reaches zero, they are killed. Characters die if they are killed.
ATK: Increases the damage of most attacks and Skills.
DEF: Reduces how much damage a character takes, and affects the strength of most shields.
SPD: Determines turn order and how often a character takes their turn.
CRIT Rate: The chance that a character’s attack is a Critical Hit, which deals increased damage.
CRIT DMG: The damage multiplier granted by a Critical Hit.
More Stats
Break Effect: Enhances Weakness Break effects such as the damage dealt by Weakness Break DoTs and how much enemies are delayed by Quantum and Imaginary Breaks.
Energy Regeneration Rate: Increases the rate at which a character generates Energy through their Basic ATKs, Skills, defeating enemies, and taking damage.
Effect Hit Rate%: Increases the chance to apply effects such as debuffs to enemy targets.
Effect RES%: Increases the character’s resistance to incoming debuffs.
DMG%: Increases the damage multiplier of a character. You will often see DMG % Bonus for specific Elements.
Aggro: Characters all have an inherent base Aggro Value, which is multiplied by the character’s individual Aggro Modifiers. The higher the Aggro Value, the more likely they are to be targeted by enemies. The base values for each Path are as follows:
- Preservation (6)
- Destruction (5)
- Harmony / Nihility / Abundance (4)
- Erudition / The Hunt (3)
Character Skills & Attacks
Every character has a distinct set of five abilities: a Basic ATK, Skill, Ultimate, Talent, and Technique.
Basic ATKs generate one Skill Point, while most Skills consume one Skill Point.
Ultimates are powerful abilities that can be cast at any time during combat. However, they require max Energy to cast. As a reminder, Energy is gained through taking and inflicting damage.
Talents are passive effects that help the character perform the role they are in, for example increasing the damage of the character or their supportive capabilities.
Techniques are abilities used outside and just before battle offering effects to the character/team. There are two types of Techniques: The first applies a buff or effect without attacking and can be stacked with each other or the second type. The second attacks immediately, applying some effect and initiating combat. Your Technique Points cap begins at 3 and increases as you progress through the game.
Every character also has a number of Traces. Traces can be leveled to increase the potency of a character’s abilities. There are additional Traces that provide raw basic stats, and three unique Traces that provide passive effects that are locked behind Character and Ascension level (2, 4 and 6).
Equipment
Each character can be equipped with a set of Relics and a Light Cone which provide not only raw stats but also powerful passive effects.
Light Cones
Each character can equip a Light Cone which provides them with HP, ATK, and DEF stats. If a character’s path matches the Light Cone’s path, they gain an additional Light Cone Ability unique to each Light Cone.
Relics
Each character has 6 Relic slots, which are divided into 2 categories. You will start with Head, Hands, Body, and Feet slots and unlock the Planar Sphere and Link Rope slots as you progress the main story. Relics represent a significant portion of end-game characters’ power, but should not be a priority until at least TL40. Low rarity Relics are significantly weaker than their 5★ counterparts, to the point that investing in them is often a waste of Trailblaze Power.
Relics can be leveled up by consuming other Relics or through Relic EXP Materials. They gain or improve a substat every 3 levels.
Relics of higher rarity have higher main stats, higher substat rolls, and higher max level. It is recommended that you always use the highest rarity Relics available to you.
| Relic Rarity | Max Level | Max Additional Substat Rolls |
| 5★ | 15 | 5 |
| 4★ | 12 | 4 |
| 3★ | 9 | 3 |
| 2★ | 6 | 2 |
Main Stats
Each Relic is limited to certain main stats depending on its slot:
- Head: HP
- Hands: ATK
- Body: HP% / ATK % / DEF % / Crit Rate / Crit DMG / Outgoing Healing Boost / Effect Hit Rate
- Feet: HP% / ATK % / DEF % / SPD
- Planar Sphere: HP% / ATK% / DEF% / Element DMG Boost %
- Link Rope: Break Effect % / Energy Regeneration Rate / HP% / ATK% / DEF%
Relic Sets
Relic Sets are divided into 2 categories: A 4-piece Relic Set consisting of Head, Hands, Body, and Feet; and a 2-piece Planar Ornaments set consisting of a Planar Sphere and a Link Rope.
Set Bonuses
Equipping multiple Relics of the same set provides set bonuses. Relic Sets provide a 2-piece and 4-piece set effect while Planar Ornaments provide a separate 2-piece set effect.
Obtaining Relics
In the early game, Relics can be obtained from chests and question completion rewards. Additionally, upon reaching Trailblaze Level 20, one set of 4★ Relics are available to purchase from each of the planetary vendors.
Avoid farming Relics until at least TL 40 (which is still only recommended for those planning on rushing harder content such as Memory of Chaos) as it’s highly inefficient to farm any sub-5★ Relics. The story and exploration will continue to reward you with Relics as you progress, and powerful Relics are generally unnecessary through the story.
Combat System
Honkai: Star Rail is a turn-based character RPG. The party consists of up to 4 characters who can individually cast various Basic ATKs, Skills, and Ultimates.
Out of combat, characters can use Techniques to start the next encounter with various bonuses in the form of extra damage, buffs, enemy debuffs, or crowd control.
Initiating Combat
In the Overworld, you can attack enemies to initiate combat. When an enemy is attacked with their corresponding Weakness, any enemies in that encounter with the Weakness will either suffer a Weakness Break or have reduced Toughness.
The Combat Screen
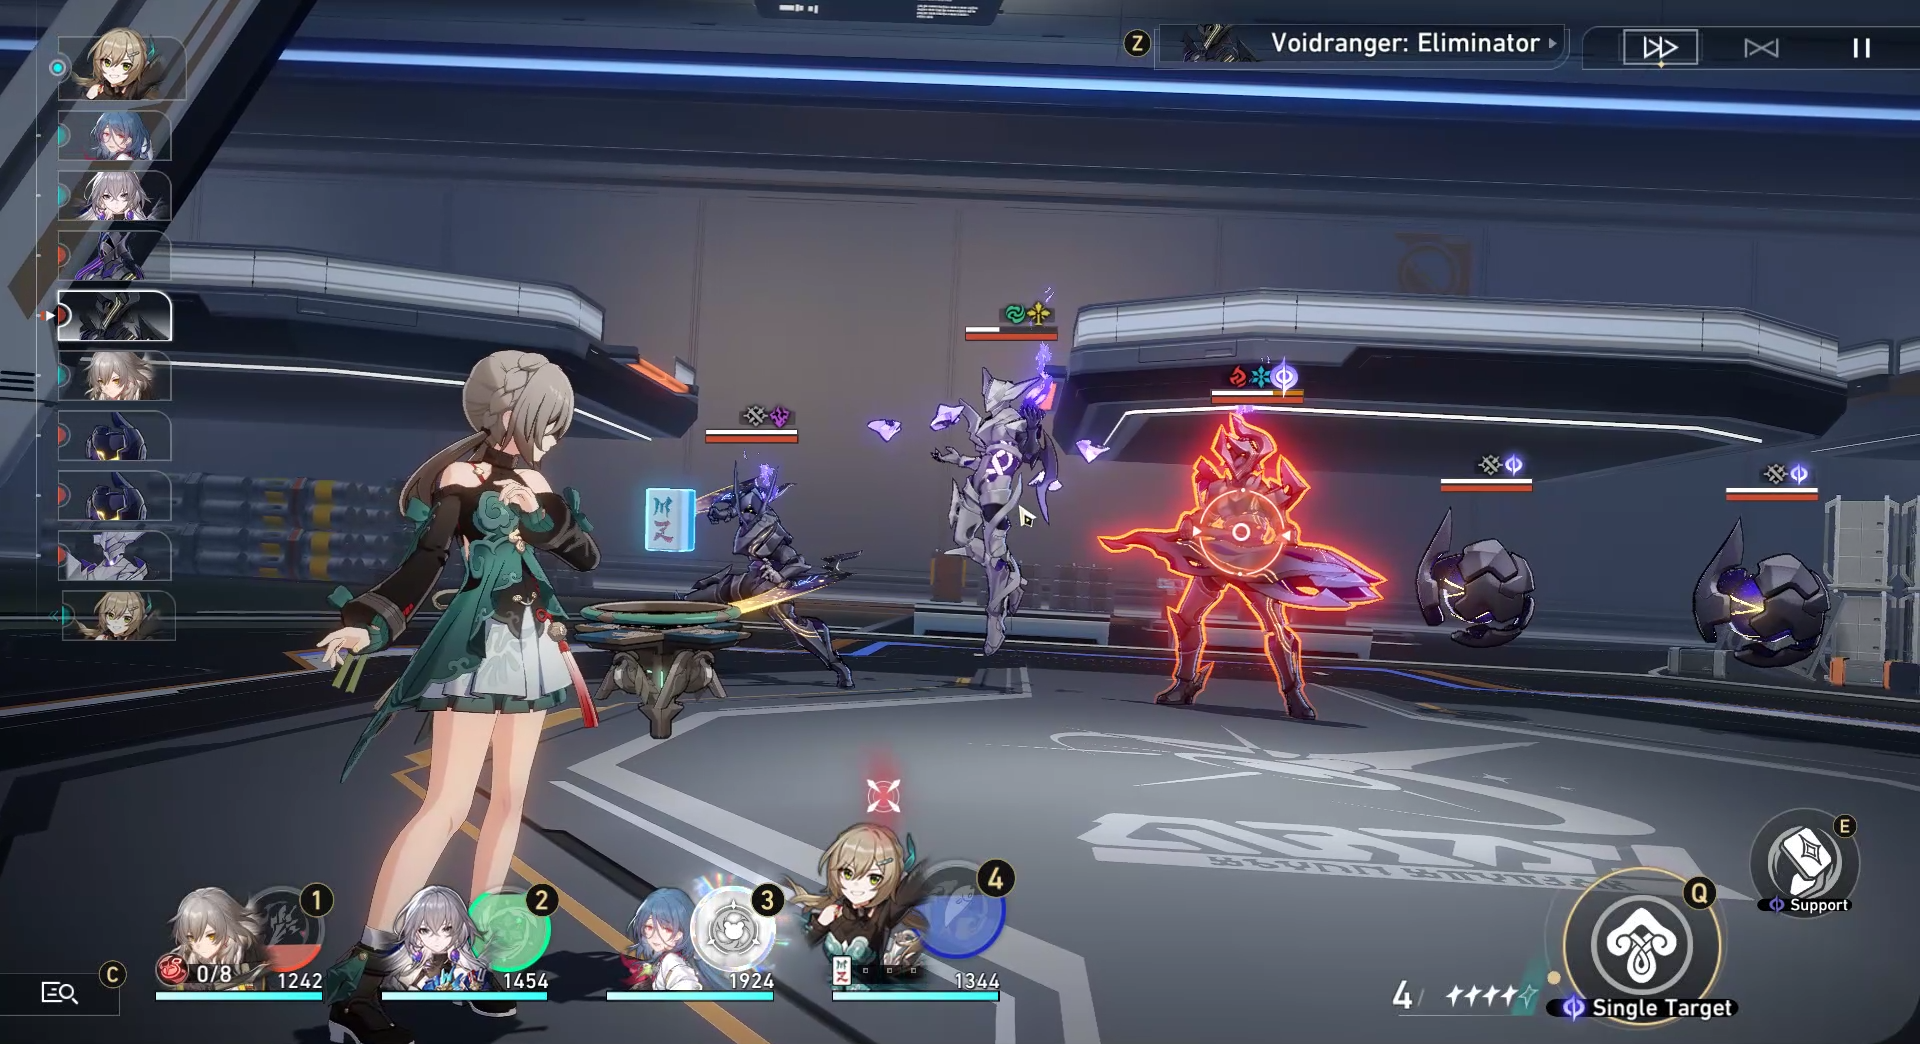
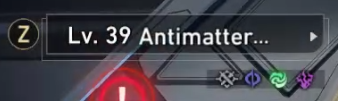
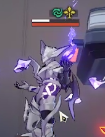
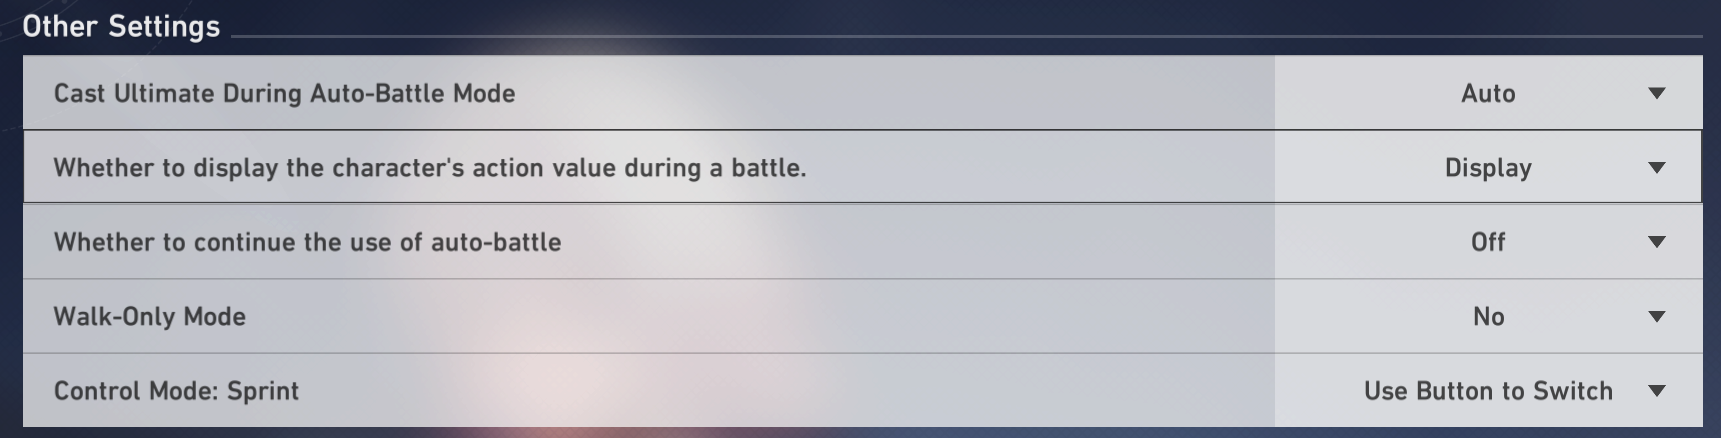
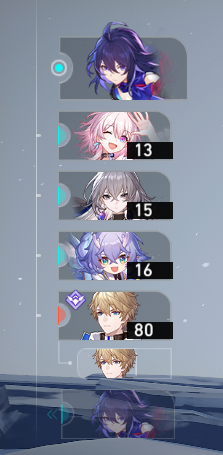 | Action Order Characters perform their actions in sequence based on their Speed (SPD) stat. Speed can affect initial turn order as well as how often your character goes. It is visually represented in-game through Action Value (AV), the numbers provided in the black boxes. Characters are arranged by lowest to highest AV, and the lowest AV character goes first. Speed is an integral mechanic to HSR, and you may find our in-depth Speed Guide to be helpful in fully understanding it. Note that AV is invisible by default; to view it, you need to go to ‘Other Settings’ and set ‘Whether to display the character’s action value during a battle’ to ‘Display’. If you are still confused, check the image below this table for reference. Almost every action in Star Rail follows turn order, with one important exception. Ultimates can be cast at any time; they immediately interrupt the action queue after the current attack is completed. |
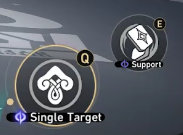
| Skill Points You start each battle with 3 Skill Points. Using a Skill consumes Skill Points. Using a Basic ATK generates one Skill Point. You can hold up to 5 Skill Points, and Skill Points are shared across all characters within the team. | |
 | Energy Characters require Energy to use their Ultimates. Energy is generated when characters receive or deal damage, defeat enemies, or trigger effects from certain characters or Light Cones. The Energy gained through the first four of these methods is increased based on the character’s Energy Regeneration Rate. |
 | Other Controls Long holding or tapping on a Skill or Ultimate will bring up its description. Pressing C (or clicking the magnifying glass bottom left) will bring up a screen to show the status of your characters in the battle. Pressing Z (or clicking the enemy name) will bring up the screen to show the status of your enemies in the battle. On a controller, pressing L3 will access enemy and character status. |
 | Enemy HP & Toughness The red bar above the enemy is their HP meter, and the white bar is their Toughness meter. In order to defeat enemies, you need to deplete the enemy’s HP. Attacking enemies with Elements they have weakness to (displayed as icons above the Toughness bar) will cause a Weakness Break, at which point their resistances will drop and they will take more damage from any type. |
Gacha System
Honkai: Star Rail’s gacha system is the primary way to obtain new characters and weapons. Players can spend their Star Rail Passes and Star Rail Special Passes or exchange Stellar Jades at a rate of 160 Jades per Pass to roll on Warps.
The rates for all Warps are as follows:
5★ Characters and Light Cones = 0.6% (divided evenly between Characters and Light Cones where applicable)
4★ Characters and Light Cones = 5.1%
The Gacha also has a “pity” system. Players are guaranteed a 5★ every 90 pulls on every Warp banner.
The 5★ that players pull depends on the banner they pulled on. On Standard Warps, the 5★ will be randomly selected from the Standard 5★ pool of characters and Light Cones. On Character Event Warps, there is a 50% chance to receive the rate-up character. If you do not get the rate-up character, you will receive a character from the pool of Standard 5★ characters. The next time you receive a 5★ from a Character Event Warp, you are guaranteed to get the rate-up character. On Light Cone Event Warps, there is a 75% chance you will receive the rate-up Light Cone. If you do not get the rate-up Light Cone you’ll receive a Standard 5★ Light Cone instead, and the next 5★ is guaranteed to be the rate-up Light Cone.
If players pull a duplicate of a character that they already own, they will receive the character’s Eidolon and some Undying Starlight. Eidolons can be used to unlock powerful, character-specific upgrades. Undying Starlight can be spent in the store for a variety of rewards including extra pulls, a rotating selection of 4★ characters, and all 7 of the Standard 5★ Light Cones.
If players pull a duplicate of a Light Cone that they already own, they are able to enhance the Light Cone’s passive by Superimposing and consuming any duplicate copies. Each Light Cone can be Superimposed up to 4 times for a maximum Superimposition Rank 5.
It is generally recommended that you spend your Stellar Jades on Star Rail Special Passes rather than Star Rail Passes. Special Passes are much more scarce, and allow you to roll for limited characters via Character Event Warps; additionally, you will naturally acquire Standard 5★s as you pull on limited banners. Star Rail Passes are available more frequently from sources such as Simulated Universe.
F2P players should avoid using Special Passes on the Light Cone Event Warp. While the featured Light Cone could make your character(s) stronger, it will generally be a better investment to use your Special Passes on Character Event Warps to widen your available roster.
Warps (Banners) & Pity

Departure Warp
This Warp is available to all new accounts in Honkai: Star Rail. Only Star Rail Passes can be spent on this Warp. Players can only spend a total of 50 pulls on this banner. Pulls on this banner can only be done in batches of 10 at a 20% discount (i.e. 8 passes for 10 pulls). After 50 pulls, the player is guaranteed a 5★ Standard Warp character if they have not already done so. 5★ Light Cones do NOT drop from this banner. After the 50 pull limit is met, players can no longer summon on the Departure Warp and it will be removed from the menu.
After receiving the 5★ character from the Departure Warp, players can optionally skip consuming the full 50 pull limit, as there is no additional chance to obtain a 5★ character. The only additional bonus from the Departure Warp is the 20% discount.

Standard Warp
This Warp is permanently available to all accounts in Honkai: Star Rail. Only Star Rail Passes can be spent on this Warp. After 90 pulls, a 5★ character or Light Cone is guaranteed. This banner has no rate-ups for any characters. However, players can select and obtain a 5★ character after 300 total pulls on this banner. This is a one-time offer.
Seven 5★ Characters are available on this banner. They are:
 Bailu | Bailu is a 5★ Lightning character belonging to the Abundance Path, who focuses on AoE and passive healing. She also has a powerful revive that can automatically trigger once per battle. As of version 1.1, she is only one of three healers available, making her fairly unique. However, her long-term value has been questioned due to her lack of utility. |
 Bronya | Bronya is a 5★ Wind character belonging to the Harmony Path, who can manipulate ally action economy and provide powerful damage buffs. For this reason, she is currently highly valued as a strong support unit. |
 Clara | Clara is a 5★ Physical character belonging to the Destruction Path, who has a giant robot companion. Her kit focuses on drawing enemy Aggro and powerful follow-up attacks that are activated when Clara or her allies are hit. She has an incredibly high damage ceiling, but is dependent on drawing enemy Aggro to reach it. She pairs well with March 7th, a free 4★ unit. |
 Gepard | Gepard is a 5★ Ice character belonging to the Preservation Path, who offers team-wide shielding, crowd-control, and tanking. While his kit is simple, his shields are extremely strong and he can often solo-sustain teams, sometimes preventing any damage whatsoever. |
 Himeko | Himeko is a 5★ Fire character belonging to the Erudition Path, who excels at dealing AoE damage and DoTs through her skills and follow-up attacks. She pairs well with Asta, a free 4★ unit. |
 Welt | Welt is a 5★ Imaginary character belonging to the Nihility Path, who applies debuffs to enemies in the form of delaying enemy actions and applying AoE slows to enemies. He pairs well with units focused around Speed, like Asta, or characters from the Hunt Path such as Seele and Dan Heng. |
 Yanqing | Yanqing is a 5★ Ice character belonging to the Hunt Path, who is capable of dealing high amounts of single-target burst damage as long as he doesn’t get hit. Yanqing pairs well with units that can Taunt enemies like Fire Trailblazer, and shielders like Gepard and March 7th. |
Seven 5★ Light Cones are available on this banner. They are:
 In the Name of the World (Nihility) |  Moment of Victory (Preservation) |  Night on the Milky Way (Erudition) |  Something Irreplaceable (Destruction) |
 But the Battle Isn’t Over (Harmony) |  Sleep Like the Dead (Hunt) |  Time Waits for No One (Abundance) |
The 5★ rate is divided evenly between Characters and Light Cones. This means there is a 0.3% chance for Characters and a 0.3% chance for Light Cones.

Character Event Warp
This Warp is available to all accounts in Honkai: Star Rail. The limited Character Event Warp will change every 3 weeks to feature a different limited character. Only  Star Rail Special Passes can be spent on this Warp, with a 5★ character being guaranteed after 90 pulls if not pulled before then. The featured 5★ character will be pulled at a 50% rate whenever a 5★ character is pulled. If the 5★ obtained is not the featured character, the next 5★ pulled will be guaranteed to be the limited event character. This is commonly referred to as the 50/50.
Pity & Rates
The Character Event Warp is guaranteed to drop one 4★ item (character or Light Cone) every 10 pulls and one 5★ character every 90 pulls. The chance of pulling a 5★ character increases dramatically starting on the 74th pull (soft pity).
The base rates and average rates (accounting for pity) are:
| Item | Base Rate | Average Rate Including Pity |
| 5★ Character | 0.6% | 1.6% |
| 4★ Character or Light Cone | 5.1% | 13% |
| 3★ Light Cone | 94.3% | 85.4% |

Light Cone Event Warp
This Warp is available to all accounts in Honkai: Star Rail. The limited Light Cone Event Warp will change every 3 weeks to feature a different limited Light Cone. Only Star Rail Special Passes can be spent on this Warp, with a 5★ Light Cone being guaranteed after 80 pulls if not pulled before then. The featured 5★ Light Cone will be pulled at a 75% rate whenever a 5★ Light Cone is pulled. If the 5★ obtained is not the featured Light Cone, the next 5★ pulled will be guaranteed to be the limited event Light Cone.
Pity & Rates
The Light Cone Event Warp is guaranteed to drop one 4★ item (character or lightcone) every 10 pulls and one 5★ Light Cone every 80 pulls. The chance of pulling a 5★ character increases dramatically starting on the 63rd pull (soft pity).
The base rates and average rates (accounting for pity) are:
| Item | Base Rate | Average Rate Including Pity |
| 5★ Light Cone | 0.8% | 1.87% |
| 4★ Character or Light Cone | 6.6% | 14.8% |
| 3★ Light Cone | 92.6% | 83.3% |
Undying Starlights & Undying Embers
Undying Starlight and Undying Ember are currencies that can be obtained by rolling on Warps. These can be spent in the Embers Exchange and Starlight Exchange to purchase Special Passes, Passes, upgrade resources, and more. Players should purchase the discounted Passes in the Ember Exchange for Embers, as they restock monthly.
Freebie Characters
There are a number of characters that are available to everyone, obtainable through either story progression or other methods:
 Trailblazer | The Trailblazer is by default a Physical character belonging to the Destruction Path, with options for both single-target and AoE damage. As of right now, they can also swap to being a Fire character the belongs to the Preservation Path, that taunts enemies and shields allies. Their Physical kit provides decent Physical damage dealing in a pinch, but otherwise unremarkable compared to their far superior Fire kit. Their Preservation kit offers teamwide damage reduction, shield and a powerful taunt. |
 March 7th | March 7th is an Ice character belonging to the Preservation Path, who shields allies and freezes enemies. Plays well with many of the launch game’s damage dealers, including Dan Heng, Clara, and Yanqing. Unlocked as part of the Main Trailblaze Mission. Her kit provides survivability and utility through powerful single-target shield and freeze support. |
 Dan Heng | Dan Heng is a Wind character belonging to the Hunt Path who focuses on bursts of single-target damage. A very solid single-target damage dealer who synergizes with many of the other freebie characters. Unlocked as part of the Main Trailblaze Mission. |
 Asta | Asta is a Fire character belonging to the Harmony Path who can buff allies’ ATK & SPD. An incredibly powerful support due to her mixture of offensive buffs and action economy manipulation. Guaranteed on the first Warp. |
 Natasha | Natasha is a Physical character belonging to the Abundance Path who focuses on healing allies. Currently quite valuable, as there are not that many healers in the game. Unlocked as part of the Main Trailblaze Mission. |
 Qingque | Qingque is a Quantum character belonging to the Erudition Path who enhances her Basic ATKs through the power of gacha! A fairly tricky kit to take advantage of. Obtained after completing Stage 3 of Forgotten Hall. |
 Serval | Serval is a Lightning character belonging to the Erudition Path who focuses on dealing AoE damage and DoTs. Obtainable through pre-registration awards. |
 Herta | Herta is an Ice character belonging to the Erudition Path who focuses on AoE damage and follow-up attacks. She is valuable in some auto-farming setups, but has some trouble scaling into difficult content. Obtained through the Starcrossed Symphony Event. Additional copies are obtainable from Simulated Universe Worlds 2, 4, 6, and 7. |
 Yukong | Yukong is an Imaginary character belonging to the Harmony Path who supports allies with incredibly powerful CRIT, ATK%, and Imaginary DMG% buffs. She is a very strong support unit, but may require more setup than other Harmony characters ensuring that the proper characters benefit from her buffs. Obtained after completing the Forgotten Hall: Memory of Xianzhou Stage 1. |
KQM has worked on character overviews and build setups which you can find here:
Other Rewards
Due to Mihoyo reaching 10 million pre-registrations, every account will receive the following pre-registration rewards:
- 100,000 credits
- 20 Star Rail Passes
- 4★ Character: Serval
This applies to every account, not just pre-registered ones. Enjoy your free pulls!
Other Events
For participants in the All Star Invite web event, you may also receive a 4★ Light Cone, Make the World Clamor, and a 4★ relic (The Musketeer Gloves are recommended). This event is still available until May 25th (UTC+8), so you can still obtain the Light Cone even if you rerolled.
HoyoLab Daily Check-In
The Daily Check-In provides an additional 120 Stellar Jade the first 3 times you check-in and an additional 90 Stellar Jade over the course of the month.
FAQs
Does the server I choose affect gameplay?
The server you choose will for the most part only affect your ping, which is less of an issue in turn-based games. However, it may create some delay when engaging enemies with a character’s technique or attack in the overworld.
One thing that the server you choose will affect is the Support Character system. Honkai Star Rail allows you to designate a character as your Support Character. In Calyxes and Caverns of Corrosion, players can borrow a Support Character from one of their friends to bring along. This requires you to be on the same server as your friends.
Does the Trailblazer that I choose at the start of the game matter?
While the Trailblazer that you select does not affect any gameplay elements, only visual and audio ones, you cannot change after making your choice. Choose carefully!
How long does it take to guarantee a limited character?
Starting off a fresh new account, 1.0 will give you enough to hit pity on both the Departure Banner as well as once on the Event Warp, meaning that you will not be able to guarantee the Event character if you lose the 50/50. If you save for the first two patches after release, you will have enough Stellar Jade and Special Passes to guarantee a 5★ character on an Event Warp – 180 pulls, or two hard pities.
As you progress through content and exhaust sources of one-time rewards, the amount of Stellar Jade and Passes that you will receive per patch will drop drastically. Depending on if events provide Stellar Jade’s in amounts comparable to HoYoverse’s other similar games, a F2P player will be able to guarantee an Event Warp character every 2-3 months. This also heavily depends on how consistently a player can clear all the available content (daily activities, shop pulls, Simulated Universe, Forgotten Halls, Events, and so forth).
How do I change the Trailblazer’s Element?
As you progress through the story, you unlock new Elements for the Trailblazer. You can change their Element at any time in the character menu using the switch button in the lower right hand corner.
How important are Eidolons?
Generally speaking, Eidolons, Signature Light Cones, and other ways of investing heavily into a few characters are not a requirement or even the best investment that you can make to boost your overall account power. Especially as a newer player, investing into a variety of characters will be better. As of release, almost all characters are strong enough without any Eidolons.
Are there any things I should avoid doing as a new player?
Play and spend responsibly! Early game investment into characters is not costly, so there is very little opportunity cost to trying things out. Just because a Light Cone or Character is a higher rarity does not make it the best option. Don’t spend Stellar Jades to complete your Departure Banner or pull on the Standard Banner. The game will give you enough Standard Warp passes to use. Another thing you should avoid is spending Fuel early in the game! Unless you want to unlock the main story right away, you should save them until you reach at least TL 40 wherein you can finally guarantee getting 5★ Relics. This is important because you’ll already be at the point of having high enough levels for your Characters, Light Cones, and Traces that the next step of improvement is by farming Relics. Without a decent Fuel stockpile, the initial Relic grind past TL40 can be grueling.
Credits
alreph
Artesians
Cyn
Davjac123
fourmana
jas
Mayoute
nyte
Reens
rndmstrnger23
skylarke
xf3
Changelog
28 April 2023 – Published for v1.0.
18 July 2023 – Updated for v1.2: Rewrote sections, added Yukong and additional Herta Eidolon to Freebie.