
Updated for Version 1.6

Note that the information given may change if new discoveries are made. More extensive testing is in progress.
Join our Discord to check on and participate in the theorycrafting process.
Table of Contents
Introduction
Introducing Ruan Mei, a biologist of the Genius Society, and a 5-Star Ice Harmony character in Honkai Star Rail. Captivating both friend and foe alike with her musical skills, she is able to manipulate the battle to the sounds of her tune, inspiring allies while leaving enemies stunned and unable to act.
If you’re looking for universal buffs with almost no conditions and nearly full uptime, all on a SP-positive unit, Ruan Mei is a great pickup. While she’s not always the perfect choice, she can fit into nearly every team in the game.
Infographic
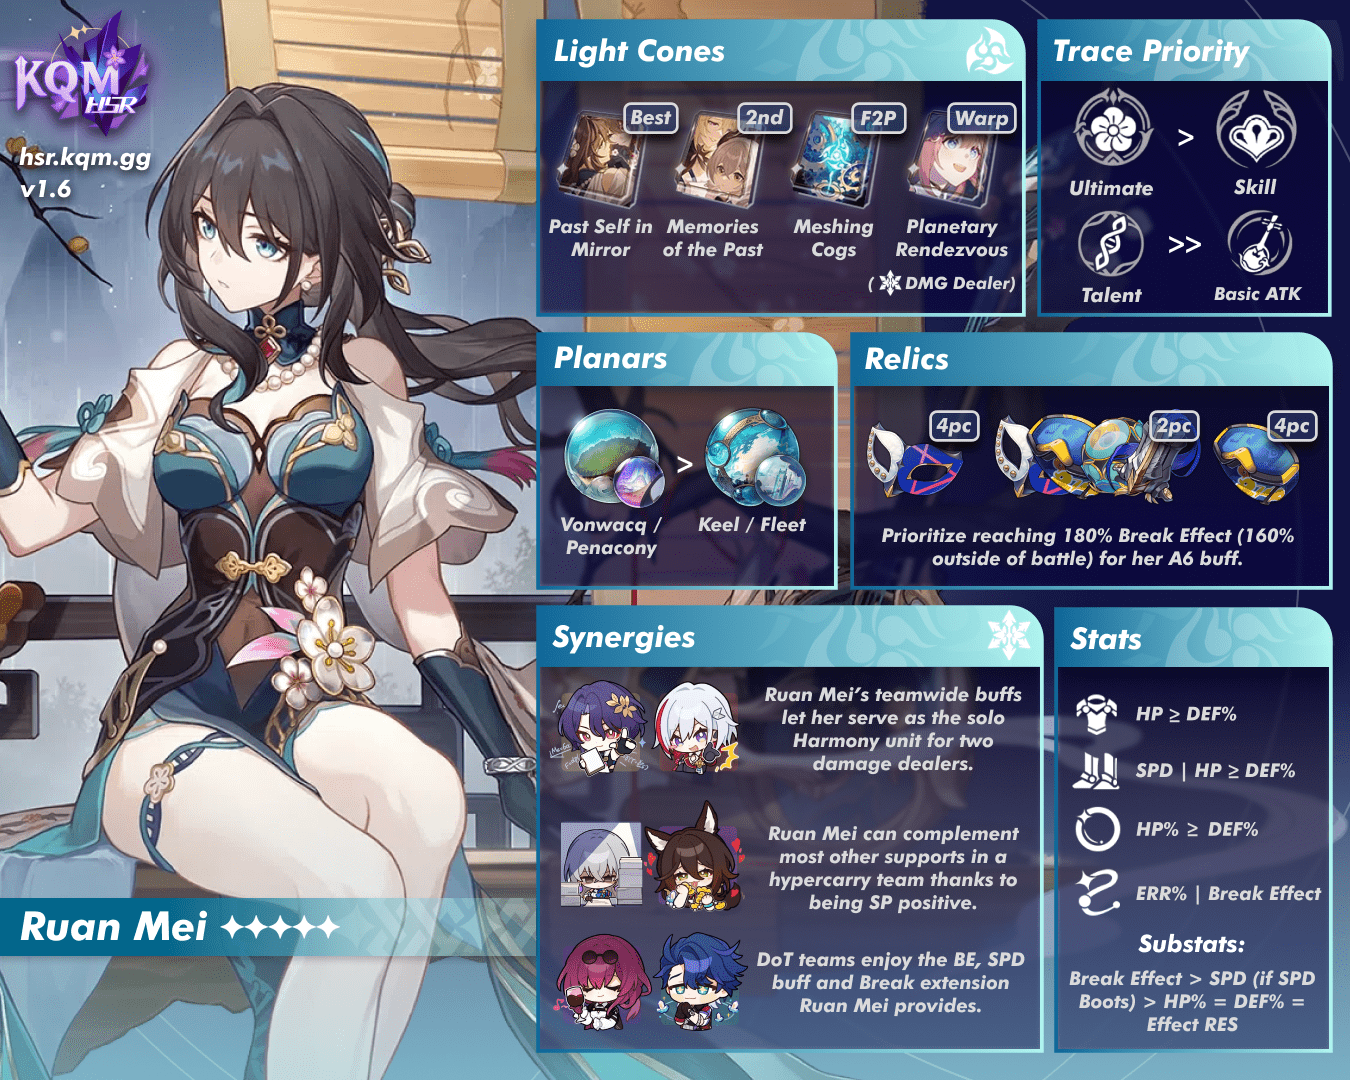
Character Overview
Ruan Mei’s Skill can increase the team’s Weakness Break Efficiency and DMG% — two universally useful buffs that every damage dealer in the game can benefit from. On top of this, the buff is tied to her own turns, which means it will not expire prematurely on fast damage dealers like Seele and Sushang. Furthermore, because it lasts 3 turns, Ruan Mei can keep both buffs permanently active while remaining slightly SP positive.
Her Ultimate, Petals to Stream, Repose in Dream, increases the RES PEN of all allies. Additionally, while the buff is active, ally attacks apply a mark to enemies that will extend the time they spend with their Weakness broken and will deal additional Ice-Type damage to them when they attempt to recover.
The majority of Ruan Mei’s damage comes from her Talent, which uniquely scales on her Ice Break DMG.
Ruan Mei is the perfect support for a dual carry team due to her party wide buff, but her powerful buffs make her a universal support fitting most of the characters in the game.
Playstyles
Ruan Mei operates on a simple pattern of one Skill followed by two Basic ATKs. Her Ultimate and Skill duration are dependent on her own turns, so Action Advance applied to her teammates will not affect the overall buff uptime, meaning this pattern can be effortlessly repeated.
Because her Ultimate buff ticks down at the beginning of her own turn, it should never be cast right before Ruan Mei is about to take her turn. If Ruan Mei gains enough energy to cast her Ultimate right before her turn, you should wait until AFTER her turn starts to cast it, or you are wasting a turn worth of Ultimate duration.
Traces
 Basic ATK | Threading Fragrance
Trace Description
Threading Fragrance [Single Target]
Deals Ice DMG equal to 50%/100%/110% of Ruan Mei’s ATK to a single target enemy.
A standard ATK-scaling Basic ATK. Contributes a small amount of Toughness damage.
 Skill | String Sings Slow Swirls
Trace Description
String Sings Slow Swirls [Support]
After using her Skill, Ruan Mei gains Overtone, lasting for 3 turn(s). This duration decreases by 1 at the start of Ruan Mei’s turn. When Ruan Mei has Overtone, all allies’ DMG increases by 16%/32%/35.2% and Weakness Break Efficiency increases by 50%.
The core of her utility, her Skill is the first source of additional team Weakness Break Efficiency. It increases the amount of Toughness damage characters deal while also bringing a DMG% buff.
 Ultimate | Petals to Stream, Repose in Dream
Trace Description
Petals to Stream, Repose in Dream [Support]
Ruan Mei deploys a field that lasts for 2 turns. The field’s duration decreases by 1 at the start of her turn.
While inside the field, all allies’ All-Type RES PEN increases by 15%/25%/27% and their attacks apply Thanatoplum Rebloom to the enemies hit.
When these enemies attempt to recover from Weakness Break, Thanatoplum Rebloom is triggered, extending the duration of their Weakness Break, delaying their action by an amount equal to 20% of Ruan Mei’s Break Effect plus 10%, and dealing Break DMG equal to 30%/50%/54% of Ruan Mei’s Ice Break DMG.
Enemy targets cannot have Thanatoplum Rebloom re-applied to them until they recover from Weakness Break.
A rare source of RES PEN, Thanatoplum Rebloom further delays enemy turns when they would normally recover while keeping their Toughness broken.
 Talent | Somatotypical Helix
Trace Description
Somatotypical Helix [Support]
Increases SPD by 8%/10%/10.4% for the team (excluding this character). When allies Break an enemy target’s Weakness, Ruan Mei deals to this enemy target Break DMG equal to 60%/120%/132% of her Ice Break DMG.
Would you like to go fast? This is how you go fast just by existing. The additional damage is a nice bonus that shouldn’t be overlooked.
The damage from Ruan Mei’s Talent is initiated after any attacks that trigger a break, after the Toughness breaker finishes their attack. If the Talent damage ends up killing the enemy, Ruan Mei will take ownership of the kill and Energy, something to keep in mind when paired with kill-reliant characters.
 Technique | Silken Serenade
Trace Description
Silken Serenade
After using the Technique, gains Silken Serenade. At the start of the next battle, automatically triggers the Skill for 1 time(s) without consuming Skill Points.
In Simulated Universe, when Ruan Mei has Silken Serenade, the team actively attacking enemies will always be regarded as attacking their Weakness to enter battle, and this attack can reduce all enemies’ Toughness regardless of Weakness types. When breaking Weakness, triggers Weakness Break Effect corresponding to the attacker’s Type. For every Blessing in possession up to 20 Blessing(s), additionally increases the Toughness-Reducing DMG of this attack by 100%. After breaking an enemy target’s Weakness, additionally deals to the enemy target Break DMG equal to 100% of Ruan Mei’s Ice Break DMG.
Automatically casts Skill at start of battle for no SP and generates 30 Energy for Ruan Mei, which is the same amount of Energy her Skill normally generates. For low cycle MoC clears, this means that Ruan Mei can frontload her damage, as her Ultimate can be cast after only one Basic ATK, factoring in the Energy from her Technique casting her Skill.
Additionally the Simulated Universe effect provides a strong opener that can allow you to fully Weakness Break nearly all enemies, while applying a Break effect of your choice at the start of battle.
 Ascension 2 Bonus Ability | Inert Respiration
Trace Description
Inert Respiration
Increases Break Effect by 20% for all allies.
A nice boost that synergizes well with her kit. The Break Effect bonus applies to herself.
This boost does not show up in the stat page outside of battle, so add 20% to your Break Effect when calculating if you have reached the 180% Break Effect threshold needed to max out her A6.
 Ascension 4 Bonus Ability | Days Wane, Thoughts Wax
Trace Description
Days Wane, Thoughts Wax
Ruan Mei regenerates 5 Energy at the start of her turn.
The additional 5 Energy per turn is required for 3-turn Ultimates and helps increase Ultimate uptime in 4-turn setups.
 Ascension 6 Bonus Ability | Candle Lights on Still Waters
Trace Description
Candle Lights on Still Waters
In battle, for every 10% of Ruan Mei’s Break Effect that exceeds 120%, her Skill additionally increases allies’ DMG by 6%, up to a maximum of 36%.
Further increases the DMG% buff of her Skill — more than doubling the buff’s value at Trace Level 10 — and further incentivizes building Break Effect on her. Ruan Mei needs 180% Break Effect, including her A2 Trace bonus, to max out her A6’s effect.
Note: Trace levels shown are 1/10/12 (Basic ATK 1/6/7).
Trace Priority
> ≥ >>
Ultimate > Skill ≥ Talent >> Basic ATK
Ruan Mei’s Ultimate is prioritized first, for both the amount of RES PEN it provides and the Thanatoplum Rebloom trigger damage it does. Her Skill is secondary, as her Ultimate’s RES PEN buff provides a bigger increase to team damage than her Skill’s DMG% buff. Her Talent provides the majority of her personal damage and a decent permanent SPD buff, and should be leveled alongside her Skill.
She does not build ATK or CRIT, so her Basic ATK does not need to be leveled.
Eidolons
 Eidolon 1 | Neuronic Embroidery
Eidolon Description
While the Ultimate’s field is deployed, the DMG dealt by all allies ignores 20% of the target’s DEF.
A very strong buff with high uptime that also synergizes extremely well with other sources of DEF Reduction. A good stopping point if you’re looking to invest into Ruan Mei.
 Eidolon 2 | Reedside Promenade
Eidolon Description
With Ruan Mei on the field, all allies increase their ATK by 40% when dealing DMG to enemies with Weakness Break.
ATK% buff is great, as she does not buff ATK from her base kit.
 Eidolon 3 | Viridescent Pirouette
Eidolon Description
Ultimate Lv. +2, up to a maximum of Lv. 15.
Talent Lv. +2, up to a maximum of Lv. 15.
Increases both her RES PEN buff and Thanatoplum Rebloom damage.
 Eidolon 4 | Chatoyant Éclat
Eidolon Description
When an enemy target’s Weakness is Broken, Ruan Mei’s Break Effect increases by 100% for 3 turn(s).
Break Effect increases both the damage she does as well as the amount her Ultimate delays; however, these benefits are minor for the cost. Mostly a stepping stone for E6.
 Eidolon 5 | Languid Barrette
Eidolon Description
Skill Lv. +2, up to a maximum of Lv. 15.
Basic ATK Lv. +1, up to a maximum of Lv. 10.
Skill levels provide slightly more DMG%, but are not particularly notable as the Weakness Break Efficiency from her Skill does not scale on its level.
 Eidolon 6 | Sash Cascade
Eidolon Description
Extends the duration of the Ultimate’s field by 1 turn(s). The Talent’s Break DMG multiplier additionally increases by 200%.
Can allow for 100% Ultimate uptime with 3-turn Ultimate setups, further synergizing with E1. Almost triples her Talent damage.
Build
Light Cones
 Past Self in Mirror | More Break Effect increases both the damage and buffs Ruan Mei provides, while the increased DMG% and SP refund on Ultimate are great, making her more SP positive. Note that the DMG% buff ticks down on the turns of the buff recipient, compared to Ruan Mei’s own Skill which ticks down on her own turns, reducing its effectiveness on faster allies. The Energy restore is not something to rely on due to occurring only at the start of waves. Note that the Energy regeneration is not affected by ERR%. |
 Memories of the Past | Gives a substantial amount of Break Effect, just like Past Self in Mirror, which is appreciated, greatly reducing the amount of substats needed to max out her A6. Grants Energy when Ruan Mei attacks, which can reduce the amount of turns between her Ultimates. Requires S5 for a consistent 3-turn Ultimate. |
 Meshing Cogs | The lack of Break Effect lowers the synergy of this Light Cone. Meshing Cogs is great for the Energy; however, the lower base stats will leave Ruan Mei more fragile in some scenarios. Like Memories of the Past, it requires S5 for a consistent 3-turn Ultimate. Meshing Cogs can sometimes allow for a 2-turn Ultimate if attacked by multiple enemies. |
 Planetary Rendezvous | A solid option when supporting an Ice damage dealer at higher levels of superimposition. However, Ruan Mei will be limited to 4-turn Ultimates. |
Relics
Relic Sets
 4-Pc Thief of Shooting Meteor | Provides extra Break Effect for maxing out her Ascension 6 Bonus Ability. Despite showing the “Weakness Break” text, damage from Ruan Mei’s Talent does not trigger the Energy regeneration effect. |
| 2-Pc Combinations | 2-Pc options include: Break Effect, SPD, HP%, Guard of Wuthering Snow An option if lacking a good 4-PC Thief of Shooting Meteor set. SPD can help with SP generation, Toughness Break, and SPD tuning, while HP and DMG Reduction help with general survivability. Good generalist option. |
 4-Pc Messenger Traversing Hackerspace | A solid option if the additional Break Effect from Thief of Shooting Meteor is not needed. Be aware that the SPD buff is based on a unit’s Base SPD, and can disrupt SPD tuned setups, such as when tuning Bronya to be slower than a damage dealer. |
 4-Pc Passerby of Wandering Cloud | A more niche option for low-cycle clears in teams where SP may be of concern. |
Planar Ornaments
 Penacony, Land of the Dreams | Provides the Energy Regeneration Rate required to guarantee 3-turn Ultimates, and can further buff Ice-Type damage dealers. |
 Sprightly Vonwacq | Provides the ERR needed for a 3-turn Ultimates. Can be used to activate her Ultimate early in Action Order while keeping her SPD low, extending the duration of her Ultimate for damage dealers. |
 Broken Keel | A solid option if not pursuing a 3-turn Ultimate, although the Effect RES requirement may be a little difficult to hit due to a lack of Effect RES in her Traces. |
 Fleet of the Ageless | Another generalist support set like Broken Keel. Fleet’s SPD requirement is easy to hit, although the ATK% buff is typically weaker than the CRIT DMG% from Keel. It is superior in DoT teams. |
 Talia: Kingdom of Banditry | Typically not recommended due to the greater supportive potential of the other sets mentioned above. |
Stats
 Body |  Boots |  Sphere |  Rope |
| HP% / DEF% | SPD / HP% / DEF% | HP% / DEF% | Break Effect / Energy Regeneration Rate |
Substats
Break Effect > SPD > HP% = DEF% ≥ Effect RES
Break Effect is the most valuable stat to chase on Ruan Mei’s Relics in order to help max out her A6 DMG% buff. High SPD can be valuable to help generate SP, but it is not strictly better as her buff durations are tied to her turns as opposed to her teammates’.
Note that if you are using a slow Ruan Mei with Sprightly Vonwacq for a low-cycle clear, HP% or DEF% Boots with little to no SPD substats are preferable.
Energy Breakpoints
| Light Cone | +15 ERR Rope | 5% ERR Planar | A6 Triggers | Rotation (per Ultimate) | |
| Any | No | No | 5 | 2 Skill | 3 Basic |
| Yes | No | 4 | 1 Skill | 3 Basic | |
| Memories of the Past / Meshing Cogs S2 | No | No | 4 | 1 Skill | 3 Basic |
| Memories of the Past / Meshing Cogs S5 | Yes | Yes | 3 | 1 Skill | 2 Basic |
In Memory of Chaos, the following setups allow for a first-turn Ultimate when used with Ruan Mei’s Technique followed by a Basic ATK.
| Light Cone | +15 ERR Rope | 5% ERR Planar | A6 Triggers |
| Past Self in Mirror S1 | No | No | 1 |
| Any | Yes | No | 1 |
A full breakdown of rotations, including ones that use external Energy gain can be found in Ruan Mei Energy and Rotations.
E1 or S1?
E1 Description
Neuronic Embroidery
While the Ultimate’s field is deployed, the DMG dealt by all allies ignores 20% of the target’s DEF.
S1 Description
Past Self in Mirror
Increases the wearer’s Break Effect by 60%. When the wearer uses their Ultimate, increases all allies’ DMG by 24%, lasting for 3 turns. Should the Break Effect exceed or equal 150%, 1 Skill Point will be recovered.
During the start of every wave, all allies regenerate 10 Energy. Effects of the same type cannot stack.
Ruan Mei’s E1 is a great damage bonus that any team can benefit from. With no other sources of DEF Shred or DEF Ignore, E1 amounts to roughly an 11% increase in team damage whenever her Ultimate is up. At higher amounts of DEF Shred, the value of this Eidolon increases; for example, if you can achieve 80% DEF Shred from elsewhere, then the value of E1 will increase to an approximately 23% damage increase, due to the multiplicative nature of DEF Ignore and DEF Shred.
Ruan Mei’s signature Light Cone Past Self in Mirror instead enhances her already existing strengths, increasing her DMG% buffs, giving a large amount of Break Effect, and helping with her SP generation if she has sufficient Break Effect. While S1 increases Ruan Mei’s team flexibility due to the extra SP it helps to generate, the Energy it gives is not always valuable and is also heavily conditional on new enemy waves. Because of this, S1 may see noticeably more value in content with many waves.
Character Comparisons
Bronya

Being the first limited 5-Star Harmony, a comparison to Bronya is inevitable. In practice, the two operate very differently, and often fulfill different roles in a team, although they can be used together in certain teams.
Bronya’s higher buff numbers and targeted buff application make her perfectly suited for hypercarry teams, bringing nearly unmatched buffing capabilities by potentially doubling the effective turns of an ally, dispelling debuffs, providing a wide variety of damage buffs, and manipulating the turn order. This comes at the cost of being by far the most SP-hungry support in the game, and requiring SPD tuning for maximum benefit.
Ruan Mei’s buffs are largely passive, requiring little to no interaction, and are a net positive in terms of SP. Additionally, her buffs are tied to her turn, meaning it’s easier to maintain her buffs on units with high SPD and/or the means to Action Advance themselves, like Seele, Sushang, or Jingliu. Furthermore, her buffs being field-based mean that she can buff multiple damage dealers at a time, making her more synergistic in those types of teams. Another benefit of this is that she is capable of directly buffing follow-up attackers, such as Jing Yuan or Topaz. While Bronya can support these units indirectly by giving them more actions overall, she is incapable of directly buffing their follow-up attacks without her E6. Ruan Mei, in addition to her damage buffs, also brings a non-negligible amount of sustain utility, as Thanatoplum Rebloom’s Weakness Break recovery delay overall reduces the amount of times enemies can attack.
Overall, Ruan Mei is a hands off unit, requiring little setup, thought, or SP to get optimal performance, while Bronya offers greater potential output at the cost of finicky SPD tuning and mountains of SP. Thanks to being an SP-positive support, Ruan Mei can easily slot into teams that are too SP-hungry for Bronya or those that rely on multiple damage sources. She just works™.
To learn more about Bronya, check out the Bronya Guide.
Tingyun

Tingyun is primarily a single-target buffer, able to restore an ally’s Energy as well as provide ATK and DMG% buffs. This makes her suited to hypercarry compositions where one character does the majority of the team’s damage as well as significantly helping Ultimate-reliant characters.
Ruan Mei, on the other hand, provides teamwide buffs that can help in teams with multiple damage dealers, while increasing team comfort through break amplification and enemy turn delay. Ruan Mei can also be used in a similar fashion as Tingyun in a hypercarry setup, as the buffs provided by Ruan Mei are universally appreciated and easy to maintain.
Ruan Mei and Tingyun can work very well together in a hypercarry setup as both units are fairly SP positive and not too challenging to use. It should be noted that if a chosen damage dealer relies heavily on their Ultimate to deal damage, Tingyun will naturally be a more compelling support option.
Asta

Asta’s ATK buff requires specific conditions to maintain maximum stacks; she wants to be put against Fire-Weak enemies, and requires frequent Skill usage or Eidolons. In contrast, Ruan Mei provides her buffs merely by existing on the field, and casting her Skill every third turn.
Asta’s SPD boost is significantly larger than Ruan Mei’s, at the cost of being dynamic and more SP intensive. On the other hand, Ruan Mei’s SPD buff is a passive bonus but provides less immediate SPD.
Asta provides a significant amount of Toughness damage via her Skill’s Bounce, but Ruan Mei’s 50% increase to Weakness Break Efficiency accomplishes a similar thing while being easier to maintain. In addition to this, Ruan Mei’s Talent contributes a very significant amount of damage any time that any ally inflicts Weakness Break — an effect that removes the most frustrating part of building Break Effect, which is the need for that specific character to be the one Breaking.
In general, unless you really need the SPD boost provided by Asta, Ruan Mei will be a superior choice for outright damage amplification in most cases. This remains true in both hypercarry and dual carry setups.
To learn more about Asta, check out the Asta Guide.
Pela

Ruan Mei and Pela often occupy the same slot in a team, either serving as the sole support in a team with multiple damage dealers, or as the secondary support in a hypercarry team. Both provide excellent AoE damage increases, while also generating SP.
However, Pela’s debuffs can run into uptime issues against particularly fast enemies, as the duration of debuffs are based on enemy turns. Ruan Mei’s field buffs do not run into these issues as their durations are based on her own turn. Pela also tends to generate more SP than Ruan Mei; however, Pela’s generation may be lower in teams with Ice-Type damage dealers, where she may use her Skill for her E4’s Ice RES shred. Pela’s damage increase can be comparable when looking at single instances of damage, but Ruan Mei’s consistency and personal break damage pull her ahead as a unit.
Overall, Ruan Mei brings higher damage amplification with more consistency and additional defensive utility. If you are forced to pick between one or the other, Ruan Mei is usually superior.
To learn more about Pela, check out the Pela Guide.
Notable Synergies
Damage Dealers
 Jingliu | Jingliu appreciates both the DMG% and RES PEN that Ruan Mei provides as they significantly increase her damage. Jingliu additionally does a large amount of AoE Toughness damage which can help keep enemies constantly Weakness broken. Their shared Ice Type means Ruan Mei can also take full advantage of Penacony, Land of the Dreams to further buff Jingliu’s damage. | ||
 Kafka | Kafka can take advantage of all of Ruan Mei’s buffs. Her Break Effect buff boosts Break DoT damage, her Ultimate’s Thanatoplum Rebloom break extension increases the frequency of DoT damage taken by enemies, and her SPD buff is appreciated by any Kafka team. Ruan Mei’s teamwide buffs further complement Kafka teams that utilize a second DoT damage dealer. | ||
 Welt | Ruan Mei complements Welt’s Imprisonment abilities. Ruan Mei’s Thanatoplum Rebloom also helps keep enemies Weakness broken, further extending the window where Welt can benefit from his A6 DMG%. | ||
 Yanqing | Ruan Mei helps Yanqing break enemies more often and further delays them, mitigating how often enemies can target and damage Yanqing, thus increasing his Soulsteel Sync uptime. Because they are both Ice-Type characters, Ruan Mei can equip Penacony, Land of the Dreams to further buff Yanqing’s damage. | ||
 Sushang | Sushang wants harder, better, faster, stronger Breaks and Ruan Mei delivers. Ruan Mei’s Ultimate break extension guarantees additional Sword Stance procs, while the RES Pen and DMG% buffs she provides are the cherry on top! | ||
 Blade | Blade struggles to take full advantage of most Harmony units due to his kit primarily scaling off of HP, leading to a dependence on Bronya for maximum damage. Ruan Mei helps alleviate this with her universal buffs. While her buff capabilities are still weaker than Bronya, she serves as a suitable replacement if Bronya is needed by another team. Thanks to Blade’s incredibly low SP consumption, Bronya and Ruan Mei can also easily be used together with Blade. | ||
Buffers/Debuffers
Bronya | Ruan Mei synergizes with Bronya thanks to her buffs being tied to her own turns, circumventing the issue of Bronya burning through buff durations quickly with her Action Advance. The sheer amount of DMG% that they provide still supersedes any concerns about oversaturation. This can push the damage dealer to use an ATK% Sphere rather than DMG%. | ||
Tingyun | Tingyun and Ruan Mei combined provide extra resources in the form of SP and Energy allowing any greedy damage dealer the ability to use their Skill and Ultimate more liberally. Tingyun also complements Ruan Mei due to providing buffs like ATK% and Energy generation, which are not found in Ruan Mei’s kit. Combined, the two form a very versatile, easy to play core, capable of supporting many different damage dealers. | ||
 Silver Wolf | Silver Wolf’s Weakness implant ensures the team can take advantage of Ruan Mei’s Weakness Break Efficiency buff as well as her Weakness Break extension. Ruan Mei’s Break Efficiency and Weakness Break extension help to ensure Silver Wolf can apply Entanglement and is able to maximize Entanglement damage. | ||
 Other Debuffers | Debuffs such as DEF Shred or Damage Vulnerability are separate parts of the DMG formula, and as such will stack fully with Ruan Mei’s buffs. If there is not a pressing need for the Energy of Tingyun or the Action Advance of Bronya, the combination of debuffs with Ruan Mei’s buffs will often lead to the most efficient damage amplification. | ||
Special Considerations
Damage Dealers
 Clara | While Ruan Mei’s DMG% and Res PEN buffs are still strong for Clara, the Action Delay from Breaking enemies and Thanatoplum Rebloom from her Ult will reduce the overall amount of attacks enemies can do, reducing Clara’s potential Counters. | ||
 Xueyi | The extra Weakness Break Efficiency enables Xueyi herself to build up Karma stacks faster, although it can also cause allies to essentially ‘steal’ Karma stacks from Xueyi by increasing the Toughness damage they do. The Weakness Break state extension also works against her, as Xueyi gains no Karma stacks against already Weakness Broken enemies. It is important to note that Xueyi may also lose potential Karma stacks due to rounding down (e.g., 45 Toughness Break will only give 1 stack). | ||
Teams
Dual Damage Dealer Solo Support

In these types of teams, Ruan Mei serves as the solo Harmony unit for two damage dealers, using the fact that her buffs are teamwide to her advantage. Ruan Mei’s buffs are very generalist, meaning she can work for nearly any combination of damage dealers. Thanks to her SP-positive rotation, she can help to generate SP for the team.
Example Teams

This team has Ruan Mei replace the singular support unit slot that is typically occupied by Asta or Guinaifen. Ruan Mei, in turn, brings a good bit more damage to Kafka teams. One major advantage that this team has is Ruan Mei’s Thanatoplum Rebloom will accelerate the rate of enemy turns and thus the damage they take from DoTs. Kafka teams enjoy Ruan Mei’s SP-positive rotations, letting both Kafka and her secondary damage dealer use their Skill consistently.
Hypercarry Secondary Support

In hypercarry teams, Ruan Mei serves as a great secondary Harmony unit to complement another support character, usually one that is more aggressive in their SP usage to take advantage of the fact that Ruan Mei is both SP positive and provides buffs based on her own turns. This is especially notable with Bronya, or in teams with other forms of targeted Action Advance, as the targeted buffs of other Harmony units will expire faster, forcing them to recast buffs more frequently, consuming more SP or losing relative uptime.
Example Teams

A premium Jingliu team. Ruan Mei’s field buffs allow her to combo much more gracefully with Bronya than other Harmony units as mentioned above. In this slot, she can be considered a direct upgrade to Pela. This is not an SP-hungry team, so her generating less SP than Pela is not a problem. Additionally, Ruan Mei’s personal damage from Weakness Breaks, while by no means the focus of her kit, still far outweighs that of Pela’s.
The sustain unit is ideally heavily SP positive and will never or rarely have to use their Skill, as the SP drain from Bronya and Jingliu combined is still quite heavy. Luocha is the ideal choice, while units like Fu Xuan will find it very difficult to keep up SP wise.

A fairly straightforward Jing Yuan hypercarry team. Jing Yuan may need slightly more SPD in his Relics to compensate for the lack of any dedicated SPD supports, but otherwise should still be able to comfortably get high stacks on Lightning-Lord. This is a very comfortable team in terms of SP due to Tingyun and Ruan Mei both being SP positive, and can easily run a less SP positive sustain unit as a result.

This team takes advantage of Ruan Mei’s Thanatoplum Rebloom to increase the consistency and speed of Sushang getting Sword Stance procs. Silver Wolf’s Weakness implant makes this team work in any content, although Tingyun will work better against enemies that already have Physical Weakness.
Credits
Authors
Ducc
Reens
Soul Fish
Editors
jas
Ley
Sushou
Publishers
Chase
Changelog
- 01 February 2024 – Published for v1.6