Updated for Version 1.6
Note that the information given may change if new discoveries are made. More extensive testing is in progress.
Join our Discord to check on and participate in the theorycrafting process.
Table of Contents
Introduction
Seele is a Quantum-Type character following the Path of The Hunt, and the first limited 5★ character to be released in Honkai: Star Rail. She regularly disappears among a sea of butterflies during battle and excels against content where she can hunt down weaker enemies to gain extra turns and a powerful buff, leaving them as illusions of the past.
Infographic
Character Overview
While Seele may appear to be uncomplicated at first glance, there is a surprising amount of depth to her kit. The core of Seele’s gameplay is her Talent “Resurgence”, which triggers when Seele defeats an enemy. Resurgence gives Seele an extra turn, during which she not only retains the original buffs she had during the turn she triggered it, but also gains a potent buff of her own, as well as additional Energy from the action she performs during the extra turn. Resurgence makes Seele a very competent damage dealer in AoE scenarios.
Playstyle
Seele’s entire playstyle centers around triggering Resurgence and maintaining its associated buffed state, whether it’s via careful Energy management, proper consideration of when to defeat enemies, or simply providing Seele with enough stats and Trace levels to defeat enemies quickly enough that she does not exit the buffed state in the interim.
As Seele’s Ultimate puts her in the same buffed state that is granted when she enters Resurgence, it is a great way for her to maintain the buffed state even when there are no enemies to defeat. Although Seele’s buffed state has a 1-turn duration, it does not tick down on the turn it is gained. If you were to use Seele’s Ultimate during her own turn, the buffed state will be active for both that turn and the next.
Resurgence can be triggered multiple times in a row if Seele defeats an enemy with both her Skill and Ultimate in quick succession. If Seele’s Energy fills entirely during her Skill’s animation, it is possible to queue up her Ultimate before Resurgence is triggered, allowing her to not miss out on the Energy that would be generated during the extra turn. Notably, it is almost impossible to do the same thing if her Basic ATK both fills her Energy and triggers Resurgence.
Resurgence does not activate again if Seele defeats an enemy during the extra turn granted by Resurgence. This means that players should plan ahead for the best moment to defeat enemies, and use the extra turn granted by Resurgence to focus on tougher enemies. If you want to have Seele’s Ultimate ready for a new wave of enemies or subsequent battles, you can take advantage of Resurgence to defeat enemy summons even if the Boss or Elite can be defeated without doing so, as Seele gains Energy from the extra turn and from defeating the enemy.
Lastly, it is important to remember that Seele’s Basic ATK can also trigger Resurgence. Seele’s high damage output, as well as the lower amounts of HP that smaller enemies have, means she can be a lot more SP friendly than she may appear at first. The Action Advance granted by her A6 Bonus Ability also means any time she uses her Basic ATK she will take her next turn sooner, potentially increasing her overall damage per cycle.
Traces
Note: Trace levels shown are 1/10/12 (Basic ATK 1/6/7).
Trace Priority
 =
=  ≥
≥  =
= 
Skill = Ultimate ≥ Talent = Basic ATK
Seele’s Skill and Ultimate contribute a similar amount of damage overall, and should be leveled first. Talent levels increase the DMG% provided by the buffed state, and thus are important to level alongside Seele’s other Traces, while leveling her Basic ATK can be useful for clearing out weaker enemies while generating SP. All of Seele’s Traces contribute meaningfully to her effectiveness in battle, and should all be leveled as high as possible.
Eidolons
Build
Seele’s kit is entirely focused on her personal damage, so she should be built with that in mind, focusing on damaging stats such as CRIT, ATK%, DMG Boost, and SPD.
Additionally, as Seele’s performance is dependent on dealing enough damage to defeat enemies and trigger Resurgence, marginal gains in damage can sometimes drastically improve clear speed.
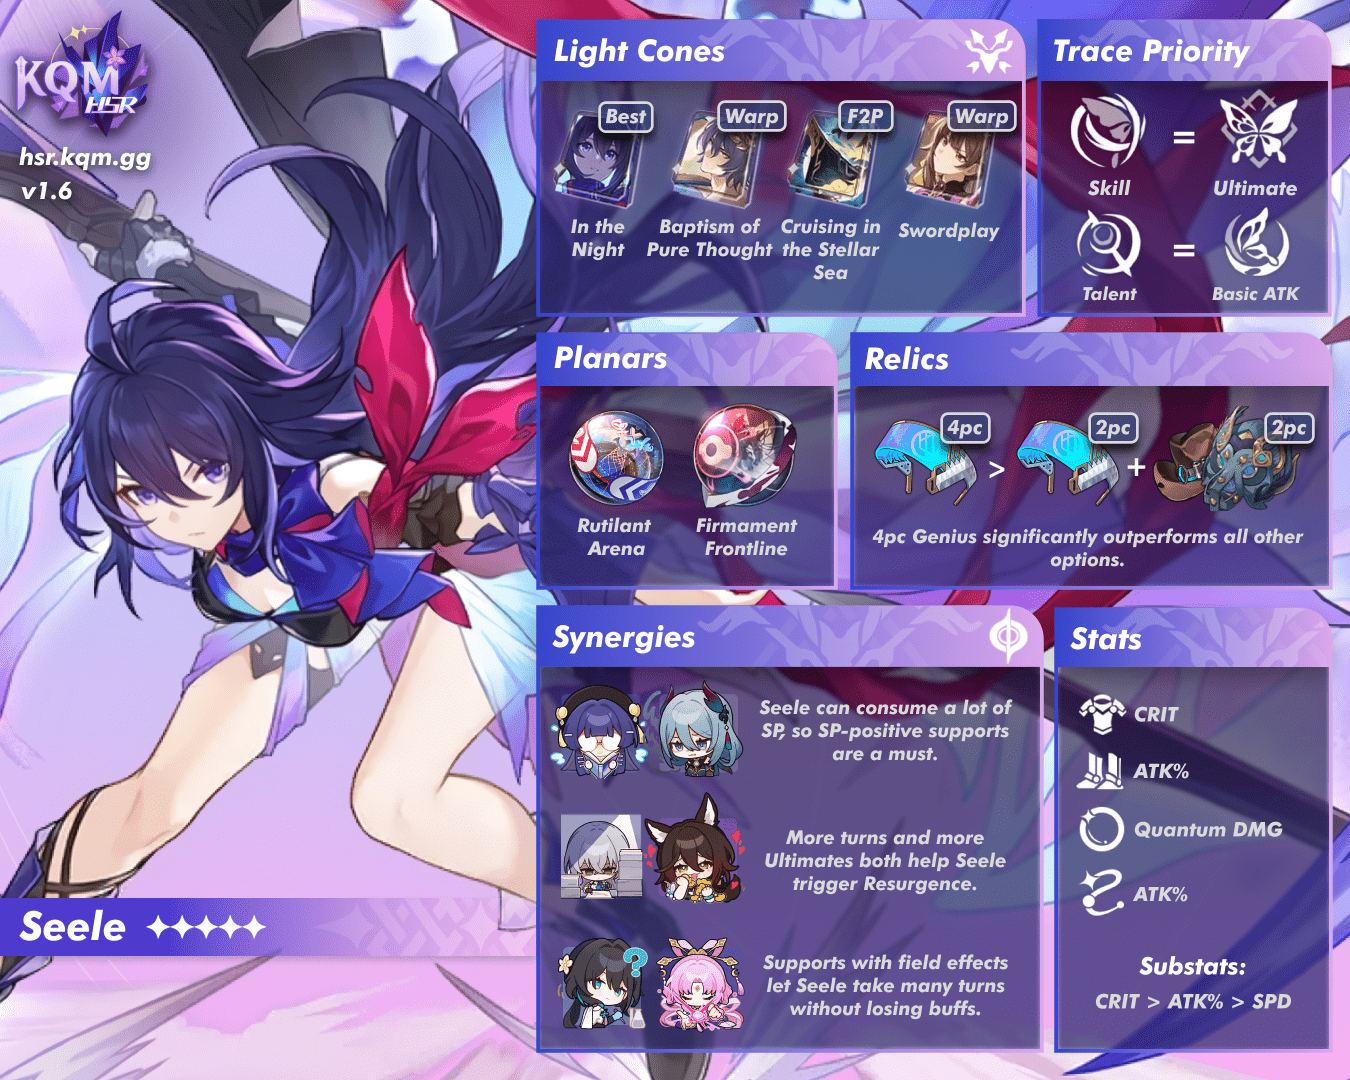
Light Cones
 In the Night | Seele’s signature Light Cone. Due to her inherent SPD buff, she will always benefit from at least 4 stacks of the passive. Noticeably better than her other options. Due to the large amount of CRIT DMG this Light Cone provides for Seele’s Ultimate, a 3:5 ratio of CRIT Rate to CRIT DMG becomes optimal, as opposed to the usual 1:2 ratio. |
 Baptism of Pure Thought | Baptism of Pure Thought acts as a straightforward stat stick for Seele, granting her a large amount of CRIT DMG against debuffed enemies, and a DMG Boost after she uses her Ultimate. Although Seele is unable to gain any benefit from the Light Cone’s follow-up attack-related buff, it is relatively easy to maintain high uptime on its other effects. |
 Sleep Like the Dead | As Seele’s Skill hits the enemy four times, the CRIT Rate buff from this Light Cone can trigger somewhat consistently, assuming you don’t guarantee CRIT hits. Additionally, its high base stats and CRIT DMG substat makes it a serviceable alternative to In the Night. |
 Cruising in the Stellar Sea Cruising in the Stellar Sea | As a Light Cone from the Herta Store, it is completely free to obtain and easy to max out its superimposition. The 16% unconditional CRIT Rate buff, paired with the ATK buff that directly synergizes with Resurgence, makes this the best F2P option for Seele. |
 Swordplay | While stacks reset when changing targets, Seele’s 4-hit Skill will quickly stack the passive on this Light Cone, making it a strong option at higher superimpositions, especially in scenarios with fewer enemies. However, this Light Cone synergizes poorly with Seele’s playstyle, since Resurgence incentivizes frequent target-switching, as well as generous use of her 2-hit Basic ATK. |
 Return to Darkness | Its higher base stats and a CRIT Rate substat makes this Light Cone a solid option for Seele. Notably, it is not recommended to use this until a moderate superimposition level, which is quite hard to obtain, especially if you want another Light Cone from the Nameless Honor. |
 Only Silence Remains | Even though this Light Cone usually performs worse than Cruising in the Stellar Sea, it is still a good option if the CRIT Rate buff can be utilized. |
Relics
Relic Sets
 4-Pc Genius of Brilliant Stars | The best set for any Quantum damage dealer. The 4-Pc Set Effect is one of the strongest in the game, especially because its bonus only gets better the closer you get to 100% DEF Reduction. |
 2-Pc Combinations | If a 4-Pc Genius of Brilliant Stars set is not available, a combination of 2-Pc Genius of Brilliant Stars with 2-Pc Musketeer of Wild Wheat or 2-Pc Prisoner in Deep Confinement can be somewhat competitive. The damage difference between the two, while undoubtedly large, is something that can be made up with significantly better substat rolls. |
Planar Ornaments
Although the performance of these sets varies, they are close enough that you should use substat rolls as the deciding factor between which set to use.
 Rutilant Arena | Seele’s Skill is the largest source of her damage overall, and this set buffs exactly that, as well as giving CRIT stats. The high CRIT Rate requirement is less of an issue when considering that Seele’s Ultimate only hits once — so Seele generally wants to build lots of CRIT Rate anyway. |
 Firmament Frontline: Glamoth | The power of this set is locked behind high SPD values, which synergizes perfectly with Seele’s inherent 25% SPD boost from her Skill. As it buffs all of Seele’s damage, it is a great alternative to Rutiliant Arena. With In the Night, one can double dip into building 160 SPD for max stacks from the Light Cone, while also getting the maximum DMG% value from this set. This requires a high amount of investment in Seele’s Relics, but if Seele’s E2 is acquired, Seele does not need any SPD in her Relics to get maximum value from this set, and it is her best option in this case. |
 Space Sealing Station | The ATK% from Space Sealing Station is not to be underestimated, especially because Seele can use it to trigger Resurgence in scenarios where Inert Salsotto could not. This Planar Set is also one of the most efficient ones to farm, as it is viable on a large portion of the damage dealers in the game, and it does not fall behind even with other sources of ATK%. |
 Inert Salsotto | Competitive to Space Sealing Station in all scenarios, and gives a lot of beneficial stats for Seele. |
Stats
Body | Boots | Sphere | Rope |
| CRIT Rate / CRIT DMG | ATK% | Quantum DMG% | ATK% |
Substats
CRIT Rate / CRIT DMG > ATK% > SPD
Why Not SPD Boots?
Although it may be tempting to put SPD Boots on Seele, especially if equipping her with In the Night, the SPD buff from Seele’s Skill already puts her at 143.75 SPD without any SPD from Relics or other teammates; this is enough to activate the base effects of Space Sealing Station and Firmament Frontline: Glamoth. To achieve 5 stacks on In the Night, only 6.25 more SPD is required. If aiming to reach 160 SPD for either Firmament Frontline: Glamoth or In the Night, 16.25 SPD, or roughly 7–8 substats, is required.
It should be noted that, as a large portion of Seele’s damage is dealt during extra turns granted by Resurgence, there is little value in additional SPD above her baseline, and SPD itself does little to help trigger Resurgence in the first place. It only takes a couple Resurgence turns for SPD to become less valuable than CRIT or ATK, even if it means not maxing out the passives from In the Night or Firmament Frontline: Glamoth.
E2 or S1?
E2 Description

Dancing Butterfly
The SPD Boost effect of Seele’s Skill can stack up to 2 time(s).
S1 Description
Increases the wearer’s CRIT Rate by 18%. While the wearer is in battle, for every 10 SPD that exceeds 100, the DMG of the wearer’s Basic ATK and Skill is increased by 6% and the CRIT DMG of their Ultimate is increased by 12%. This effect can stack up to 6 time(s).
In the Night is a great upgrade to Seele’s personal damage and consistency as she will always benefit from at least 4 passive stacks. Her E1 is very situational, and although E2 is a strong upgrade, SPD by itself does not improve Seele’s ability to trigger Resurgence, while her Signature Light Cone does, meaning In The Night is generally worth more than her early Eidolons.
Due to the lower pity and more generous chances of the Light Cone Event Warp (75:25 chance, as opposed to 50:50, for a drop-rate boosted 5★), Seele’s signature Light Cone is also generally easier to obtain than her Eidolons.
Character Comparisons
Qingque

Qingque, being freely available to anyone, can be seen as an alternative to Seele in Hypercarry teams. They both have a Skill Point-heavy playstyle, mechanics which allow them to extend the duration of buffs, a kit that focuses around personal damage, and are Quantum-Type. Additionally, as Seele’s Resurgence allows her to also be useful in multi-enemy scenarios, she can be compared to Qingque’s Blast / AoE damage.
However, the core gameplay differentiates the two. Notably, Qingque heavily relies on RNG to deal damage, as you ideally use her Skill as often as possible for stacking its DMG% buff, while also activating Autarky if E4 is unlocked. Seele’s kit, on the other hand, has much less luck involved, and is excellent for consistent damage.
Yanqing

Also a 5★ Hunt character, Yanqing has some notable differences to Seele’s playstyle, chief of which is his lack of AoE. Where Seele can effortlessly mow down legions of lesser enemies, Yanqing is confined to the cruel march of time, as he can only defeat a maximum of one enemy per turn or Ultimate.
Yanqing’s teammate requirements are also stricter than Seele’s, as he prefers a competent shielder to prevent him from taking damage in order to maintain Soulsteel Sync, whereas Seele is free to choose Abundance sustain options without much headache.
Notable Synergies
Buffers/Debuffers
 Silver Wolf | Silver Wolf comes with an abundance of damage amplification. Her DEF Reduction directly synergizes with the 4-Pc Genius of Brilliant Stars Relic Set, as DEF Reduction increases in value as it approaches 100%. Furthermore, as a Quantum-Type unit herself, Seele enables more consistent Weakness implants. |
 Pela | Pela’s SP-positive playstyle and DEF Reduction make her a very valuable pick for Seele’s teams, especially because DEF Reduction increases in value as it approaches 100%. One should note, however, that enemy DEF cannot be reduced past 100%, occasionally limiting the effectiveness of multiple sources of DEF Reduction. |
 Bronya | Seele and Bronya are a strong duo; Resurgence allows Seele to extend the buffs provided by Bronya’s Skill and Ultimate, and Bronya gives Seele more opportunities to deal damage with her Action Advance. The combination can be rather Skill Point hungry, but Bronya’s E1, her signature Light Cone But the Battle Isn’t Over, and thoughtful use of Seele’s Basic ATK can alleviate SP consumption by a fair amount. Additionally, it’s important to remember that all the extra turns that Seele takes with Bronya’s help will naturally result in lower uptime on buffs, shields, and other effects that are dependent on Seele’s turns, including her own buffed state if she does not trigger Resurgence often. |
 Tingyun | Another highly sought-after support for many teams, Tingyun provides notable buffs to Seele and regenerates her Energy — all while consuming relatively little SP. This can be especially noticeable in long fights against Bosses where Seele may be unable to trigger Resurgence consistently, as Tingyun will allow Seele to gain higher buffed state uptime through more frequent Ultimates. |
 Ruan Mei | Ruan Mei is yet another entry on the long list of Seele-compatible buffers. Although she does not bring any novel gameplay for Seele, her low SP consumption and strong buffs make her a great flex pick for a lot of Seele’s teams. Her Talent also increases her teammates’ SPD, which can be useful if Seele is using In the Night. There can be some cases where Ruan Mei’s Talent deals the killing blow on an enemy instead of Seele, thus denying Seele the chance to trigger Resurgence, but these situations are rare. |
 Asta | Asta can be a good teammate for Seele, especially when Seele is equipped with her signature Light Cone In the Night. As Asta’s Charging stacks do not decrease outside of her own turns, Seele is free to take as many turns as desired in the interim, fully capitalizing on these buffs where others would have long expired. Asta’s SPD buff is no slouch either, allowing Seele to attack enemies more frequently, as well as easily max out the passive of In the Night even before using her Skill. As Asta’s SPD buff is teamwide, Seele’s teammates can still generate Skill Points even when Seele is hovering around 200+ SPD. The only drawback for Asta is that she prefers to use her Skill, but you should consider that Asta’s SP consumption is still far less than that of the above Seele and Bronya combination. |
 Hanya | Hanya, like Asta, provides buffs to Seele’s damage and a large amount of SPD — but unlike Asta, Hanya generates Skill Points without sacrificing any of her buffing. Care should be taken to avoid defeating marked enemies immediately after Hanya applies Burden, as that can result in removing Burden before both Skill Points can be recovered. |
Notable Anti-Synergies
Other Damage Dealers
 Other damage dealers | Other damage dealers can frequently steal kills from Seele, thus denying her the opportunity to trigger Resurgence. On top of this, characters like Dan Heng・Imbibitor Lunae and Qingque also use a fair amount of SP to deal damage, directly conflicting with Seele’s desire to do the same. | ||
Teams
Teambuilding Overview

Seele works best when built as the sole damage dealer in a team, due to her Resurgence mechanic and strong personal damage. Generally, team building begins with evaluating what buffers are available to Seele, and what sort of enemies she is up against. This may involve deciding on the lineup for the other team, as a great deal of damage dealers have stricter requirements for their teams than Seele.
You should first decide on whether Seele needs a Quantum Weakness implant from Silver Wolf, or if she is going to use Skill Point-hungry supports such as Bronya, Asta, or Huohuo — these characters will largely dictate what other supports you can fit into Seele’s team.
The choice of whether to use Silver Wolf is generally dependent on the enemy matchup, as well as what other units are available. Since Silver Wolf’s damage amplification is single-target, she works best when Seele is facing at most two Bosses or Elite enemies at once, especially if they do not have Quantum Weakness. If Silver Wolf needs to use her Skill often, the team can also run into problems if she is paired with SP-negative supports such as Bronya.
If Seele is paired with Bronya, you should look to have the remaining supports be as SP positive as possible. In some circumstances, even Tingyun or Silver Wolf will consume enough SP that Seele cannot maximize her potential in this team. Pairing Seele with Asta can result in a similar predicament.
SPD tuning is only necessary if pairing Seele with Bronya; the specifics of which are covered below. Otherwise, supports should ideally be as fast as reasonably possible in order to help generate SP for Seele.
Teams with Asta
When pairing Asta with Seele you should look to bring as many SP-positive supports as you can, since Asta works best when using her Skill to build up Energy and Charging stacks. This is especially true if she has few of her Eidolons unlocked. With Asta’s E2, it is much easier to maintain Charging stacks without the use of her Skill, and her E4 and E6 have similar quality-of-life upgrades.
Tingyun, Pela, Hanya, Ruan Mei, and sometimes Silver Wolf can all work well alongside Asta, and should be chosen based on availability and the enemy lineup you are facing.
Asta and Pela

A very accessible team that performs well in the right circumstances. Pela and Natasha provide SP for Seele’s high SP consumption, and can even allow Asta to use her Skill frequently. Natasha can take advantage of the 3★ Light Cone Multiplication to generate even more SP.
Asta and Ruan Mei

Another option for a team with Seele and Asta, using 5★ supports. Ruan Mei increases the team’s Weakness Break Efficiency and buffs Seele’s damage a considerable amount, all without using much SP.
Gepard is able to effortlessly sustain the team, especially due to the teamwide SPD boost from Asta’s Ultimate and the extended Weakness Broken state from Ruan Mei, which allow ample time for Gepard to get enough Energy for his Ultimate.
Teams with Bronya
Seele can already be quite SP-hungry if she triggers Resurgence often, so adding Bronya — who both consumes SP and gives Seele another turn to potentially consume even more SP — can easily lead to more SP consumption than the other party members can support. There are ways to mitigate this SP consumption, even without Bronya’s E1 or But the Battle Isn’t Over, as Seele can occasionally use her Basic ATK to ensure there is enough SP available when Bronya uses her Skill. Nonetheless, filling the remaining party slots with SP-positive supports is strongly encouraged. This may include buffers like Hanya, debuffers like Pela, and sustain units such as Luocha, Gepard, etc., who can sustain the team without needing to use SP.
As both Seele and Bronya have their Action Advanced when they use Basic ATK, a good baseline SPD for Bronya to target is no more than 94% of Seele’s SPD, including the SPD bonus from Seele’s Skill. At this relative SPD, Bronya will always take action after Seele as long as you don’t use Bronya’s Basic ATK after Seele only uses her Skill. The important thing to remember is: If you use Bronya’s Basic ATK, you must also use Seele’s Basic ATK at least once.
Video Example
Bronya and Hanya

Hanya is a good choice for a second buffer, as her SP generation can be reliably triggered by Seele’s frequent actions, and the SPD buff on Hanya’s Ultimate only applies to Seele herself, thus not interfering with Seele and Bronya’s Action Order. Keep in mind that Hanya needs to consume one SP to generate two, and in some situations may not be able to generate both SP if the enemy afflicted by Burden is defeated prematurely.
Luocha is a good pick for the sustain role, as he can effectively sustain the team without needing SP, and can use the 3★ Light Cone Multiplication for even faster SP generation.
Bronya and Pela

Another option for the second support is Pela, who can fulfill her role without needing to use her Skill, and can even use 4-Pc Eagle of Twilight Line and Before the Tutorial Mission Starts to give her an Action Advance whenever she uses her Ultimate, allowing for very fast SP generation.
Lynx, much like Luocha in the previous example, can use Multiplication to generate SP for the team, and although she does not heal quite as much as Luocha, is able to provide enough healing with her Ultimate and Talent to effectively sustain the team in most scenarios.
Teams with Tingyun
In contrast to the above examples, Tingyun allows for a decent degree of freedom in Seele’s supports, as well as giving some notable advantages to Seele in scenarios with few enemies, where Seele cannot consistently activate Resurgence to enter the buffed state.
Since Tingyun also consumes very little SP, there is room for other supports that may occasionally want to use their Skills, such as Huohuo, Fu Xuan, Ruan Mei, etc., where Bronya or other buffers may not afford the same luxury.
Tingyun and Huohuo

Tingyun and Hanya buff Seele’s damage without consuming much SP. This allows for Huohuo — a healer that may be hard to use in Seele’s other teams due to her SP consumption — enough room to fulfill her role as a sustain unit. Additionally, Huohuo’s Ultimate increases the team’s ATK and regenerates Energy for all of her allies, which is good for both Seele and Tingyun. The frequent Ultimates Seele is able to get makes this team very strong in single-target scenarios where Seele cannot trigger Resurgence.
Teams with Silver Wolf
These teams center around pairing Seele and Silver Wolf with another support and a sustain character according to enemy Weaknesses, in order to maximize the chance of a successful Quantum Weakness implant.
It should be noted that Silver Wolf can only debuff one enemy at a time, and can be difficult to use in AoE scenarios, particularly if Seele needs Silver Wolf’s debuffs to trigger Resurgence. Additionally, she may need to use her Skill more often than usual to implant Weakness on multiple Elites or Bosses, which can affect the team’s SP consumption to the point that running supports like Bronya or Asta can be exceedingly tricky.
Silver Wolf’s single-target nature also means that in a lot of cases, she is not entirely necessary for Seele to perform to her best, especially because a good deal of enemies are already Quantum-Weak, and thus do not require Silver Wolf’s Weakness implant. It should go without saying that, although appealing to some degree, a team consisting solely of Quantum-Type units is unlikely to be the optimal choice for any given scenario.
Although Seele’s teams with Silver Wolf can take many forms depending on the enemies you are up against, here are some example teams that target a specific Weakness on enemies. For more information on how to build a team with Silver Wolf, see the Silver Wolf Guide.
Against Enemies with Lightning Weakness

An effective team against Boss enemies, as Silver Wolf brings strong single-target debuffs, and Tingyun lets Seele maintain her buffed state without needing to trigger Resurgence. This is an especially strong team in scenarios with one or two enemies.
Against Enemies with Physical Weakness

Hanya’s SP generation makes it easier for Fu Xuan to refresh the duration on her Matrix of Prescience, and Fu Xuan supports Seele by providing both damage mitigation and CRIT Rate.
Against Enemies with Ice Weakness

Pela and Gepard can both fulfill their roles without needing to use SP. Although Pela and Silver Wolf can reach 100% DEF Reduction on a single enemy, that is not the case in AoE. Pela’s AoE debuffs can also help mitigate Silver Wolf’s single-target nature.
Credits
Authors
N[L]Rem
Verifiers
Akane
jas
Ley
Publishers
nyte
spphrs
Infographic
Design: euphorysm
Content: N[L]Rem
References
Seele In The Night Crit Ratio by N[L]Rem
Changelog
- 23 February 2024 – Published for v1.6

 Technique | Phantom Illusion
 Ascension 2 Bonus Ability | Nightshade
 Ascension 4 Bonus Ability | Lacerate
 Ascension 6 Bonus Ability | Rippling Waves
 Eidolon 1 | Extirpating Slash
 Eidolon 3 | Dazzling Tumult
 Eidolon 4 | Flitting Phantasm
 Eidolon 5 | Piercing Shards
 Eidolon 6 | Shattering Shambles