
Updated for Version 2.0
Note that the information given may change if new discoveries are made. More extensive testing is in progress.
Join our Discord to check on and participate in the theorycrafting process.
Table of Contents
Introduction
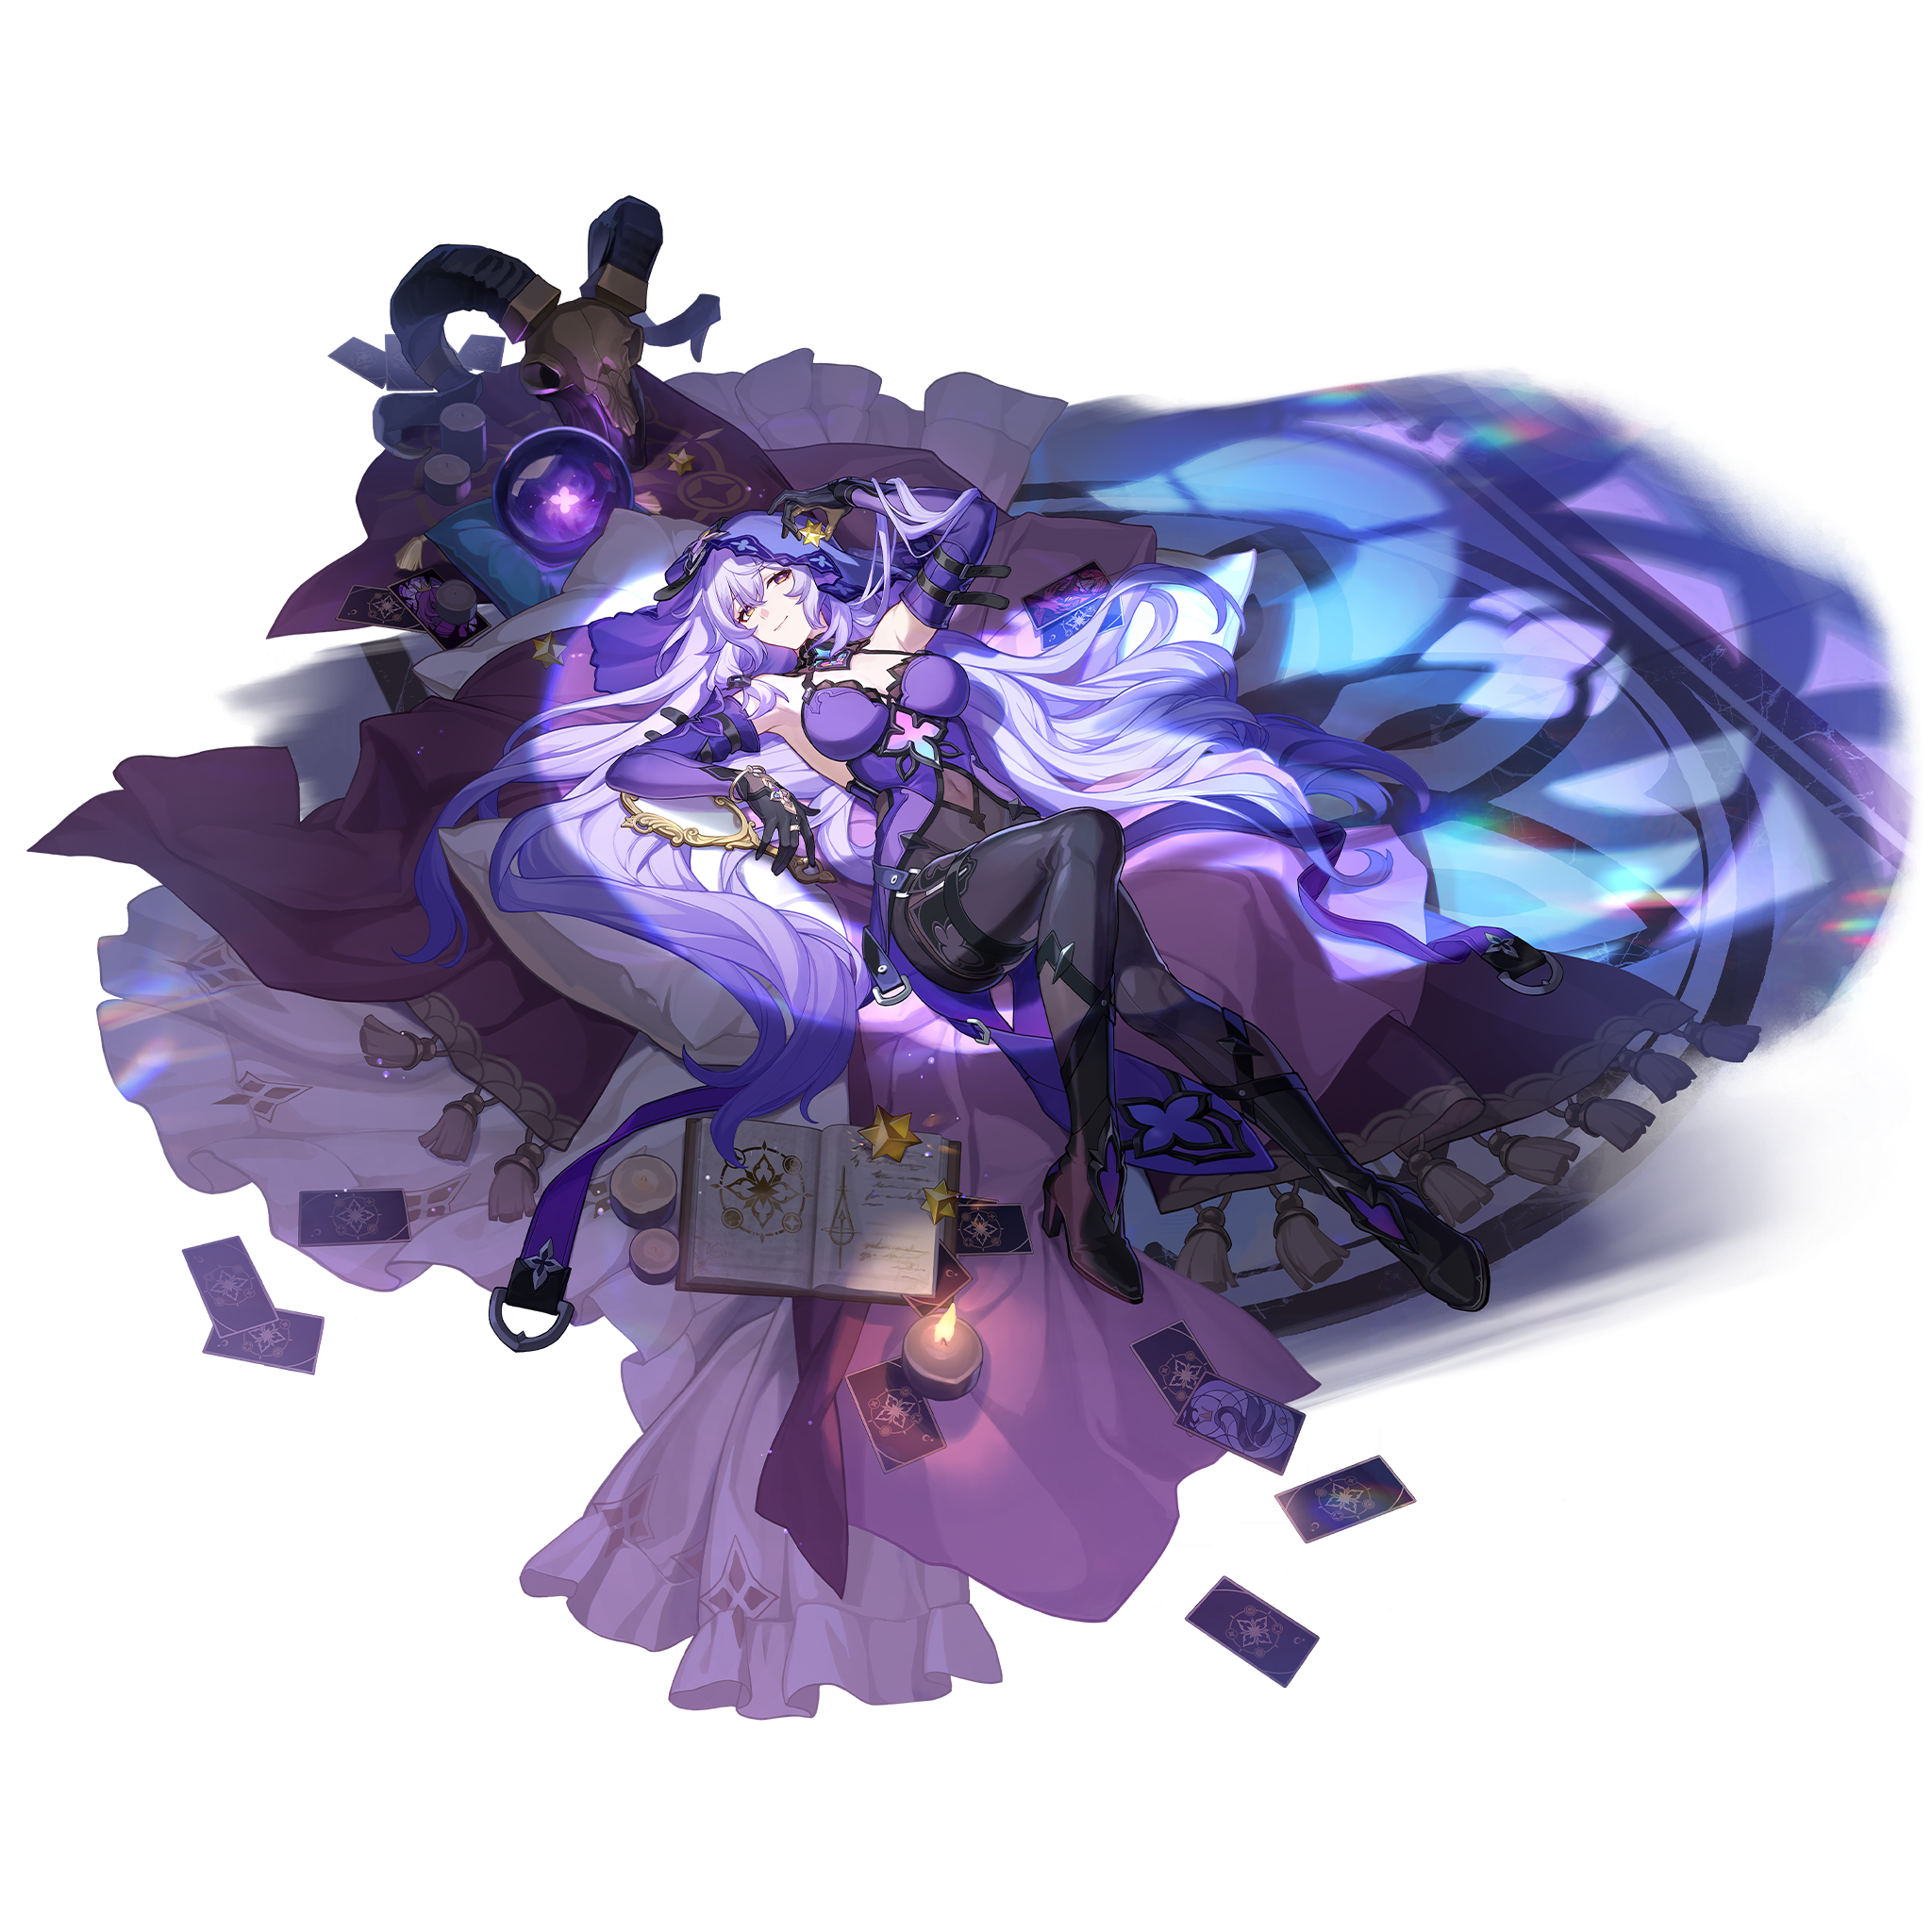
Black Swan is a 5★ Wind-Type Nihility character in Honkai: Star Rail. With the ability to apply both DEF Reduction and a DoT effect, she brings a lot to the table with a combination of debuffs and damage. With her unique kit of stacking a unique DoT called “Arcana”, she brings a new aspect to DoT-based kits that focus on getting as many stacks of Arcana as possible, unlike other DoT units that want the DoT to trigger as fast as possible.
Infographic
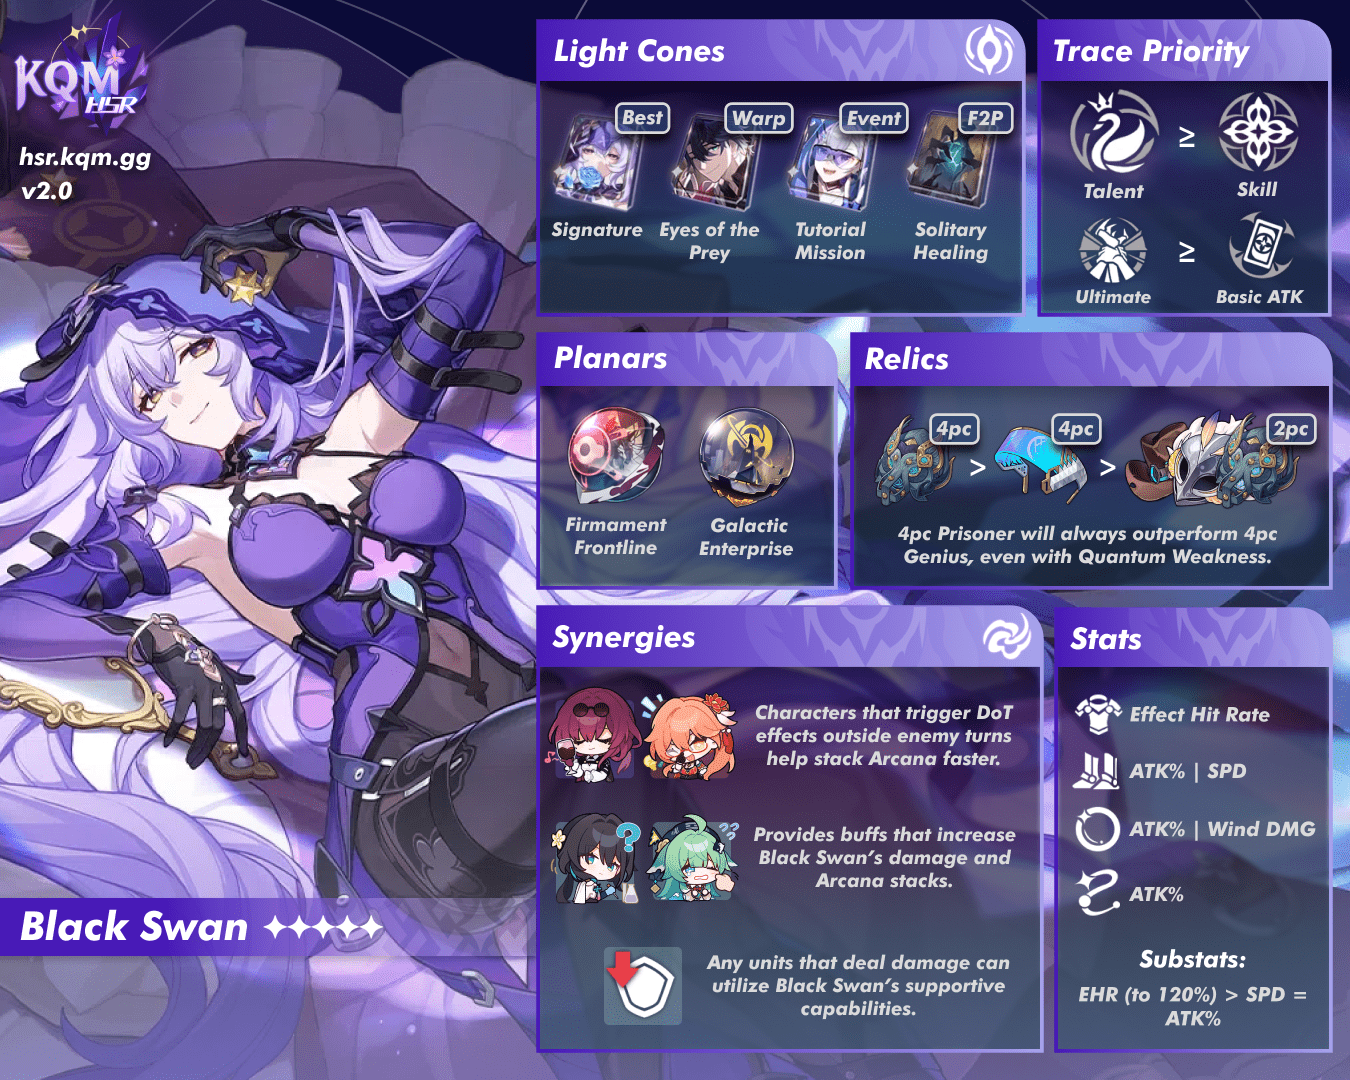
Design: euphorysm | Content: Akane
Character Overview
Black Swan’s kit revolves around a unique DoT effect called “Arcana.” Arcana deals Wind damage, and gains increasingly powerful effects as it reaches higher stack counts. Black Swan’s effectiveness in battle is directly tied to how quickly and how high Arcana can be stacked on each enemy before their turn comes.
There are three ways to stack Arcana: dealing DoT on enemy turns, attacking enemies with Black Swan’s Basic ATK or Skill, and triggering DoT outside of enemy turns via ally attacks. In each of these cases, the enemy gains more Arcana stacks for each unique DoT effect on the enemy. Because of this, Black Swan wants as many DoT effects on enemies as possible.
By default, Arcana stacks reset to 1 after it deals damage when an enemy’s turn comes, but Black Swan’s Ultimate applies a debuff that delays this reset by one enemy turn and causes Arcana to be considered as all four types of DoT effect (Bleed, Burn, Shock, and Wind Shear) at once. This second effect allows characters like Luka and Guinaifen, who can trigger Bleed and Burn outside of enemy turns, to trigger damage from Arcana when they trigger damage from any Bleed and Burn effects. Black Swan’s Ultimate also applies a Vulnerability effect, but it only takes effect during enemy turns, which means it cannot amplify damage dealt outside of enemy turns (for instance, via Kafka’s Skill).
Playstyle
Black Swan is first and foremost a damage dealer, focused on dealing damage via Arcana. Since Arcana forms the vast majority of her damage, Black Swan is typically paired with one or more other DoT units, and the team’s actions should be optimized around building up and maintaining as many Arcana stacks on enemies as possible.
In battle, Black Swan should use her Skill frequently enough to maintain full uptime on her DEF Reduction debuff. Beyond this, her actions depend heavily on both the team’s SP needs and her own Energy needs. Although both her Basic ATK and Skill can increase Arcana stacks on an enemy, her Skill generates more Energy and hits three enemies instead of one, so it is strictly better to use her Skill when possible.
This, however, comes at the cost of SP generation, and Black Swan’s teams tend to have multiple other characters that need to consume SP, forcing her to use a mix of Skills and Basic ATKs. Additionally, as she tends to defeat weaker enemies very quickly, some scenarios may require Black Swan to use her Skill quite often, requiring greater SP generation from her allies. Her Ultimate should generally be cast immediately once available, or delayed slightly if doing so would result in a larger Arcana stack count when the affected enemy’s next turn comes.
Traces
 Basic ATK | Percipience, Silent Dawn
Trace Description
Percipience, Silent Dawn [Single Target]
Deals Wind DMG equal to 30%/60%/66% of Black Swan’s ATK to a single target enemy, with a 50%/65%/68% base chance of inflicting 1 stack of Arcana. And if the hit target currently has Wind Shear, Bleed, Burn, or Shock applied to them, each respectively has a 50%/65%/68% base chance of inflicting 1 extra stack of Arcana onto the enemy.
A unique Basic ATK, this is Black Swan’s primary way of applying Arcana in single-target, scaling well with teammates that can apply DoT effects.
 Skill | Decadence, False Twilight
Trace Description
Decadence, False Twilight [Blast]
Deals Wind DMG equal to 45%/90%/99% of Black Swan’s ATK to a single target enemy and any adjacent targets. At the same time, there is a 100% base chance of inflicting 1 stack of Arcana on the target enemy and the adjacent targets. And there is a 100% base chance of reducing the DEF of the target enemy and the adjacent targets by 14.8%/20.8%/22%, lasting for 3 turn(s).
Black Swan’s Skill applies Arcana and DEF Reduction to three enemies, increasing team damage, and synergizing well with other sources of DEF Reduction. It should be used over her Basic ATK when SP allows.
 Ultimate | Bliss of Otherworld’s Embrace
Trace Description
Bliss of Otherworld’s Embrace [AoE]
Inflicts Epiphany on all enemies for 2 turn(s).
Enemies affected by Epiphany take 15%/25%/27% more DMG in their turn, and their Arcana effect is regarded as Wind Shear, Bleed, Burn, and Shock effects. In addition, when their Arcana effect is triggered at the beginning of the next turn, the Arcana stacks are not reset. The stack non-reset effect can be triggered up to 1 time(s) in Epiphany’s duration, and its charges are replenished when Epiphany is applied again.
Deals Wind DMG equal to 72%/120%/129.6% of Black Swan’s ATK to all enemies.
The Epiphany debuff only increases damage enemies take during their own turn, so to take full advantage of this bonus you should wait to use damaging Ultimates until the enemy takes a turn.
Even with Black Swan’s Ultimate active, Arcana is still only considered one DoT for Relic set effects, like 4pc Prisoner in Deep Confinement, but will allow characters who interact with specific DoT types to trigger those effects off of enemies inflicted with Arcana.
With Black Swan’s Ultimate active, her Basic ATK and Skill can each add up to 5 stacks of Arcana to a target that already has the Arcana debuff.
 Talent | Loom of Fate’s Caprice
Trace Description
Loom of Fate’s Caprice [Impair]
Every time an enemy target receives DoT at the start of each turn, there is a 50%/65%/68% base chance for it to be inflicted with Arcana.
While afflicted with Arcana, enemy targets receive Wind DoT equal to 96%/ 240%/264% of Black Swan’s ATK at the start of each turn. Each stack of Arcana increases this DoT DMG multiplier by 4.8%/12%/13.2%. Then Arcana resets to 1 stack. Arcana can stack up to 50 times.
Only when Arcana causes DMG at the start of an enemy target’s turn, Black Swan triggers additional effects based on the number of Arcana stacks inflicted on the target:
When there are 3 or more Arcana stacks, deals Wind DoT equal to 72%/180%/198% of Black Swan’s ATK to adjacent targets, with a 50%/65%/68% base chance of inflicting 1 stack of Arcana on adjacent targets.
When there are 7 or more Arcana stacks, enables the current DoT dealt this time to ignore 20% of the target’s and adjacent targets’ DEF.
The Arcana debuff is the primary source of Black Swan’s damage. At high enough stacks, her Talent grants Arcana the ability to do both AoE damage and ignore a portion of the target’s DEF.
Note that the bonus effects from the number of stacks are only applied when Arcana deals damage on the target’s turn, and effects that trigger DoT will only deal the base damage value.
Arcana will always do damage last of any DoT effects applied on the enemy, accumulating stacks from previous DoT triggered, though if the enemy dies before it detonates she will not gain the AoE trigger.
Arcana is always considered to be Wind Shear, but is not resisted by enemies with Wind Shear RES.
 Technique | From Façade to Vérité
Trace Description
From Façade to Vérité [Enhance]
After this Technique is used, there is a 150% base chance for each enemy to be inflicted with 1 stack of Arcana at the start of the next battle. For each successful application of Arcana on a target, inflicts another stack of Arcana on the same target. This process repeats until Arcana fails to be inflicted on this target. For each successive application of Arcana on a target, its base chance of success is equal to 50% of the base chance of the previous successful infliction of Arcana on that target.
Allows Black Swan to frontload Arcana stacks at the start of battle, which can trigger the secondary effects against enemies that act before you can apply DoT on them.
 Ascension 2 Bonus Ability | Viscera’s Disquiet
Trace Description
Viscera’s Disquiet
After using the Skill to hit an enemy that has Wind Shear, Bleed, Burn, or Shock, each of these debuffs respectively has a 65% base chance of inflicting 1 extra stack of Arcana.
Grants Black Swan’s Skill the same ability to apply Arcana as her Basic ATK, meaning you do not lose out on stacks when reapplying her DEF Reduction.
 Ascension 4 Bonus Ability | Goblet’s Dredges
Trace Description
Goblet’s Dredges
There is a 65% base chance to inflict 1 stack of Arcana when a target enters battle. Every time an enemy target receives DoT during a single attack by an ally, there is a 65% base chance for the target to be inflicted with 1 stack of Arcana, stacking up to 3 time(s) during 1 single attack.
Ensures that all enemies start with at least one stack of Arcana, and allows Black Swan to stack Arcana faster, increasing her synergy with characters who can detonate DoT effects.
 Ascension 6 Bonus Ability | Candleflame’s Portent
Trace Description
Candleflame’s Portent
Increases this unit’s DMG by an amount equal to 60% of Effect Hit Rate, up to a maximum DMG increase of 72%.
The DMG Boost caps at 120% Effect Hit Rate. This bonus allows Black Swan to build more EHR without losing out on damage.
Note: Trace levels shown are 1/10/12 (Basic ATK 1/6/7).
Trace Priority
≥ ≥ ≥
Talent ≥ Skill ≥ Ultimate ≥ Basic ATK
Black Swan’s Arcana debuff, which provides the vast majority of her damage, is based on her Talent Level. Leveling her Skill and Ultimate primarily increase her supportive abilities through the debuffs they apply. Her Basic ATK should not be ignored either, as leveling it increases the base chance for it to apply Arcana stacks, and it will often be used in SP-neutral or SP-positive rotations.
Overall, all of Black Swan’s Traces are worth leveling, with her Talent being the main priority.
Eidolons
 Eidolon 1 | Seven Pillars of Wisdom
Eidolon Description
While Black Swan is active in battle, enemies afflicted with Wind Shear, Bleed, Burn, or Shock will have their corresponding Wind, Physical, Fire, or Lightning RES respectively reduced by 25%.
A large damage increase with permanent uptime for DoT teams. While Epiphany is active on an enemy, Black Swan can reduce Wind, Physical, Fire, and Lightning RES with just her Arcana debuff, expanding her team support capabilities even further.
Each type of RES reduction is also considered a separate debuff for sets like Pioneer Diver of Dead Waters.
 Eidolon 2 | Weep Not For Me, My Lamb
Eidolon Description
When an enemy target afflicted with Arcana is defeated, there is a 100% base chance of inflicting 6 stack(s) of Arcana on adjacent targets.
A nice upgrade in scenarios with multiple targets, and especially good when facing content that spawns many additional enemies like Pure Fiction and certain Elites and Bosses.
 Eidolon 3 | As Above, So Below
Eidolon Description
Skill Lv. +2, up to a maximum of Lv. 15.
Talent Lv. +2, up to a maximum of Lv. 15.
Black Swan’s Talent provides the majority of her damage through the Arcana DoT, so this extra scaling makes for a decent upgrade.
 Eidolon 4 | In Tears We Gift
Eidolon Description
While in the Epiphany state, enemy targets have their Effect RES reduced by 10%. And at the start of their turn or when they get defeated, Black Swan regenerates 8 Energy. This Energy Regeneration effect can only trigger up to 1 time while Epiphany lasts. And this trigger count resets after the enemy gets inflicted with Epiphany again.
The Effect RES Reduction can make applying Arcana more consistent against enemies with high innate Effect RES, and the Energy helps Black Swan cycle her Ultimate faster, but only generally in AoE scenarios.
 Eidolon 5 | Linnutee Flyway
Eidolon Description
Ultimate Lv. +2, up to a maximum of Lv. 15.
Basic ATK Lv. +1, up to a maximum of Lv. 10.
The only upside of this Eidolon is the increase in Vulnerability scaling from her Ultimate and the base chance of applying Arcana with her Basic ATK. Other than that, this Eidolon is not particularly noteworthy.
 Eidolon 6 | Pantheon Merciful, Masses Pitiful
Eidolon Description
When enemy targets get attacked by Black Swan’s allies, Black Swan has a 65% base chance of inflicting 1 stack of Arcana on the target.
Each time Black Swan inflicts Arcana on an enemy target, there is a 50% fixed chance to additionally increase the number of Arcana stacks afflicted this time by 1.
Allows all allies to apply Arcana on their attacks, and increases the amount of Arcana stacks that can be applied at once.
Build
Light Cones
 Reforged Remembrance | The large amount of Effect Hit Rate increases Black Swan’s Arcana stacking consistency and DMG% via her A6 Bonus Ability, while the Prophet effect significantly increases her personal damage. Black Swan is able to obtain all 4 stacks of Prophet on her own thanks to her Ultimate, which, when paired with Arcana’s DEF Ignore and her Skill’s DEF Reduction, adds up to nearly 70% DEF Reduction when Arcana triggers, before any bonuses from Relics and other debuffs. |
 Before the Tutorial Mission Starts | The Effect Hit Rate increases both Black Swan’s damage and debuff consistency, and the extra Energy on attacks can significantly improve her Ultimate uptime. |
 Eyes of the Prey | Like Before the Tutorial Mission Starts, this Light Cone also provides a good amount of Effect Hit Rate, but increases Black Swan’s DoT damage instead of providing Energy, making it a strong choice for her personal damage. |
 Incessant Rain | Although it provides less Effect Hit Rate than S2+ Before the Tutorial Mission Starts or S2+ Eyes of the Prey, it offers good base stats as well as a potent Vulnerability debuff. However, since Incessant Rain can only apply Aether Code to one enemy per attack, the value of this Light Cone is diminished against multiple enemies. |
 Patience Is All You Need | Provides some DMG% and a useful SPD buff. Erode helps apply additional Arcana stacks on enemies, especially outside of Epiphany. It is better to use this Light Cone on Kafka if you have her, but still a solid choice otherwise, alleviating some of Black Swan’s stat needs. At E1, this could be used on Black Swan in niche cases to provide Lightning RES Reduction for other damage dealers. |
 Good Night and Sleep Well | Does not provide any additional utility, but Black Swan can apply three debuffs on her own to gain the full effect of Light Cone, making it a solid choice for her personal damage — although strictly inferior to Eyes of the Prey at equal superimpositions. |
 Solitary Healing | Increased DoT damage after using Ultimate is always appreciated, and the Energy helps with Ultimate uptime in AoE scenarios like Pure Fiction. |
 It’s Showtime | A decent baseline option, the passive is easy to stack and Black Swan meets the Effect Hit Rate threshold with a normal build. |
 Resolution Shines As Pearls of Sweat | Provides additional DEF Reduction that goes well with Black Swan’s Skill, but does not provide any Effect Hit Rate. |
Relics
Relic Sets
 4-Pc Prisoner in Deep Confinement | Black Swan’s Best-in-Slot Relic Set. Gives her unconditional ATK% and DEF Ignore based on how many DoT effects are on an enemy. The DEF Ignore from this set can further amplify the damage increases from Black Swan’s own DEF Reduction and DEF Ignore via her Skill and Talent, as well as the DEF Ignore from her Signature Light Cone Reforged Remembrance. One DoT party member paired with Black Swan can easily reach 3 stacks with the inclusion of DoT effects from Weakness Break. |
 4-Pc Genius of Brilliant Stars | A flexible option that provides 10% unconditional DEF Ignore, and 10% more when the enemy is weak to Quantum. Like with the 4-Pc Prisoner set, the DEF Ignore from this set amplifies the effect of other sources of DEF Reduction and/or DEF Ignore. However, If you do not already have a good 4-Pc Genius set, it is not recommended to farm this set specifically for Black Swan, as the 4-Pc Prisoner set mentioned above still performs significantly better. |
    2-Pc Combinations | Mixtures of 2-Pc sets are a functional alternative if you do not have a 4-Pc Prisoner set available, but you should switch as soon as possible, as the 4-Pc Prisoner set is significantly stronger. Options include 2-Pc Musketeer of Wild Wheat, 2-Pc Prisoner in Deep Confinement, 2-Pc Pioneer Diver of Dead Waters, and 2-Pc Eagle of Twilight Line. |
Planar Ornaments
 2-Pc Firmament Frontline: Glamoth | This is Black Swan’s Best-in-Slot Planar set, provided she has 160 SPD to gain the full Set Effect. However, it is difficult to get 160 SPD without sacrificing other useful stats such as Effect Hit Rate or ATK. At 135 SPD, this set performs similarly to Pan-Cosmic Commercial Enterprise and Space Sealing Station. This set is also paired with Penacony, Land of the Dreams, a useful Planar Ornament Set for supports. |
 2-Pc Pan-Cosmic Commercial Enterprise | Due to its passive that converts a percentage of the wearer’s Effect Hit Rate to ATK%, this is a great alternative to Firmament Frontline: Glamoth. Notably, this is the only Planar Ornament Set that Black Swan can fully utilize without at least 120 SPD from SPD Boots or SPD substats; If you have neither, this set pulls ahead of the others by a good margin. However, it is not recommended to farm this set, since few characters can use it well, and it drops alongside Celestial Differentiator, a poor option on all characters. If you are still determined to use this Planar Ornament Set, it is best to use the Omni-Synthesizer to acquire it. |
 2-Pc Space Sealing Station | A generalist set that provides a lot of ATK, performing similarly to Firmament Frontline: Glamoth when Black Swan has at least 120 SPD, but less than 160 SPD. It drops alongside Fleet of the Ageless, generally considered the best support set for DoT teams. |
Stats
 Body |  Boots |  Sphere |  Rope |
| Effect Hit Rate | SPD | ATK% | ATK% | Wind DMG% | ATK% |
Substats
Effect Hit Rate% (until 120%) > SPD = ATK%
How much Effect Hit Rate do you need?
It is sufficient to stop at 120% Effect Hit Rate only to gain the full effect of Black Swan’s A6 Bonus Ability, as that will guarantee Arcana application against enemies with 30% Effect RES or lower, assuming Lv. 10 Traces. Even at 120% Effect Hit Rate, Black Swan’s chance of applying Arcana against enemies with greater than 30% Effect RES is still high enough to be considered consistent.
If you don’t have a Light Cone that provides Effect Hit Rate, it can be unreasonably difficult to reach 120% total Effect Hit Rate. In these cases, it’s not necessary to chase Effect Hit Rate over all other stats. It’s perfectly fine to settle for a lower value — even at 98% Effect Hit Rate, Black Swan still has a 90% chance to apply Arcana against enemies with 30% Effect RES.
SPD vs ATK% Boots
With strong SPD buffers like Asta or Hanya, Black Swan generally prefers ATK% Boots. Otherwise, the two main stats perform about the same. Use whichever option has better substats, as long as you’re able to reach required SPD values (like 120 SPD to activate Space Sealing Station’s secondary passive, for example).
ATK% vs Wind DMG% Sphere
Depending on substats, these two main stats are very close in performance. If pairing Black Swan with a support that grants a lot of DMG% like Ruan Mei, an ATK% Sphere would be ideal. If pairing Black Swan with a support that grants a lot of ATK, like Asta, a Wind DMG Sphere would be ideal.
Energy Breakpoints
If your goal is to maximize Black Swan’s damage, it is not recommended to run an Energy Regeneration Rate Rope. The rotations will highly depend on the situation Black Swan is in; if the team needs SP, she should use her Basic ATK, and if there is SP to spare, she should use her Skill. The chart below shows a few common rotations that Black Swan can take to regain her Ultimate.
| Light Cone | Rotations | SP Value | ||
| Any | 0 Basic | 4 Skill | 1 Ultimate | -4 |
| 3 Basic | 2 Skill | 1 Ultimate | +1 | |
| Before the Tutorial Mission Starts |
3 Basic | 1 Skill | 1 Ultimate | +2 |
For a full breakdown of Black Swan’s Energy and Rotations, see Akane’s Black Swan Energy Breakpoint Sheet.
E1 or S1?
E1 Description
Seven Pillars of Wisdom
While Black Swan is active in battle, enemies afflicted with Wind Shear, Bleed, Burn, or Shock will have their corresponding Wind, Physical, Fire, or Lightning RES respectively reduced by 25%.
S1 Description
Reforged Remembrance
Increases the wearer’s Effect Hit Rate by 40%. When the wearer deals DMG to an enemy inflicted with Wind Shear, Burn, Shock or Bleed, they will individually gain 1 stack of Prophet. This effect can stack up to 4 times. In a single battle, each type of DoT can only generate 1 stack of Prophet. Every stack of Prophet increases the wearer’s ATK by 5% and the DoT they deal will ignore 7.2% of the target’s DEF.
Black Swan’s first Eidolon, Seven Pillars of Wisdom, applies a significant RES decrease to the corresponding Type to enemies afflicted with Wind Shear, Bleed, Burn, or Shock. Since her Ultimate causes Arcana to be considered as all four types of DoT, it instantly applies this RES Reduction for all four damage Types, leading to a significant damage increase both for herself and her allies.
Black Swan’s Signature Light Cone, Reforged Remembrance, offers a large amount of Effect Hit Rate, as well as a potent personal damage increase from the Prophet buff, which she can fully stack up on her own through her Ultimate.
Black Swan’s signature Light Cone generally provides a stronger personal damage increase compared to her E1; however, because Black Swan’s best teams all have multiple damage dealers, her E1 tends to pull ahead for overall team damage, especially if enemies do not have Weaknesses corresponding to the Type of every damage dealer. If you do not have access to a Light Cone that provides Effect Hit Rate, Reforged Remembrance can provide a similar team damage increase to her E1, along with significant quality-of-life for her own Relic optimization — but in all other cases, E1 is a stronger choice.
Lastly, it’s important to consider the difficulty of obtaining each of these upgrades. The Light Cone banner has both a higher 5-star drop rate and a higher rate-up chance than the character banner, which makes Black Swan’s signature Light Cone easier to obtain than her first Eidolon. However, given that Black Swan has multiple good 4-star Light Cone options and her E1 can increase the entire team’s damage, her E1 will scale better in the long term.
Character Comparisons
Sampo

Black Swan and Sampo both function as Wind Shear damage dealers with AoE coverage to clear wave content faster. Both bring debuffs that allow them to support DoT-centric teams.
Sampo has more potent AoE abilities with a bounce Skill and AoE Ultimate, while Black Swan excels at dealing with 3 enemies with her Blast-targeting Skill and DoT. Although her Ultimate is AoE, when dealing with 3 or more enemies, it is quite hard to stack up Arcana on the enemies outside of her Skill’s range. Despite this, Black Swan has a much higher damage ceiling than Sampo, and her utility is not strictly limited to DoT Teams.
Guinaifen

Functionally, Guinaifen and Black Swan serve the same purpose in a team — Guinaifen applies a Vulnerability debuff through her Talent, while Black Swan applies DEF Reduction via her Skill, and the two also deal significant DoT. The method is different, but the result is the same: team-wide damage amplification and strong personal damage.
This doesn’t make them equal, however. Although they offer similar damage amplification via their universal debuffs, there’s no hiding it: Black Swan’s DoT blows Guinaifen’s out of the water. Teams with Guinaifen will nearly always see an overall improvement by using Black Swan instead.
Of course, they aren’t mutually exclusive, and thanks to Black Swan’s synergy with all types of DoT effects, they can be used together well, with each amplifying the other’s output.
Notable Synergies
DoT Enabler
 Kafka | Kafka triggers DoT effects immediately with her Skill and Ultimate, including Black Swan’s Arcana. With enough SPD, Kafka can trigger Black Swan’s A4 to increase Arcana stacks multiple times before an enemy’s turn comes and its stacks reset. Kafka’s many ways of applying Shock, such as her Ultimate, Talent, Technique, and even signature Light Cone, combined with her DoT detonation, make her more efficient at stacking Arcana than any other character listed here. | ||
 E4+ Sampo | At E4, Sampo’s Skill will trigger Wind Shear for a small percent of its damage on targets with 5+ stacks each time it bounces. This interaction also applies to Black Swan’s Arcana, which can be triggered by Sampo and allows him to act as a DoT Enabler, adding more stacks of Arcana to any enemies his Skill hits. | ||
 Luka | Luka’s Enhanced Basic ATK can detonate Arcana while Black Swan’s Ultimate debuff is active. He also applies a Bleed effect of his own that can help stack Arcana even further. However, Luka should only be run against enemies with Physical Weakness, because his output suffers significantly without the ability to cause Weakness Break. | ||
 Guinaifen | Much like Luka, Guinaifen applies her own DoT, and can detonate Arcana while Black Swan’s Ultimate debuff is active. Against enemies with 40% Effect RES, Guinaifen’s E1 allows Black Swan to guarantee Arcana stacks with only 120% Effect Hit Rate. | ||
Bufffer/Debuffer
 Ruan Mei | Ruan Mei gives Black Swan nearly everything she wants: strong DMG% buffs, Weakness Break Efficiency, All-Type RES PEN, and a SPD increase. She can even cause DoT effects to trigger more quickly when her Weakness Break extension triggers. | ||
 Asta | Asta’s teamwide ATK and SPD buffs greatly benefit teams with multiple DoT characters, and the Burn DoT applied by her Basic ATK can even help Black Swan stack Arcana faster. An excellent choice overall. Asta has many utilities that enhance Black Swan’s damage. She has DoT on her A2 Bonus Ability that allows for Black Swan’s Arcana to get more stacks, an ATK buff from her Talent, which she can keep at 100% uptime with her E2 and E6, and a huge party-wide SPD buff. All of this, paired with her SP-positive playstyles at high Eidolon, makes her a great buffer for Black Swan. | ||
 E0-E3 Sampo | Sampo’s notable personal DoT damage, in combination with his Ultimate’s DoT Vulnerability debuff, makes him a worthwhile addition to Black Swan teams. | ||
 Pela | Since DEF Reduction becomes stronger as it approaches 100%, Pela can provide significant damage increases for Black Swan in particular. Add onto this her SP positivity and her ability to debuff in AoE, and you have quite a potent synergy. Keep in mind, however, that enemy DEF Reduction cannot exceed 100%, so if you’re using Black Swan’s signature Light Cone Reforged Remembrance, the majority of Pela’s DEF Reduction is wasted, and she becomes far less valuable than other options. | ||
 Tingyun | Tingyun’s ATK buff, Benediction damage, and Energy transfer is almost universally valuable, and Black Swan appreciates it as much as any damage dealer. | ||
 Huohuo | Huohuo’s party-wide Energy regeneration and ATK buff are especially valuable for teams with multiple damage dealers, and Black Swan’s best teams all fit this description. Her higher-than-average SP consumption can be an issue, however — especially when Black Swan is paired with Kafka, who wants to use her Skill on every turn. In those cases, it’s best to pair her with a highly SP positive support. | ||
 Hanya | Hanya’s SP positivity is attractive for Black Swan’s teams, since she and her best allies tend to be somewhat SP negative. However, the bulk of Hanya’s buffs are locked behind her single-target Ultimate — and since Black Swan’s teams generally have two or more DoT units, Asta is generally a better choice unless the team is extremely SP-starved. | ||
Teams
Double DoT

Black Swan’s ideal team. She should be paired with another DoT character (ideally, one that can trigger DoT outside of enemy turns), a Harmony buffer with party-wide buffs or a Nihility debuffer with AoE debuffs, and a sustain unit for comfort.
Example Teams
4★ Team

This team focuses on getting as many turns as possible for Black Swan and Sampo by using Asta’s SPD Buff. Sampo should use his Skill as often as possible, and if SP is available, so should Black Swan. To facilitate this, Lynx can equip Multiplication to allow her to generate SP faster, and Asta can use her Basic ATK.
Although Luka or Guinaifen can replace Sampo on this team, this puts a greater reliance on Black Swan’s Ultimate, as it is the only way Luka or Guinaifen can trigger Arcana damage outside of enemy turns.
Black Swan and Kafka: Ruan Mei Variant

Kafka is an ideal partner for Black Swan, with a strong DoT effect of her own and multiple ways to trigger DoT outside of enemy turns. Ruan Mei grants significant party-wide buffs, along with a Weakness Break extension that can make enemies take DoT faster. Due to the relatively high SP consumption of this core, a strong SP generator is necessary — Luocha is a great choice, but any highly SP-positive sustain unit will work.
Black Swan and Kafka: Pela/Huohuo Variant

The strong core of Black Swan and Kafka is quite flexible, allowing a wide range of support options. In this variant, Huohuo sustains the team while providing Energy and ATK, and Pela generates SP while providing DEF Reduction that stacks with Black Swan’s own.
Triple DoT

Three DoT characters mean at least three different DoT effects, instantly maximizing the 4-Pc Prisoner in Deep Confinement Relic Set effect. These teams will generally not outperform variants with two DoT units and one Harmony unit, but at high investment, they can sometimes perform on par.
While Kafka is the obvious choice for such a team, the choice between the 4★ DoT characters largely boils down to the scenario you’re facing, as well as enemy Weakness; Luka is strong in single-target and against enemies with Physical Weakness, whereas Guinaifen is strong in AoE and against Fire-Weak enemies. Sampo is a strong generalist, with his strong AoE DoT and DoT Vulnerability debuff, and his ability to trigger Wind Shear outside of enemy turns at E4.
Example Teams
Kafka and Sampo

Ideal against enemies with Wind or Lightning Weakness but strong regardless, this team focuses on stacking Arcana as high as it can possibly go, especially with an E4 Sampo.
If Sampo is E4, he should use his Skill as often as SP allows. If not, he and Black Swan should alternate Skill usage with one another.
Sampo and Guinaifen

Without Kafka, this team has fewer options to trigger DoT effects outside of enemy turns, and thus cannot stack Arcana as high — but smart play can still produce good results. Guinaifen’s Ultimate can be timed to detonate her Burn DoT during Black Swan’s Ultimate, dealing extra damage and further stacking Arcana. If Sampo has his E4, he can also use his Skill to trigger Arcana’s damage and generate further stacks. Huohuo provides Energy and ATK to the whole team, allowing for greater uptime on Epiphany, as well as more Burn detonation from Guinaifen.
Debuffer

A supportive team building option that puts greater focus on Black Swan’s debuffs. Any damage dealer can make use of her DEF Reduction along with either a Harmony or another Nihility unit to further buff team damage. With proper Ultimate timing, some damage dealers can even benefit from her Ultimate’s Vulnerability, dealing damage between the two turns of an Elite or Boss enemy.
This team archetype benefits quite a bit from Black Swan’s E1, as long as the damage dealer paired with her deals Physical, Fire, Wind, or Lightning damage.
This team is highly flexible in terms of building, but suboptimal if Black Swan is decently invested, since she prefers to be paired with other DoT characters.
Example Teams
Black Swan and Dr. Ratio

In this team, Black Swan provides debuffs for Dr. Ratio’s Talent while contributing a decent amount of damage herself. Ruan Mei takes the third slot, providing strong teamwide buffs that benefit both Black Swan and Dr. Ratio, as well as an extra debuff via her Ultimate. For those without Ruan Mei, Pela is also a strong option. Luocha is chosen for the final slot due to his SP positivity, but a less SP-positive sustain like Fu Xuan or Huohuo can still work when using a more SP-positive support like Pela.
Credits
Authors
Akane
jas
Soul FIsh
Editors
jas
N[L]Rem
Reens
Calculations
Crimson
Akane
Publishers
qq
References
BS by Crimson
Black Swan Stuff by Akane
Black Swan Energy Breakpoints by Akane
Black Swan EHR by Cyn
Changelog
- 28 February 2024 – Reworded Relic/Planar sections, minor explanation changes to Eidolon 4 and Patience Is All You Need.
- 10 February 2024 – Published for v2.0