
Updated for Version 2.1
Note that the information given may change if new discoveries are made. More extensive testing is in progress.
Join our Discord to check on and participate in the theorycrafting process.
Table of Contents
Introduction
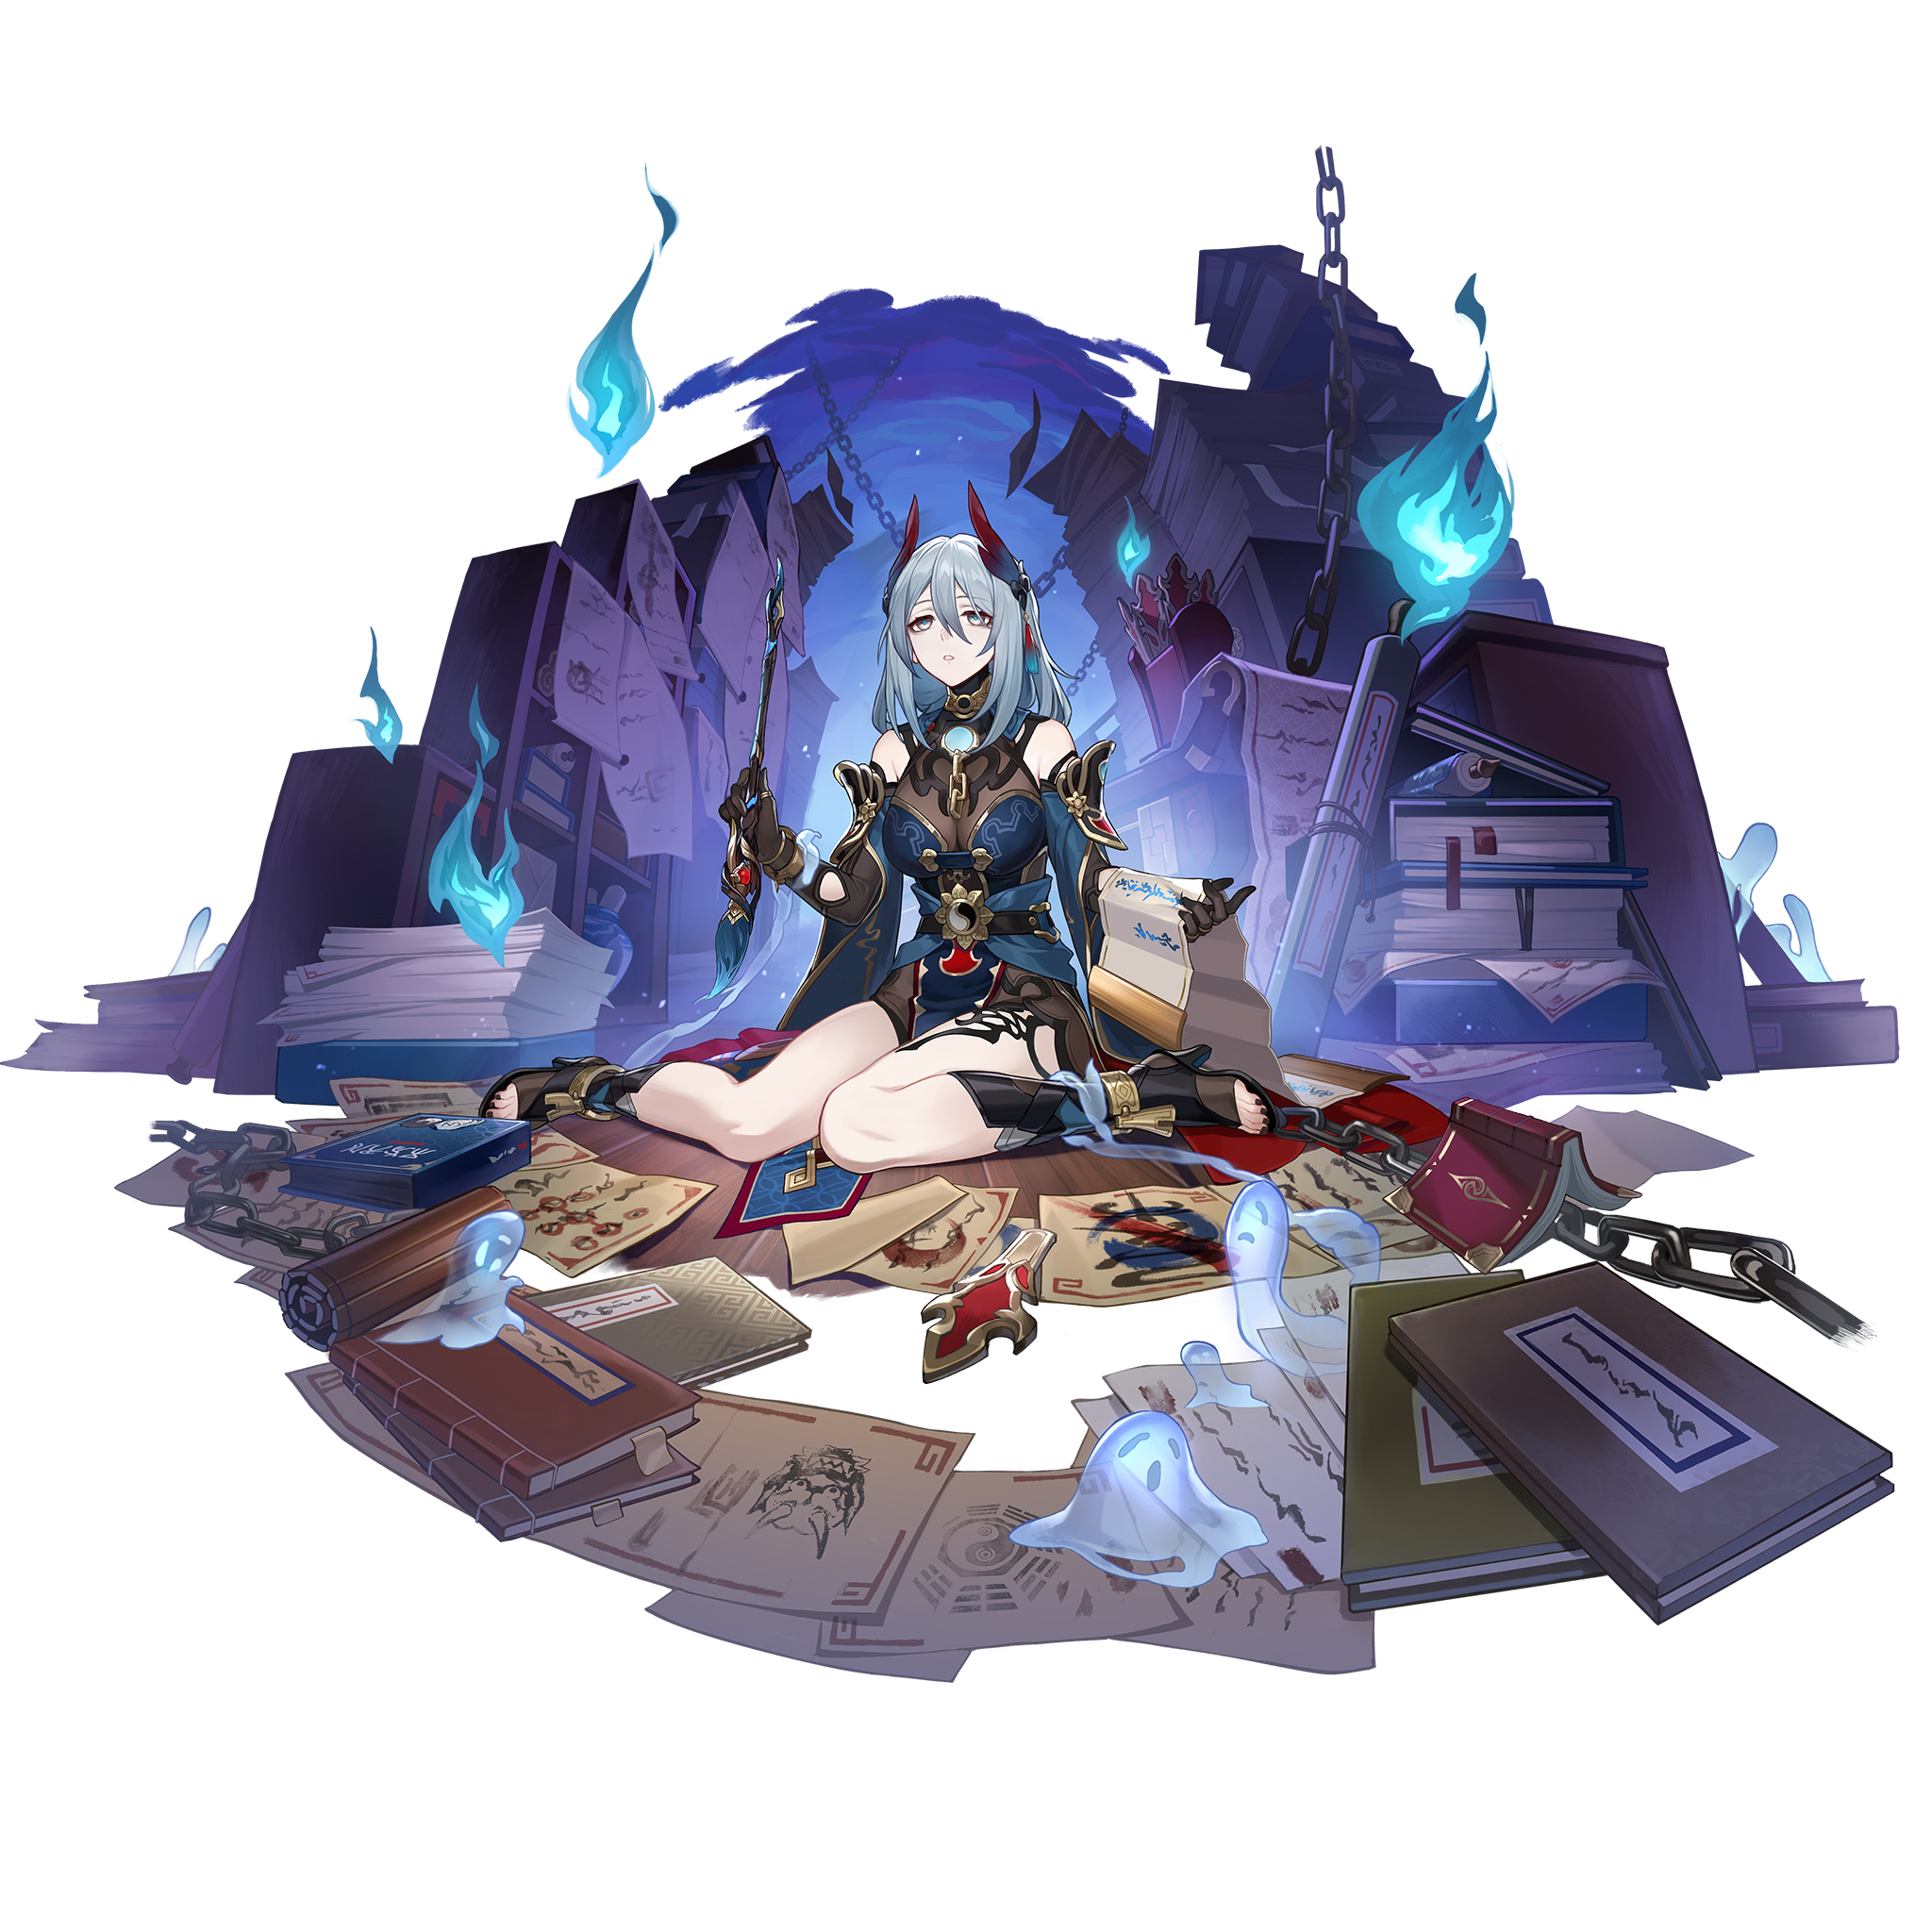
Hanya is a 4★ Physical-Type Harmony character in Honkai: Star Rail who is a SP-Positive single-target buffer. Her uniqueness lies in her Skill’s SP recovery, allowing SP hungry characters to use their Skills more often. She is also the first unit to use SPD as a scaling stat.
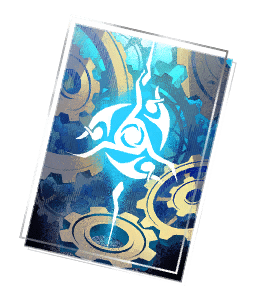
Infographic
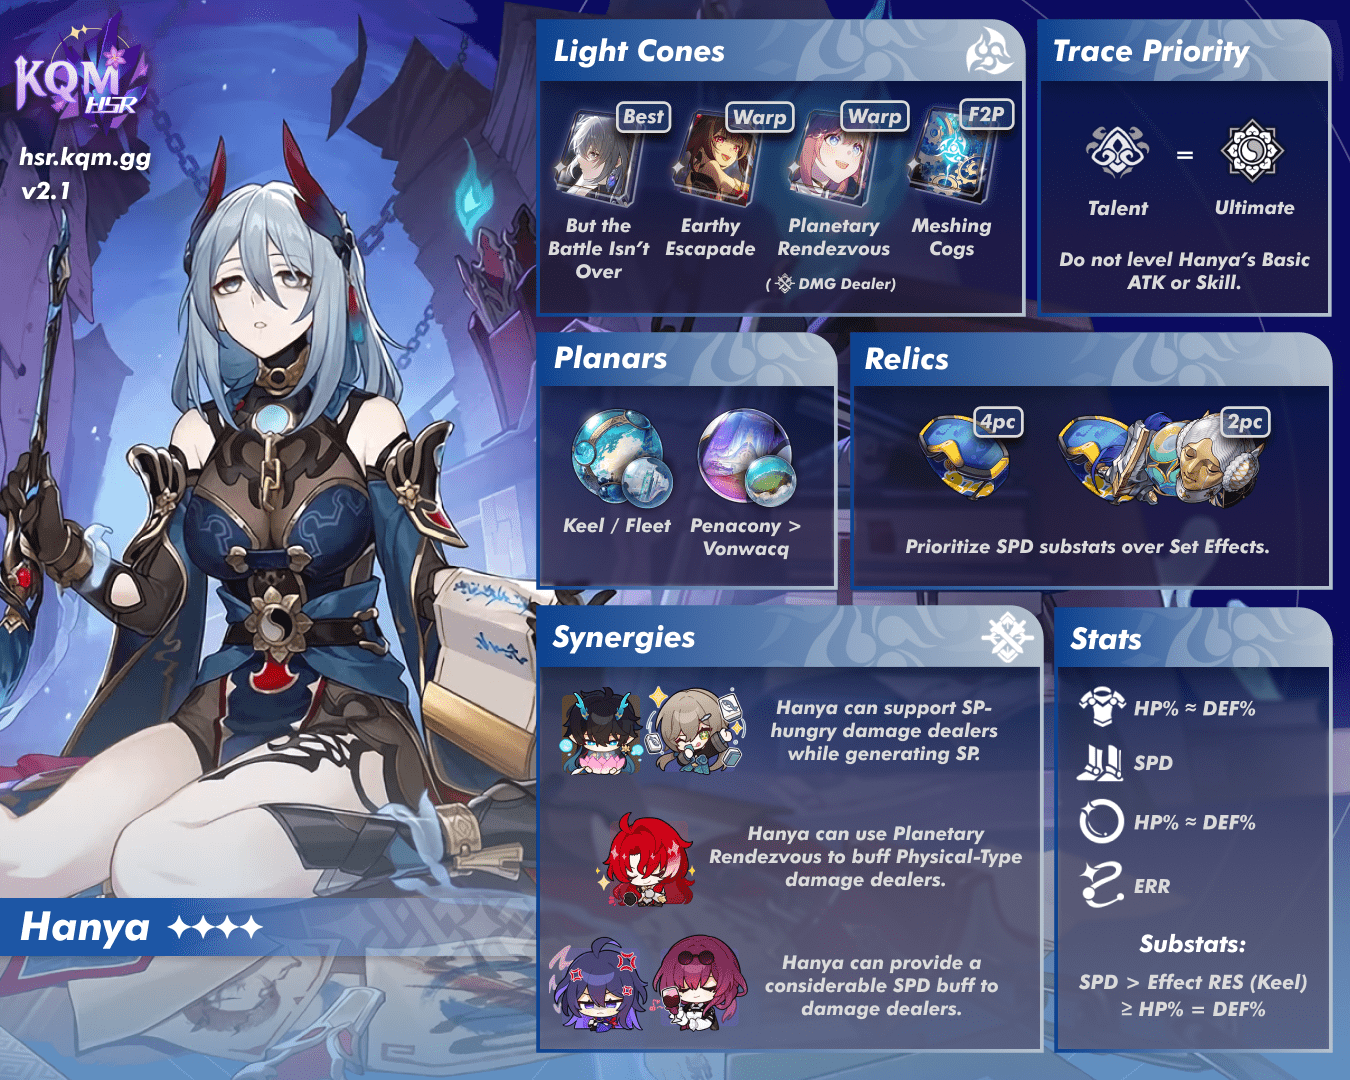
Credits: euphorysm (Design), N[L]Rem (Content)
Character Overview
Hanya can be used in many hypercarry teams due to her SP-Positivity. Compared to other Harmony characters, her ATK%, SPD, and DMG buffs are not world-changing, but still very helpful.
Hanya’s Skill applies Burden on an enemy, which recovers 1 SP every other attack that hits that enemy. It is dispelled after 4 attacks (including her Skill) are made on the enemy. As it recovers 2 SP at the cost of 1, it is equivalent to a Basic ATK in terms of SP gain, potentially allowing her to use it every turn while providing extra utility.
Hanya’s Ultimate increases the SPD and ATK% of an ally for 2 turns. This lets them gain more actions and deal even more damage. The duration of this buff is based on the target’s turns.
Although Hanya’s Skill’s buffs can apply to all allies with her Talent and A2 Bonus Ability, her Ultimate is single-target. Therefore, she functions better in hypercarry teams than dual damage dealer teams.
Playstyle
Although Hanya has a high SPD and attacks often, you should not build her as a damage dealer, due to her negligible damage and lack of self buffs. Instead, you should only use her as a support.
As a support, Hanya uses her Skill every turn in situations where Burden is quickly dispelled, or alternates between her Skill and Basic ATK if Burden is still applied on an enemy.
Hanya’s Ultimate is best used on the target’s turn, as the buff does not tick down on the turn it is applied.
Traces
 Basic ATK | Oracle Brush
Trace Description
Oracle Brush [Single Target]
Deals Physical DMG equal to 50%/100%/110% of Hanya’s ATK to a single enemy.
A standard Basic ATK.
 Skill | Samsara, Locked
Trace Description
Samsara, Locked [Single Target]
Deals Physical DMG equal to 120%/240%/264% of Hanya’s ATK to a single target enemy, then applies Burden to them.
For every 2 Basic ATKs, Skills, or Ultimates allies use on an enemy with Burden, allies will immediately recover 1 Skill Point. Burden is only active on the latest target it is applied to, and will be dispelled automatically after the Skill Point recovery effect has been triggered 2 times.
Hanya’s source of SP recovery. However, leveling it only improves the damage.
Note that Burden is not a debuff, and does not reset when the Skill is recast on an enemy with Burden. It can also be triggered by bounce attacks, even if the attack does not hit the enemy with Burden.
 Ultimate | Ten-Lords’ Decree, All Shall Obey
Trace Description
Ten-Lords’ Decree, All Shall Obey [Enhance]
Increases the SPD of a target ally by 15%/20%/21.0% of Hanya’s SPD and increases the same target ally’s ATK by 36%/60%/64%, lasting for 2 turn(s).
A high-cost Ultimate that provides single-target buffs. The SPD buff provided is based on Hanya’s SPD when this is used. Do note that its duration does not decrease if used during the target ally’s turn, potentially increasing its duration to 3 turns (or 4 turns with E4).
 Talent | Sanction
Trace Description
Sanction [Support]
When an ally uses a Basic ATK, Skill, or Ultimate on an enemy inflicted with Burden, the DMG dealt increases by 15%/30%/33%, lasting for 2 turn(s).
A sizable DMG Boost. Note that it is effective starting right before the ally’s attack, and its duration does not decrease on the turn it is gained.
 Technique | Netherworld Judgement
Trace Description
Netherworld Judgment
Immediately attacks the enemy. After entering battle, applies Burden equivalent to that applied by the Skill to a random enemy.
Gives you Burden for free at the start of a battle, which is equal to 2 SP. However, this requires attacking the enemy, so you may want to consider using other Techniques, especially because Hanya usually acts first due to her high SPD.
 Ascension 2 Bonus Ability | Scrivener
Trace Description
Scrivener
Allies triggering Burden’s Skill Point recovery effect have their ATK increased by 10% for 1 turn(s).
Requires careful planning to ensure the damage dealer triggers the SP recovery.
 Ascension 4 Bonus Ability | Netherworld
Trace Description
Netherworld
If the trigger count for the Burden’s Skill Point recovery effect is 1 or lower when an enemy with Burden is defeated, then additionally recovers 1 Skill Point(s).
This ensures no SP recovery would be lost from Hanya’s Skill most of the time. Exceptions are when the affected enemy is defeated by her Skill, or when Burden’s SP recovery effect also triggers at the same time (unless the enemy performs an action after it is defeated).
 Ascension 6 Bonus Ability | Reanimated
Trace Description
Reanimated
When Burden’s Skill Point recovery effect is triggered, this character regenerates 2 Energy.
A small amount of Energy for Hanya. In some cases, this allows Hanya to use her Ultimate in one fewer turn.
Note: Trace levels shown are 1/10/12 (Basic ATK 1/6/7).
Trace Priority
=
Ultimate = Talent
Hanya’s Ultimate and Talent are her main methods of supporting her allies, so both should be leveled evenly. There is no need to level her Basic ATK or Skill, as doing so only increases the damage multiplier.
Eidolons
 Eidolon 1 | One Heart
Eidolon Description
When an ally with Hanya’s Ultimate’s effect defeats an enemy, Hanya’s action is Advanced Forward by 15%. This effect can only be triggered 1 time(s) per turn.
More actions for Hanya, but can desync her buffing rotations.
 Eidolon 2 | Two Views
Eidolon Description
After using the Skill, this character’s SPD increases by 20% for 1 turn(s).
Its uptime would depend on how often Hanya uses her Skill. Her Ultimate can snapshot the increased SPD, providing a larger SPD buff.
 Eidolon 3 | Three Temptations
Eidolon Description
Skill Lv. +2, up to a maximum of Lv. 15.
Basic ATK Lv. +1, up to a maximum of Lv. 10.
Skill and Basic ATK levels only affect the damage Hanya deals, which does not benefit her much, as she is not a damage dealer.
 Eidolon 4 | Four Truths
Eidolon Description
The Ultimate’s duration is additionally extended for 1 turn(s).
This can allow Hanya to go for a 4-turn Ultimate instead of a 3-turn Ultimate to maintain her Ultimate’s buff uptime, providing more choices for her Light Cones.
 Eidolon 5 | Five Skandhas
Eidolon Description
Ultimate Lv. +2, up to a maximum of Lv. 15.
Talent Lv. +2, up to a maximum of Lv. 15.
Ultimate and Talent levels enhance Hanya’s buffing capabilities even more.
 Eidolon 6 | Six Reverences
Eidolon Description
Increase the DMG Boost effect of the Talent by an additional 10%.
A substantial increase to Hanya’s Talent’s DMG% buff, adding additional damage to her team.
Build
Hanya only needs enough Energy Regeneration Rate (ERR) to use her Ultimate once per 3 turns (4 instead if you have her E4), as much SPD as possible, and enough HP and DEF to let her survive.
Light Cones
 But the Battle Isn’t Over | Ensures 3-turn Ultimates by using Hanya’s Skill each turn. This would in turn increase the frequency of triggering the SP generation of this Light Cone. To maximize the benefits of this Light Cone, Hanya’s action needs to be before the damage dealer. Do note that Hanya’s E1 may desync her actions from the damage dealer, which may cause the DMG% buff to land on other allies. |
 Earthly Escapade | The CRIT DMG boost is wasted on Hanya, but she can maintain the Mask buff easily, as SP recovery due to Burden can cause her to gain Radiant Flame stacks. However, if you have this Light Cone, you likely have Sparkle, who would make better use of this Light Cone than Hanya. |
 Planetary Rendezvous | A good option when paired with Physical-Type damage dealers. |
 Dreamville Adventure | Requires planning of actions to maintain the right buff. A good option when paired with damage dealers that use their skill often. However, its DMG% buff is worse than Planetary Rendezvous at higher superimposition. |
 Past and Future | Requires SPD tuning just like But the Battle Isn’t Over. Hanya’s E1 may therefore hinder the performance of this Light Cone as well. |
 Dance! Dance! Dance! | An option for short duration battles such as Pure Fiction, where SPD and action advances are appreciated. Requires superimposition to have significant effect. |
 Memories of the Past | Grants Energy when Hanya attacks, which she does every turn. This allows Hanya to use her Ultimate once per 3 turns by using her Skill each turn, but the Break Effect is negligible. For a more detailed breakdown of Hanya’s Energy requirements with this Light Cone, see: Energy Breakpoints. |
 Meshing Cogs | An alternative to Memories of the Past, although its base stats are lower. |
Relics
Relic Sets
 4-Pc Messenger Traversing Hackerspace | Hanya’s best Relic set. It increases Hanya’s SPD, and her Ultimate can snapshot the additional 12% SPD. |
 2-Pc Combinations | An option if lacking a good 4-Pc Messenger Traversing Hackerspace set. Hanya’s Ultimate buffs rely on SPD, while the rest improve her survivability. 2-Pc options include: Messenger Traversing Hackerspace, Knight of Purity Palace, Longevous Disciple and Guard of Wuthering Snow — Prioritize substats over Set Effects. |
 4-Pc Musketeer of Wild Wheat | An alternative for increasing Hanya’s SPD, but the ATK% and Basic ATK DMG Boost are unnecessary for her. |
Planar Ornaments
 Fleet of the Ageless | Improves Hanya’s survivability while providing a decent ATK% buff to the team. The SPD requirement is easy to meet. |
 Broken Keel | CRIT DMG% is generally stronger than ATK% except for DoT teams, but the Effect RES requirement is harder to meet. |
 Penacony, Land of the Dreams | Useful when going for a 3-turn Ultimate. Also buffs Physical-Type damage dealers. |
 Sprightly Vonwacq | Provides ERR similar to Penacony, Land of the Dreams. However, since Hanya normally has a high SPD, she is usually the first to act, and the 40% Action Advance is not particularly useful for her. |
Stats
 Body |  Boots |  Sphere |  Rope |
| HP% / DEF% | SPD | HP% / DEF% | Energy Regeneration Rate |
Substats
SPD > Effect RES (If using Broken Keel) > HP% = DEF%
SPD is essential to provide better buffs with Hanya’s Ultimate, while HP% and DEF% can improve her survivability. If you use Broken Keel on her, Effect RES is also needed.
Energy Breakpoints
Hanya should use her Ultimate once per 3 turns, or 4 turns if you have her E4.
| Light Cone | +15 ERR Rope | 5% ERR Planar | A6 Triggers | Rotation (per Ultimate) |
| Any | No | No | 3 | 3 Skill and 2 Basic |
| Memories of the Past / Meshing Cogs S4+ | No | No | 2 (S5) or 4 (S4) | 2 Skill and 2 Basic |
| Any | Yes | Yes | 4 | 2 Skill and 2 Basic |
| Memories of the Past / Meshing Cogs S1+ | Yes | No | 0 (S5) to 6 (S1) | 3 Skill |
| But the Battle Isn’t Over | Yes | Yes | 5 | 3 Skill |
Character Comparisons
Asta

Hanya and Asta are compared mainly due to the SPD buff they both provide — other than that, what they do is quite different.
Asta’s buffs are teamwide, allowing her to be used in DoT teams. But for her to gain Charging stacks, she wants to be against Fire-Weak enemies and to use her Skill often. In comparison, Hanya cares little about the enemy, but her buffs are mainly single-target. Hanya’s SP generation makes her SP-Positive in almost all cases.
Overall, Asta excels in buffing DoT and dual carry setups, especially if they grant enough SP for Asta to use. Hanya is more suitable for hypercarry setups and can provide more SP for the damage dealer.
To learn more about Asta, check out the Asta Guide.
Pela

Pela and Hanya are often fighting for the last spot of teams as they are equally SP-Positive.
Pela is very flexible in terms of SP usage. In most teams, she uses her Basic ATK each turn, granting one SP immediately, while Hanya’s SP generation is a refund, not an instant gain. Hanya’s team’s rotations must factor this in, or her DMG% buff might expire before she can use another Skill.
While both can be used in most teams, Hanya is more suitable for hypercarry setups than Pela. However, using Hanya requires more careful planning than Pela.
To learn more about Pela, check out the Pela Guide.
Tingyun

Hanya and Tingyun are often compared as they both provide single-target buffs. Tingyun requires large amounts of ATK, while Hanya values SPD. As you would want to build SPD on most characters naturally, Tingyun’s ATK requirement forces her to compromise on survivability, but Hanya does not have this concern.
Tingyun’s Energy buff makes her more suitable for Ultimate-oriented characters, while Hanya’s SPD buff is better for damage dealers that want to take more actions. Hanya is also more SP-Positive than Tingyun, making Hanya slightly more comfortable than Tingyun with SP Hungry units such as Qingque. Although Tingyun is significantly stronger than Hanya in most cases, both can be used together to maximize the buffs applied to a damage dealer.
Notable Synergies
Damage Dealers
 Argenti | Argenti’s Skill and Ultimate are both AoE, guaranteeing activation of Hanya’s Burden. He is also a Physical-Type damage dealer, allowing Hanya to use Planetary Rendezvous and Penacony, Land of the Dreams to further enhance his damage. |
 Other Physical Damage Dealers | Hanya can run both Planetary Rendezvous and Penacony, Land of the Dreams, which can further buff the damage of units such as Physical Trailblazer and Sushang. |
 SP-Hungry Characters | Hanya’s Skill consumes 1 SP to generate 2. This can allow characters such as Dan Heng • Imbibitor Lunae or Qingque to be more aggressive with their SP usage. |
Notable Anti-Synergies
 Bronya | Bronya’s Skill causes Hanya’s Ultimate to deplete faster as the damage dealer gets more turns. This issue can be eased with Hanya’s E4 and more frequent Ultimates. |
 Gepard | Hanya’s SPD buff can cause Gepard’s Shield on the damage dealer to expire earlier. |
Teams
Hypercarry
As Hanya’s Ultimate targets a single ally, it is more preferable to place her in teams that are focused on a single damage dealer. In these teams, Hanya serves to generate SP. She may complement another support or work by herself to buff the damage dealer. In both cases, Hanya is flexible enough to work with most damage dealers, especially ones that need lots of SP to function.
Example Teams
F2P

Hanya provides Qingque with a variety of buffs while generating Skill Points for Qingque. Hanya’s SPD buff also helps Qingque to take more actions and charge her Ultimate faster, though it also increases Qingque’s SP consumption. However, due to the large amounts of ATK% and DMG% buffs on Qingque, Hanya’s other buffs may be diluted.
Argenti Hypercarry

Hanya synergizes with Argenti very well because he is Physical-Type and his attacks are AoE. Her buffs allow him to deal more damage and take more actions, while Tingyun and Huohuo’s Ultimate give him Energy, allowing him to charge his Ultimate much faster.
Dual Damage Dealer
Some damage dealers, such as Topaz or Herta, do not need high SPD to function well — If Hanya has very high SPD, she can use her Ultimate on both damage dealers before it expires on one of them. Her Skill also benefits both damage dealers, granting maximum value of her buffs.
Example Teams
Topaz + Dr. Ratio

Topaz and Dr. Ratio work well together due to Dr. Ratio’s Talent. They should both have a low SPD while Hanya should have a high SPD, allowing Hanya to use her Ultimate on both of them if she is fast enough.
As Topaz and Dr. Ratio both provide one debuff, and Hanya’s Burden is not a debuff, you need to have other sources of debuffs to ensure Dr. Ratio’s Talent can be consistently triggered. This can come from Topaz’s E1 or signature Light Cone, a sustain character who can provide debuffs themselves, such as Fire Trailblazer, or a Preservation character equipping Trend of the Universal Market.
Argenti + Herta

Argenti and Herta both deal AoE damage and do not need high SPD to function well. Ideally, Hanya should have a high enough SPD to use her Ultimate on both of them alternatively, but if that is not possible, she should focus her Ultimate on Argenti, as he makes use of the SPD buff better than Herta does. In either case, both Argenti and Herta benefit from Hanya’s DMG% buff and SP generation.
Credits
Authors
ArielFriedrichGauss
Editors
Akane
N[L]Rem
sky
Publishers
spphrs
Changelog
- 15 April 2024 – Published for v2.1